Configurations
This page describes the APIs Onshape provides for working with configurations.
You can use configurations to create variations of entire Part Studios, assemblies, specific parts and more. You can configure feature and parameter values, part properties, custom part properties, face and part appearances, and sketch text. Each Part Studio can have only one configuration, but it can contain multiple configuration inputs. The configuration inputs you define for a Part Studio become options when inserting that Part Studio into an assembly or drawing. You can also create configurations for an assembly, regardless of any existing Part Studio configurations. Assembly configurations work the same way as Part Studio configurations, but are limited to configuring mates (not mate connectors), instances, and patterns.
- All Onshape API calls must be properly authenticated.
- For Enterprise accounts, replace cad in URLs with your company domain.
- Onshape IDs are written as: {did}, {wvmid}, {eid}, {pid}, {otherId}. See Onshape API Intro for information on what these IDs mean and how to obtain them from your documents.
- Variables for replacement are written as: {variable1} or <variableTwo>. Never include the braces or angle brackets themselves with these variables.
- Visit the Learning Center's Intro to the Onshape API course for additional instruction and videos.
Endpoints
- getConfiguration: Get the configuration data for a Part Studio or Assembly.
curl -X 'GET' \ 'https://cad.onshape.com/api/v6/elements/d/{did}/wvm/{wvmid}/e/{eid}/configuration' \ -H 'Accept: application/json;charset=UTF-8; qs=0.09' \ -H 'Authorization: Basic CREDENTIALS'\ -H 'Content-Type: application/json;charset=UTF-8; qs=0.09' - updateConfiguration: Update the configuration data for a Part Studio or Assembly.
curl -X 'POST' \ 'https://cad.onshape.com/api/v6/elements/d/{did}/wvm/{wvmid}/e/{eid}/configuration' \ -H 'Accept: application/json;charset=UTF-8; qs=0.09' \ -H 'Authorization: Basic CREDENTIALS'\ -H 'Content-Type: application/json;charset=UTF-8; qs=0.09' \ -d '{ }' - decodeConfiguration: Process an encoded configuration file.
curl -X 'GET' \ 'https://cad.onshape.com/api/v6/elements/d/{did}/wvm/{wvmid}/e/{eid}/configurationencodings/{encodingId}' \ -H 'Accept: application/json;charset=UTF-8; qs=0.09' \ -H 'Authorization: Basic CREDENTIALS' - encodeConfigurationMap: Create an encoded map of configurations.
curl -X 'POST' \
    'https://cad.onshape.com/api/v6/elements/d/{did}/e/{eid}/configurationencodings' \
    -H 'Accept: application/json;charset=UTF-8; qs=0.09' \
    -H 'Authorization: Basic CREDENTIALS'\
    -H 'Content-Type: application/json;charset=UTF-8; qs=0.09' \
    -d '{
        "parameters": [
        {
            "parameterId": "{parameterId}",
            "parameterValue": "{configValue}"
        }
        ]
    }'
Encoded configurations
The encodeConfigurationMap and decodeConfiguration APIs convert parameters from JSON to URL-encoded strings.
For example,
{
    "parameters": [
        {
        "parameterId": "List_izOjbm5HCRXEld",
        "parameterValue": "_500_mm"
        }
    ]
}
encodes to:
{
    "encodedId": "List_sCW2T7xBCmN6an=_500_mm",
    "queryParam": "configuration=List_izOjbm5HCRXEld%3D_500_mm"
}
- You can use the
encodedIdin request bodies. See Export a configured assembly for an example. - You can use the
queryParamas a query parameter. See Export a configured part for an example.- Note that the value includes the parameter name within it for convenience. Be careful when copy and pasting. It might be helpful to think of these values as:
{queryParam} = "configuration={encodedString}". - When using the Onshape API Explorer, use only the
{encodedString}in anyconfigurationquery parameter fields.
- Note that the value includes the parameter name within it for convenience. Be careful when copy and pasting. It might be helpful to think of these values as:
Configured parts
Configured parts each have a unique part ID. Changing the configuration for a part changes the part ID.
Configuration visibility conditions
You can adjust the conditions under which a configuration input is visible. See Help: Setting visibility conditions for details.
When working with visibility conditions in the API, note that:
- The configuration endpoints include a
visibilityConditionattribute for every configuration input. - The GET configuration endpoints include an
isVisibleattribute for every configuration input.
Visibility condition errors
- Configuration endpoints in v1 through v9 of the Onshape API will silently repair any bad visibility conditions.
- Configuration endpoints in v10 or later will return a 400 error when bad visibility conditions are detected.
Sample Workflows
These sample workflows all build off one another. Completing all of the workflows will take you step-by-step through the process of getting Configuration information, encoding the information for use, and using the encoded configuration to create a configured export. You can also watch the video to see the entire workflow in the Glassworks API Explorer.
The general workflow for working with configurations is:
- Call getConfiguration to get the configuration details.
- Call encodeConfigurationMap to encode the configuration string.
- Use the encoded configuration string in other Onshape API calls, like exporting a configured Part Studio or Assembly.
Get a configuration
In this example, we’ll use the getConfiguration endpoint to get the Configuration information from a Part Studio.
- Make a copy of this public document. Make a note of the new document’s document ID, workspace ID, and element ID.
- Click the Configurations dropdown in the Features list, and observe that there are two options for the drillbit length,
250 mmand500 mm.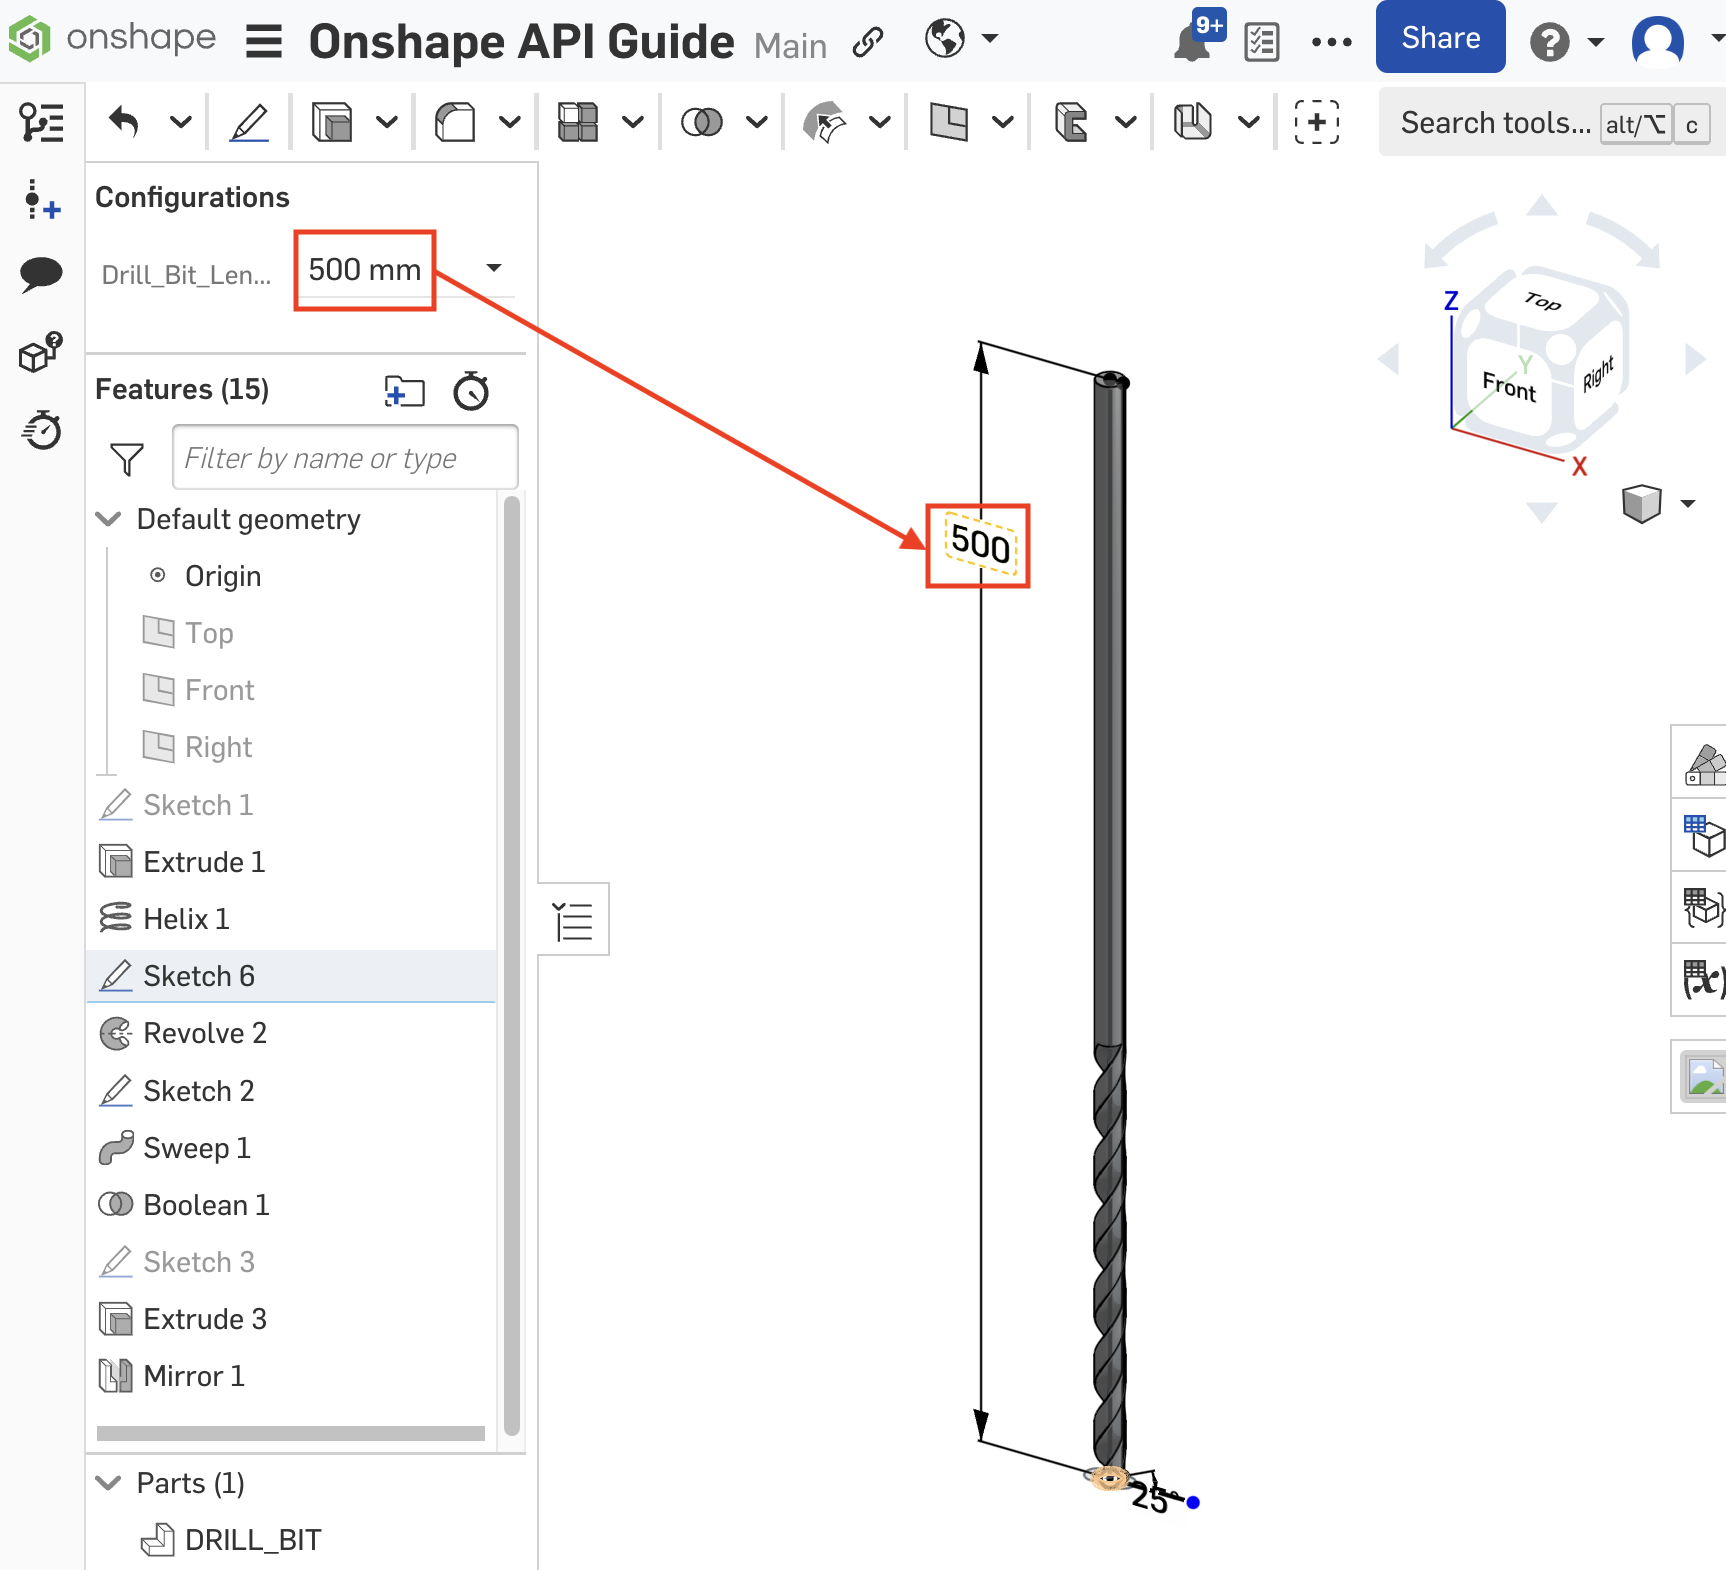
- Set up a call to the getConfiguration endpoint to get the Configuration for the Part Studio. Don’t forget to replace the URL parameters with the IDs from your copy of the document, and replace
CREDENTIALSwith your authorization credentials.curl -X 'GET' \ 'https://cad.onshape.com/api/v6/elements/d/{did}/w/{wid}/e/{eid}/configuration' \ -H 'Accept: application/json;charset=UTF-8; qs=0.09' \ -H 'Authorization: Basic CREDENTIALS' \ - Review the Configuration information detailed in the response. You can see that the Part Studio contains one configuration (
Drill_Bit_Length) with two options (250 mmand500 mm).{ "btType": "BTConfigurationResponse-2019", "currentConfiguration": [ { "btType": "BTMParameterEnum-145", "namespace": "", "nodeId": "{nodeId1}", "enumName": "{enumName}", "value": "Default", "parameterId": "{paramId}" } ], "configurationParameters": [ { "btType": "BTMConfigurationParameterEnum-105", "enumName": "{enumName}", "namespace": "", "defaultValue": "Default", "options": [ { "btType": "BTMEnumOption-592", "optionName": "250 mm", "option": "Default", "nodeId": "{nodeId2}" }, { "btType": "BTMEnumOption-592", "optionName": "500 mm", "option": "_500_mm", "nodeId": "{nodeId3}" } ], "visibilityCondition": { "btType": "BTParameterVisibilityCondition-177" }, "isCosmetic": false, "parameterId": "{paramId}", "parameterName": "Drill_Bit_Length", "nodeId": "{nodeId4}" } ], "serializationVersion": "1.2.7", "sourceMicroversion": "{mid}", "microversionSkew": false, "rejectMicroversionSkew": false, "libraryVersion": 2522 }
Encode a configuration string
In this example, we’ll encode a Configuration so it can be used in other API calls. Please read the Encoded Configuration Strings section before beginning this example.
- This example builds off the previous one. Please complete the Get a Part Studio Configuration workflow to obtain the raw Configuration output for the Part Studio.
- Set up a call to the encodeConfigurationMap endpoint. Don’t forget to replace the URL parameters with the IDs from your document, and replace
CREDENTIALSwith your authorization credentials.curl -X 'POST' \ 'https://cad.onshape.com/api/v6/elements/d/{did}/e/{eid}/configurationencodings' \ -H 'Accept: application/json;charset=UTF-8; qs=0.09' \ -H 'Authorization: Basic CREDENTIALS' \ -H 'Content-Type: application/json;charset=UTF-8; qs=0.09' \ -d '{ }' - Now we need to create our JSON body for the request. Note the structure of the body:
Fill out the request body with our information:{ "parameters": [ { "parameterId": "string", "parameterValue": "string" } ], "standardContentParametersId": "string" }- We’re not using a standard content part, so we can delete the second key/value pair.
- The parameterId can be found in the response from the previous example.
- For the parameter value, we’ll enter one of our configuration options from the previous example. In this case, we’ll use
_500_mmto export a 500 mm drillbit part. Note that we use theoptionand NOT theoptionNamefor the parameter value.
{ "parameters": [ { "parameterId": "{parameterId}", "parameterValue": "_500_mm" } ] } - Now we can make our call:
curl -X 'POST' \ 'https://cad.onshape.com/api/v6/elements/d/{did}/e/{eid}/configurationencodings' \ -H 'Accept: application/json;charset=UTF-8; qs=0.09' \ -H 'Authorization: Basic CREDENTIALS' \ -H 'Content-Type: application/json;charset=UTF-8; qs=0.09' \ -d '{ "parameters": [ { "parameterId": "{parameterId}", "parameterValue": "_500_mm" } ] }' - The call responds with two values: the ID of the encoding, and the encoded configuration string (usually begins with
configuration=). We can use these values in other API calls to refer to this specific configuration.{ "encodedId": "{encodedId}", "queryParam": "{queryParam}" }
Export a configured part (synchronous)
In this example, we will export a configured part. We have a drillbit with two configurations: 250 mm and 500 mm lengths. To export a 500 mm drillbit, we can specify the configuration as part of the export.
Endpoint
GET /partstudios/d/did/w/wid/e/eid/parasolid
Query Params
{
    "includeExportIds": false,
    "configuration": {queryParam}
    "binaryExport": false'
}
- This example builds off the previous two. Please complete this exercise after the Encode a configuration workflow.
- Next, set up a call to the PartStudio/exportParasolid endpoint.
- Don’t forget to replace the URL parameters with the IDs from your document, and replace
CREDENTIALSwith your authorization credentials. - Note that this endpoint includes an optional
configurationpath parameter. We’ll replace the entire parameter with the{queryParam}from the previous step. Remember that{queryParam}is in the format ofconfiguration={encodedString}.
curl -X 'GET' \ 'https://cad.onshape.com/api/v6/partstudios/d/{did}/w/{wid}/e/{eid}/parasolid?includeExportIds=false&{queryParam}&binaryExport=false' \ -H 'Accept: */*' \ -H 'Authorization: Basic CREDENTIALS' \ - Don’t forget to replace the URL parameters with the IDs from your document, and replace
- This endpoint returns a redirect URL. Navigate to the returned URL in your browser to download the export.
- Hint: The URL will look something like this, but with different IDs:
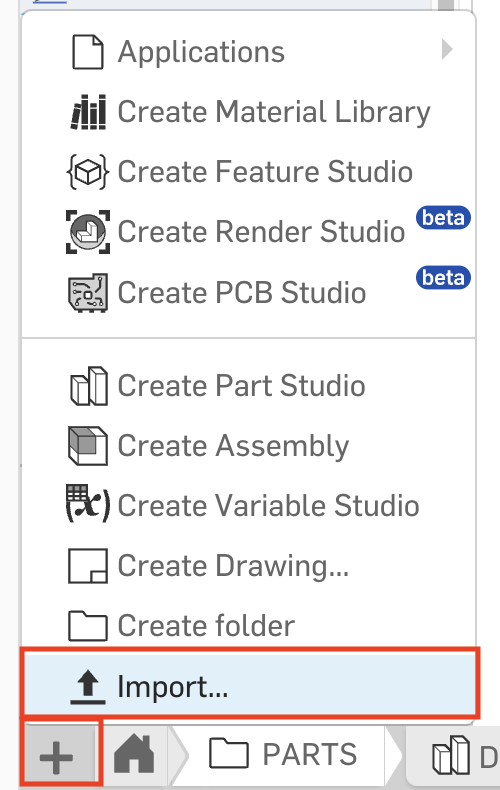
https://cad.onshape.com/api/v6/partstudios/d/e60c4803eaf2ac8be492c18e/w/d2558da712764516cc9fec62/e/958bceb5a2511b572dbbe851/parasolid?includeExportIds=false&configuration=List_izOjbm5HCRXEld%253D_500_mm&binaryExport=false - Now we need to import our Parasolid to confirm the correct configuration was used. Open your document in the Onshape UI, click the Insert new tab button, and then select Import.
- Navigate to the export you downloaded (with the
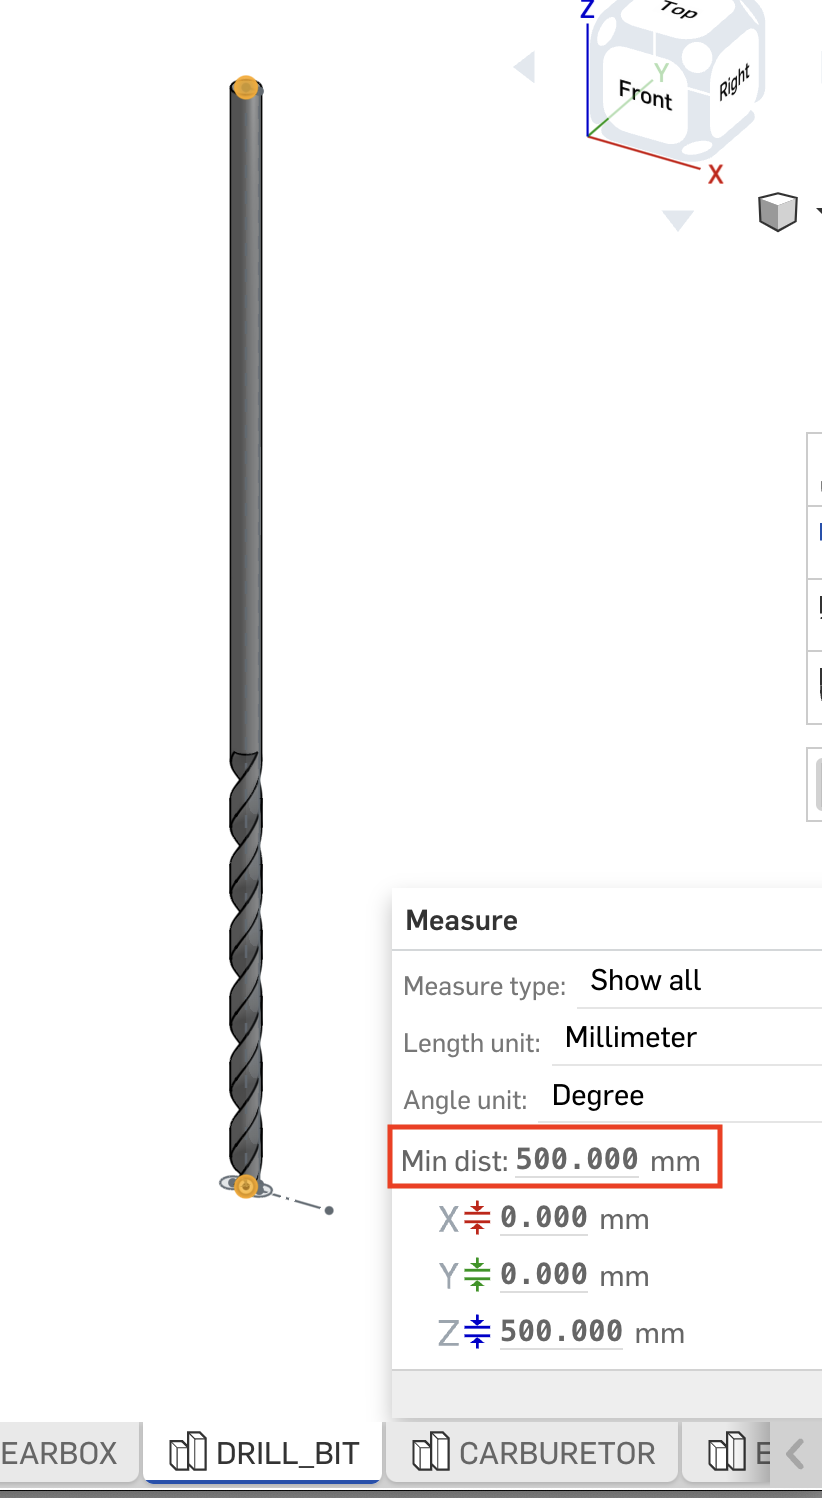
.x_textension) and import it into Onshape. - Use the measure tool to confirm the length of the imported drillbit is 500 mm.
Export a configured assembly (asynchronous)
Endpoint
POST /assemblies/d/did/w/wid/e/eid/translations
Request Body
{
    "angularTolerance": 0.001,
    "distanceTolerance": 0.01,
    "formatName": "{formatName}",
    "resolution": "fine",
    "configuration": "{encodedId}"
}
In this example, we will export a configured assembly. The assembly a configured part with two options: 250 mm and 500 mm lengths. To export an assembly that uses the 500 m drill length, we can specify the configuration as part of the export.
Follow the Get a configuration steps to get the configuration details for the
DRILL_CHUCKassemblyRequest
curl -X 'GET' \
  'https://cad.onshape.com/api/v10/elements/d/e60c4803eaf2ac8be492c18e/w/d2558da712764516cc9fec62/e/bfc8e0f5a1b9e7f91d4bcea7/configuration' \
  -H 'Accept: application/json;charset=UTF-8; qs=0.09' \
  -H 'Authorization: Basic CREDENTIALS'
Response
{
    "btType": "BTConfigurationResponse-2019",
    "rejectMicroversionSkew": false,
    "microversionSkew": false,
    "currentConfiguration": [],
    "configurationParameters": [
        {
        "btType": "BTMConfigurationParameterEnum-105",
        "parameterId": "List_sCW2T7xBCmN6an",
        "isCosmetic": false,
        "enumName": "List_sCW2T7xBCmN6an_conf",
        "enumOptionVisibilityConditions": {
            "btType": "BTEnumOptionVisibilityConditionList-2936",
            "visibilityConditions": []
        },
        "options": [
            {
            "btType": "BTMEnumOption-592",
            "optionName": "250 mm",
            "option": "Default",
            "nodeId": "MWGwNOdlW3UaUCPd+"
            },
            {
            "btType": "BTMEnumOption-592",
            "optionName": "500 mm",
            "option": "_500_mm",
            "nodeId": "MpgGz9fyFlSDGq22Y"
            }
        ],
        "namespace": "",
        "defaultValue": "Default",
        "nodeId": "MIqFliu7ft3jF/xLO",
        "parameterName": "Configuration",
        "visibilityCondition": {
            "btType": "BTParameterVisibilityCondition-177"
        }
        }
    ],
    "libraryVersion": 2641,
    "sourceMicroversion": "18743880b25d66c7c5742bf9",
    "serializationVersion": "1.2.10"
    }
Follow the Encode a configuration steps to encode the configuration for the
500 mmoption using the following values from the previous response:"parameterId": "List_sCW2T7xBCmN6an""option": "_500_mm"
Request
curl -X 'POST' \
    'https://cad.onshape.com/api/v10/elements/d/e60c4803eaf2ac8be492c18e/e/bfc8e0f5a1b9e7f91d4bcea7/configurationencodings' \
    -H 'Accept: application/json;charset=UTF-8; qs=0.09' \
    -H 'Content-Type: application/json;charset=UTF-8; qs=0.09' \
    -H 'Authorization: Basic CREDENTIALS'  \
    -d '{
        "parameters": [
            {
            "parameterId": "List_sCW2T7xBCmN6an",
            "parameterValue": "_500_mm"
            }
        ]
    }'
Response
{
    "encodedId": "List_sCW2T7xBCmN6an=_500_mm",
    "queryParam": "configuration=List_sCW2T7xBCmN6an%3D_500_mm"
}
Next, set up a call to the Assembly/translateFormat endpoint. Don’t forget to replace the URL parameters with the IDs from your document, and replace
CREDENTIALSwith your authorization credentials. Note that this endpoint includes an optionalconfigurationfield in the request body. This is where we’ll enter theencodedId("List_sCW2T7xBCmN6an=_500_mm") from the last step.Request
curl -X 'POST' \
    'https://cad.onshape.com/api/v10/assemblies/d/e60c4803eaf2ac8be492c18e/w/d2558da712764516cc9fec62/e/bfc8e0f5a1b9e7f91d4bcea7/translations' \
    -H 'accept: application/json;charset=UTF-8; qs=0.09' \
    -H 'Content-Type: application/json;charset=UTF-8; qs=0.09' \
    -H 'Authorization: Basic CREDENTIALS'  \
    -d '{
        "angularTolerance": 0.001,
        "distanceTolerance": 0.01,
        "formatName": "STEP",
        "resolution": "fine",
        "configuration": "List_sCW2T7xBCmN6an=_500_mm"
    }'
Next, poll the Translation/getTranslation response (using the
idfrom the last response as thetranslationId) untilrequestStatechanges fromACTIVEtoDONEorFAILED. OncerequestState=DONE, make a note of theresultElementIdin the response. This is the element ID of the blob with the exported file.Call BlobElement/downloadFileWorkspace to retrieve the exported results. Request
curl -X 'GET' \
'https://cad.onshape.com/api/v6/blobelements/d/{did}/w/{wid}/e/{resultElementId}' \
  -H 'accept: application/octet-stream' \
  -H 'Authorization: Basic CREDENTIALS' \
Now we need to import our file to confirm the correct configuration was used. You can either:
- Call the createTranslation endpoint.
- Open your document in the Onshape UI, click the Insert new tab button, and then select Import.
In Onshape, use the measure tool to confirm the length of the dill in the imported assembly is 500 mm.
Configure suppression of an assembly instance
See Assemblies: Configure suppression of an instance
Workflow Video
This video demonstrates how to get a configuration, encode it, and use the encoded configuration string in a synchronous export.