Drawings
This page describes the APIs Onshape provides for working with Onshape drawings.
Prerequisites
|
|---|
Sample Code
Endpoints
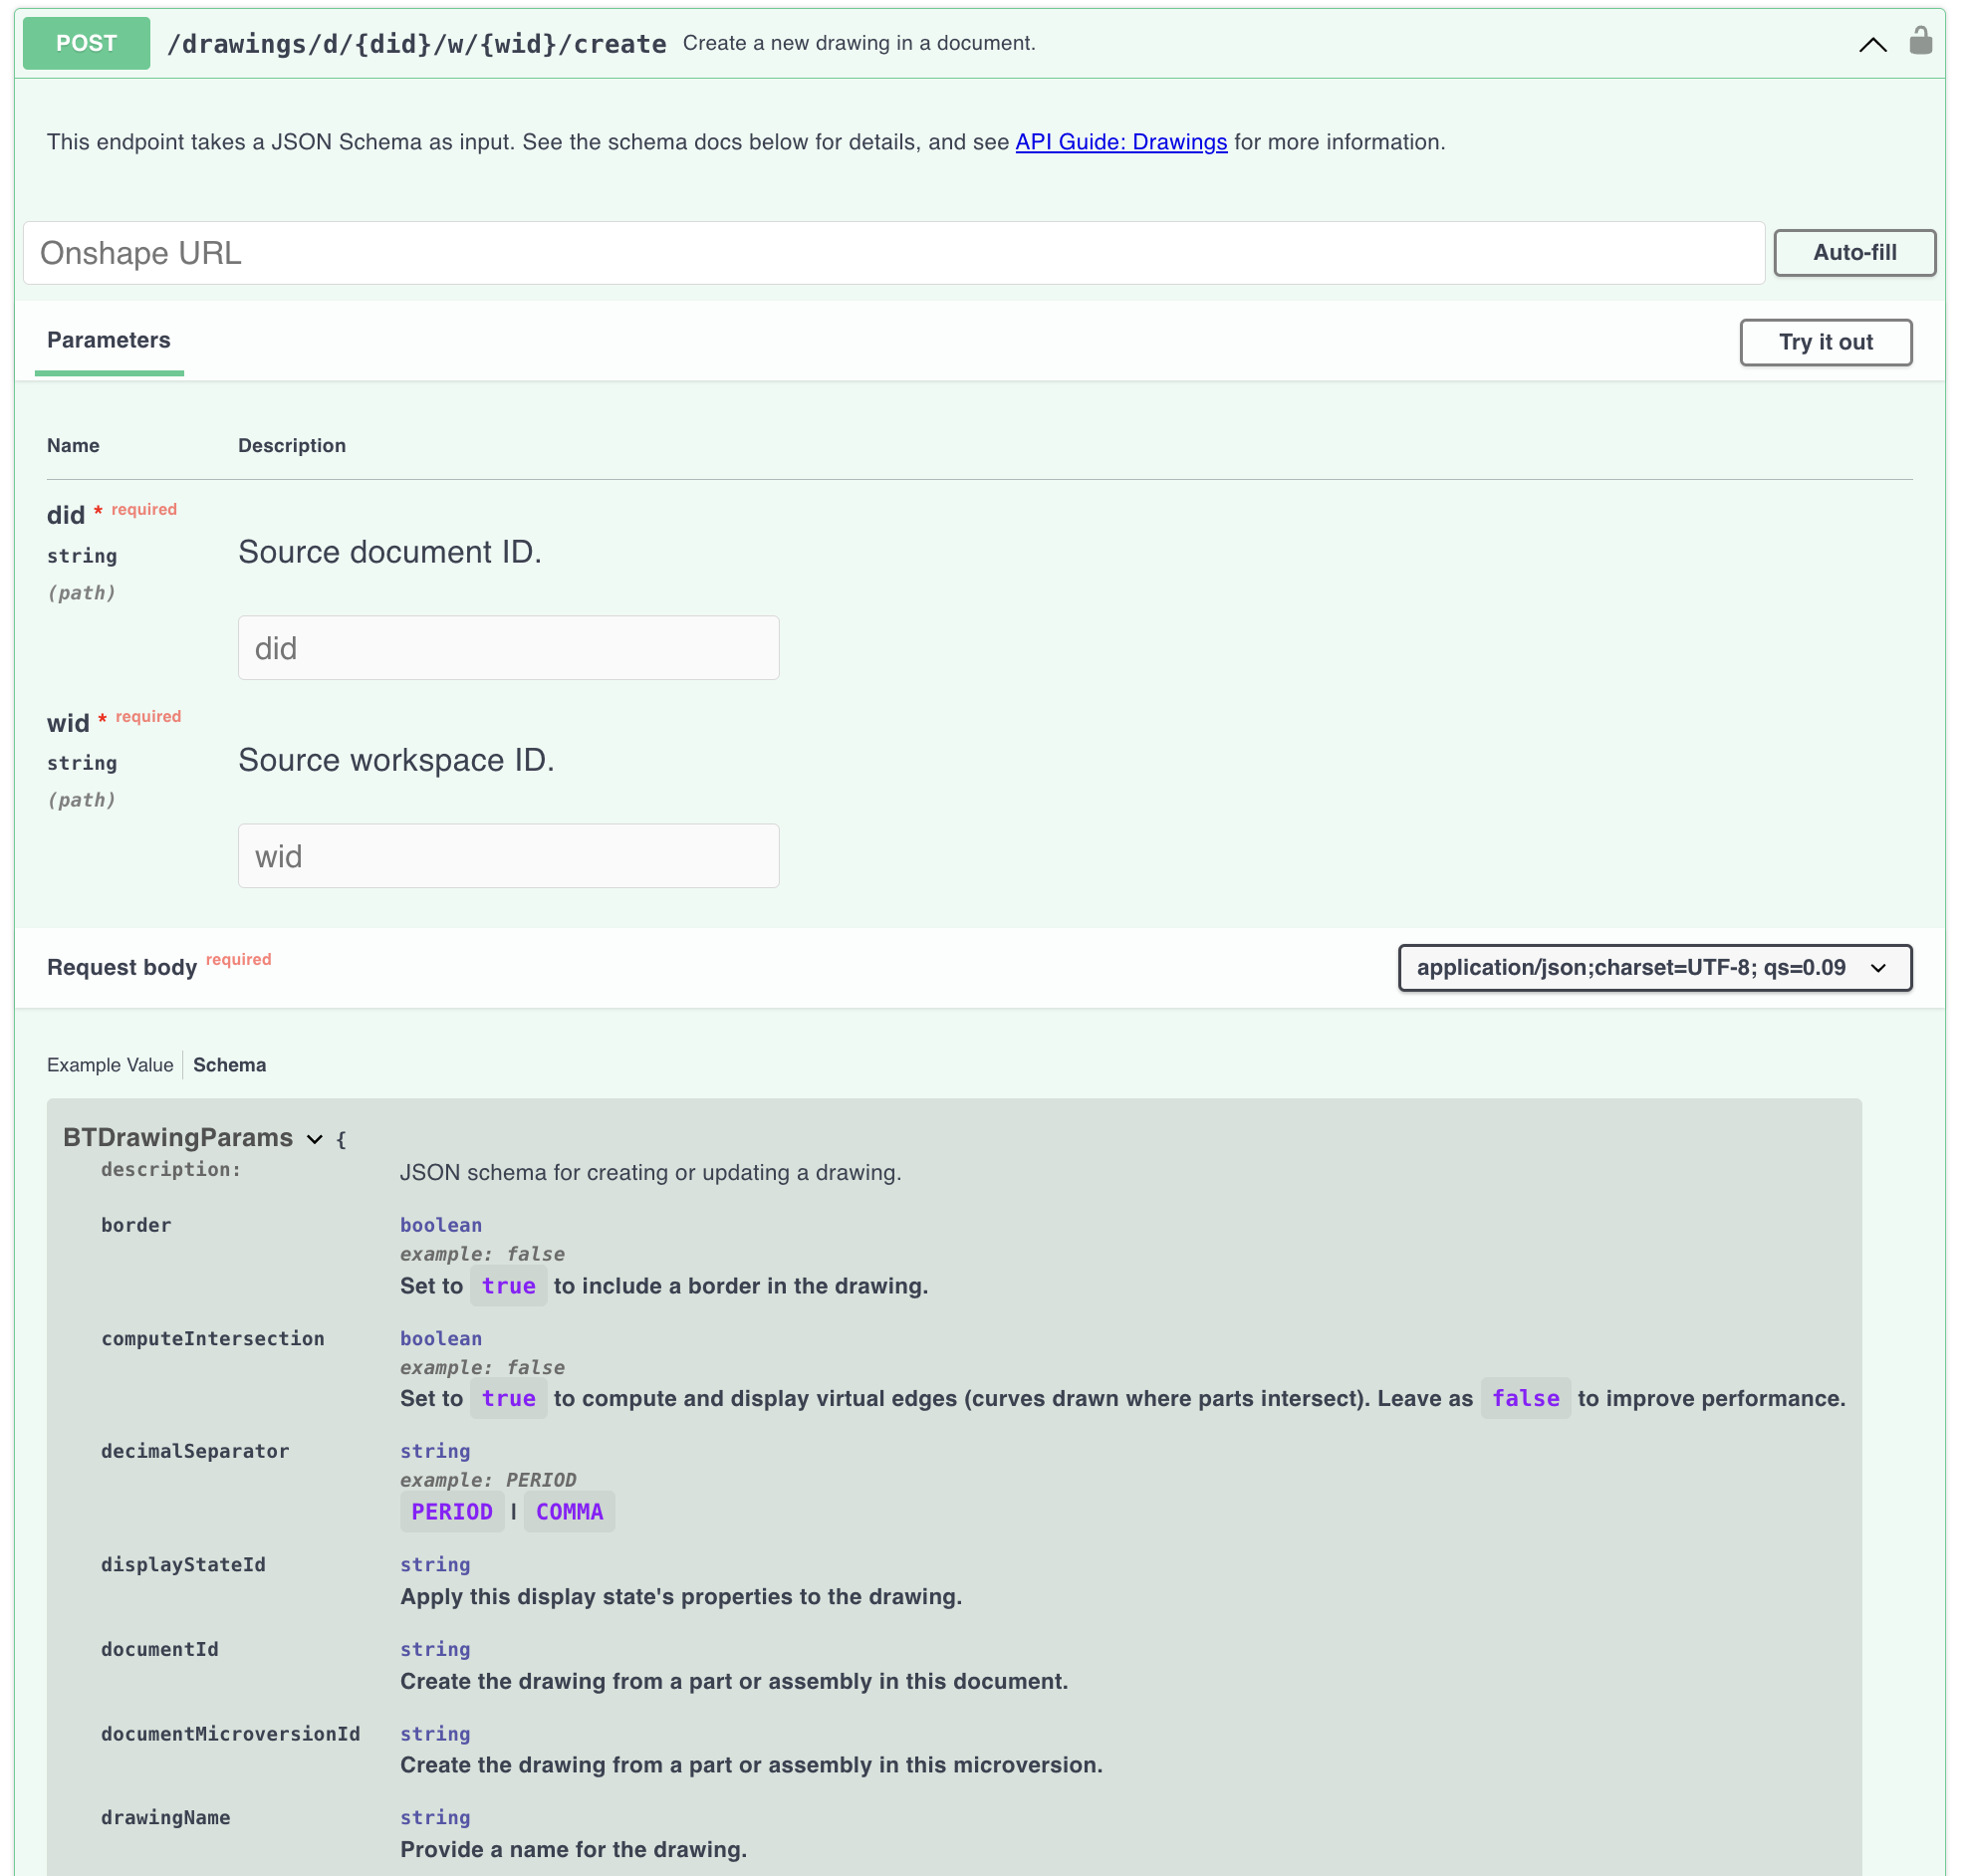
To create drawings, Onshape allows you to send all drawing data points and information through the API as part of the request body JSON.
The following endpoints are available:
- createDrawingAppElement: Create a drawing
Specify the document in which to create the drawing in the URL, and pass any additional options as part of the request body. You can provide a name for the drawing, manipulate the drawing graphics area, specify a part or template to create the drawing from, and more.curl -X 'POST' \ 'https://cad.onshape.com/api/v6/drawings/d/{did}/w/{wid}/create' \ -H 'Authorization: Basic CREDENTIALS' \ -H 'Accept: application/json;charset=UTF-8; qs=0.09' \ -H 'Content-Type: application/json;charset=UTF-8; qs=0.09' \ -d '{ <JSON request body options from the BTDrawingParams schema> }'- See documentation for all available options in the API Explorer.
- For instructions on viewing the documentation for the request body schemas, see our API Explorer page.
Check out the Sample Workflows section below for some practical examples.
- modifyDrawing: Modify a drawing and add annotations
Specify the drawing to modify in the URL, and pass the information on the modification in the request body.curl -X 'POST \ 'https://cad.onshape.doc/api/v6/drawings/d/{did}/w/{wid}/e/{eid}/modify' \ -H 'Authorization: Basic CREDENTIALS' \ -H 'Accept: application/json;charset=UTF-8; qs=0.09' \ -H 'Content-Type: application/json;charset=UTF-8; qs=0.09' \ -d '{ "description": "Description string.", "jsonRequests": [ { <JSON request body options from the jsonRequests schema> } ] }'- Note that the
jsonRequestsschema is not defined in the Glassworks API Explorer; see the OnshapeDrawingJson repository for this information, and check out the Sample Workflows section below for some practical examples. - The
descriptionfield is limited to 32 characters.
- Note that the
- getModificationStatus: Get the status of a drawing modification
curl -X 'GET' \ 'https://cad.onshape.com/api/v6/drawings/modify/status/{mrid} -H 'Authorization: Basic CREDENTIALS' \ -H 'Accept: application/json;charset=UTF-8; qs=0.09' \ -H 'Content-Type: application/json;charset=UTF-8; qs=0.09' \- Provide the modification ID (from the
modifyDrawingresponse body) to get the status of the modification. - This call also returns the unique IDs of any annotations that were successfully created or edited.
- The
requestStatefield has three potential values:ACTIVE: drawing modification is in progressDONE: drawing modification finished successfullyFAILED: an error occurred and the drawing was not modified
- To set up the call:
- Replace
{mrid}with theidreturned in the modification response, and replaceCREDENTIALSwith your credentials. - Poll the modification status until the request is no longer
ACTIVE. - ⚠️ POLL RESPONSIBLY. See Rate Limiting and API Limits for more information.
curl -X 'GET \ 'https://cad.onshape.doc/api/v6/drawings/modify/status/{mrid}' \ -H 'Authorization: Basic CREDENTIALS' \ -H 'Accept: application/json;charset=UTF-8; qs=0.09' \ -H 'Content-Type: application/json;charset=UTF-8; qs=0.09' \ - Replace
- Provide the modification ID (from the
- createDrawingTranslation: Export a drawing to JSON
curl -X 'POST' \ 'https://cad.onshape.com/api/v6/drawings/d/{did}/w/{wid}/e/{eid}/translations' \ -H 'accept: application/json;charset=UTF-8; qs=0.09' \ -H 'Authorization: Basic CREDENTIALS' \ -H 'Content-Type: application/json;charset=UTF-8; qs=0.09' \ -d '{ "formatName": "DRAWING_JSON" }' - getDrawingTranslatorFormats: View available drawing export formats
curl -X 'GET' \
'https://cad.onshape.com/api/v6/drawings/d/{did}/w/{wid}/e/{eid}/translationformats' \
  -H 'accept: application/json;charset=UTF-8; qs=0.09' \
  -H 'Authorization: Basic CREDENTIALS'
Errors
⚠️ Warning
When polling for a drawing modification to complete, use a reasonable interval (e.g., avoid polling multiple times a second, use an exponential backoff strategy, etc.). See Rate Limiting and API Limits for more information.
Status codes
If a drawing modification call fails, the modifyDrawing response will return an error, as expected. However, if the call includes multiple modifications, it will return 200 if any of the batch modifications succeed. The status field for each modification includes the status of the individual operation. For example:
{
	"status": "OK | Partial_success | Failed",
	"statusCode": "200 |207 | 400 ",
	"errorDescription": "Some Succeeded and Some Failed | Failed",
	"changeId": "f19a07278a009f85f68f4526",
	"results": [
		{
			"status": "OK",
			"logicalId": "h:10000D09"
		},
		{
			"status": "OK",
			"logicalId": "h:10000D0A"
		},
		{
			"status": "Failed",
			"errorDescription": "Error processing Onshape::Note: Point reference is not an object."
		},
		{
			"status": "Failed",
			"logicalId": "h:10000C29",
			"errorDescription": "Error processing : Invalid handle "
		}
	]
}
Viewing drawing errors
See also: Sample Code: Find errors in a drawing
You can export your drawing to JSON to find errors with your drawing. Each view in the JSON includes an errorState for reporting drawing errors. See the Find dangling entities tutorial for an example.
Examples - Create Drawings
Create a drawing from a part
In this example, we’ll create a drawing from the FLYWHEEL part in this public document.
- Open an Onshape document in which to create your drawing.
- Start to form the createDrawingAppElement call. Replace
{did}and{wid}in the URL below with the document ID and workspace ID of your document (i.e., the target document), and replaceCREDENTIALwith your authorization credentials.curl -X 'POST' \ 'https://cad.onshape.com/api/v6/drawings/d/{did}/w/{wid}/create' \ -H 'Authorization: Basic CREDENTIALS' \ -H 'Accept: application/json;charset=UTF-8; qs=0.09' \ -H 'Content-Type: application/json;charset=UTF-8; qs=0.09' \ - Add the request body information:
- Add
flywheelDrawingas thedrawingNamefield. - We must specify the source document’s document and version IDs. Note that since our target document and source document are different, we use the
externaldocument and version ID fields. - We must also provide the ID of the part to create the drawing from, and the ID of the element (i.e., tab) in which the part lives.(Hint: You can call getPartsWMVE to get a list of part IDs in an element.)
curl -X 'POST' \ 'https://cad.onshape.com/api/v6/drawings/d/{did}/w/{wid}/create' \ -H 'Authorization: Basic CREDENTIALS' \ -H 'Accept: application/json;charset=UTF-8; qs=0.09' \ -H 'Content-Type: application/json;charset=UTF-8; qs=0.09' \ -d '{ "drawingName": "flywheelDrawing", "externalDocumentId": "e60c4803eaf2ac8be492c18e", "externalDocumentVersionId": "405ba186c3a70e0227ab2941", "elementId": "6bed6b43463f6a46a37b4a22", "partId": "JiD" }'
- Add
- Call the endpoint and open your document. Confirm that you see the new
flywheelDrawingelement containing the drawing: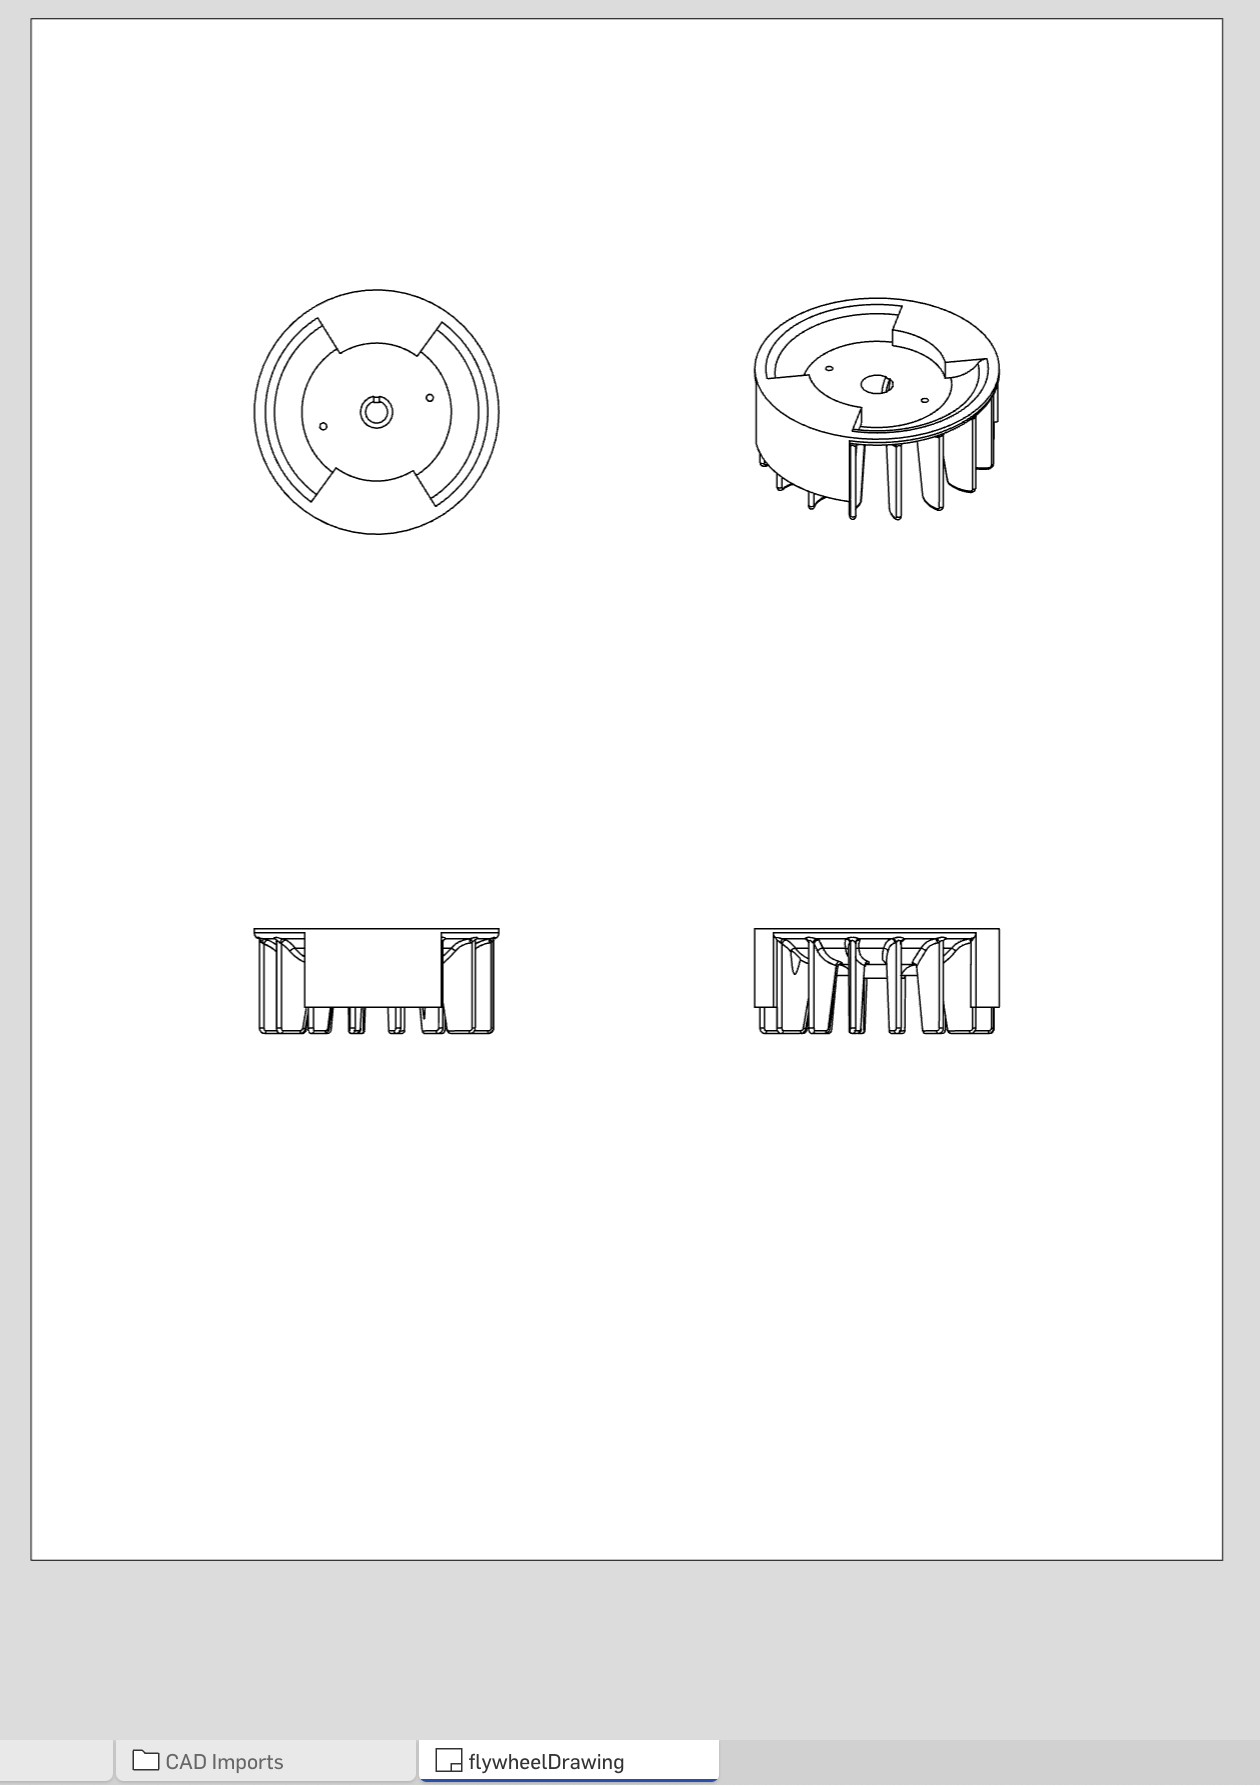
Create a drawing from a template
In this example, we’ll create a drawing from the standard ANSI template in this public document.
- Open an Onshape document in which to create your drawing.
- Start to form the createDrawingAppElement call. Replace
{did}and{wid}in the URL below with the document ID and workspace ID of your document (i.e., the target document), and replaceCREDENTIALwith your authorization credentials.curl -X 'POST' \ 'https://cad.onshape.com/api/v6/drawings/d/{did}/w/{wid}/create' \ -H 'Authorization: Basic CREDENTIALS' \ -H 'Accept: application/json;charset=UTF-8; qs=0.09' \ -H 'Content-Type: application/json;charset=UTF-8; qs=0.09' \ - Add the request body information:
- Add
templateAnsiDrawingas thedrawingNamefield. - We must specify the source document’s document ID and workspace ID.
- We must also provide the ID of the element (i.e., tab) in which the template lives.
- Note that we use the
templatedocument, workspace, and element ID fields when referring to a specific template for drawing creation.curl 'https://cad.onshape.com/api/drawings/d/{did}/w/{wid}/create' \ -H 'Authorization: Basic CREDENTIALS' \ -H 'Accept: application/json, text/plain, */*' \ -H 'Content-Type: application/json;charset=UTF-8' \ -d '{ "drawingName": "templateAnsiDrawing", "templateDocumentId":"cbe6e776694549b5ba1a3e88", "templateWorkspaceId":"24d08acf10234dbc8d3ab585", "templateElementId":"17eef7862b224f6fb12cbc46" }'
- Add
- Call the endpoint and open your document. Confirm that you see the new
templateAnsiDrawingelement containing the empty drawing template.
Create a drawing in a custom graphics area
- Open an Onshape document in which to create your drawing.
- Start to form the createDrawingAppElement call. Replace
{did}and{wid}in the URL below with your document, and replaceCREDENTIALwith your authorization credentials.curl -X 'POST' \ 'https://cad.onshape.com/api/v6/drawings/d/{did}/w/{wid}/create' \ -H 'Authorization: Basic CREDENTIALS' \ -H 'Accept: application/json;charset=UTF-8; qs=0.09' \ -H 'Content-Type: application/json;charset=UTF-8; qs=0.09' \ - Add information about the drawings area. In this example, we’ll add an additional column and row to the drawings area, a title block, and add a border around it.
curl -X 'POST' \ 'https://cad.onshape.com/api/v6/drawings/d/{did}/w/{wid}/create' \ -H 'Authorization: Basic CREDENTIALS' \ -H 'accept: application/json;charset=UTF-8; qs=0.09' \ -H 'Content-Type: application/json;charset=UTF-8; qs=0.09' \ -d '{ "drawingName": "customGraphicsArea", "border": "true", "numberHorizontalZones": "3", "numberVerticalZones": "3", "titleblock": true }' - Call the endpoint and open your document. Confirm that you see the new
customGraphicsAreaelement: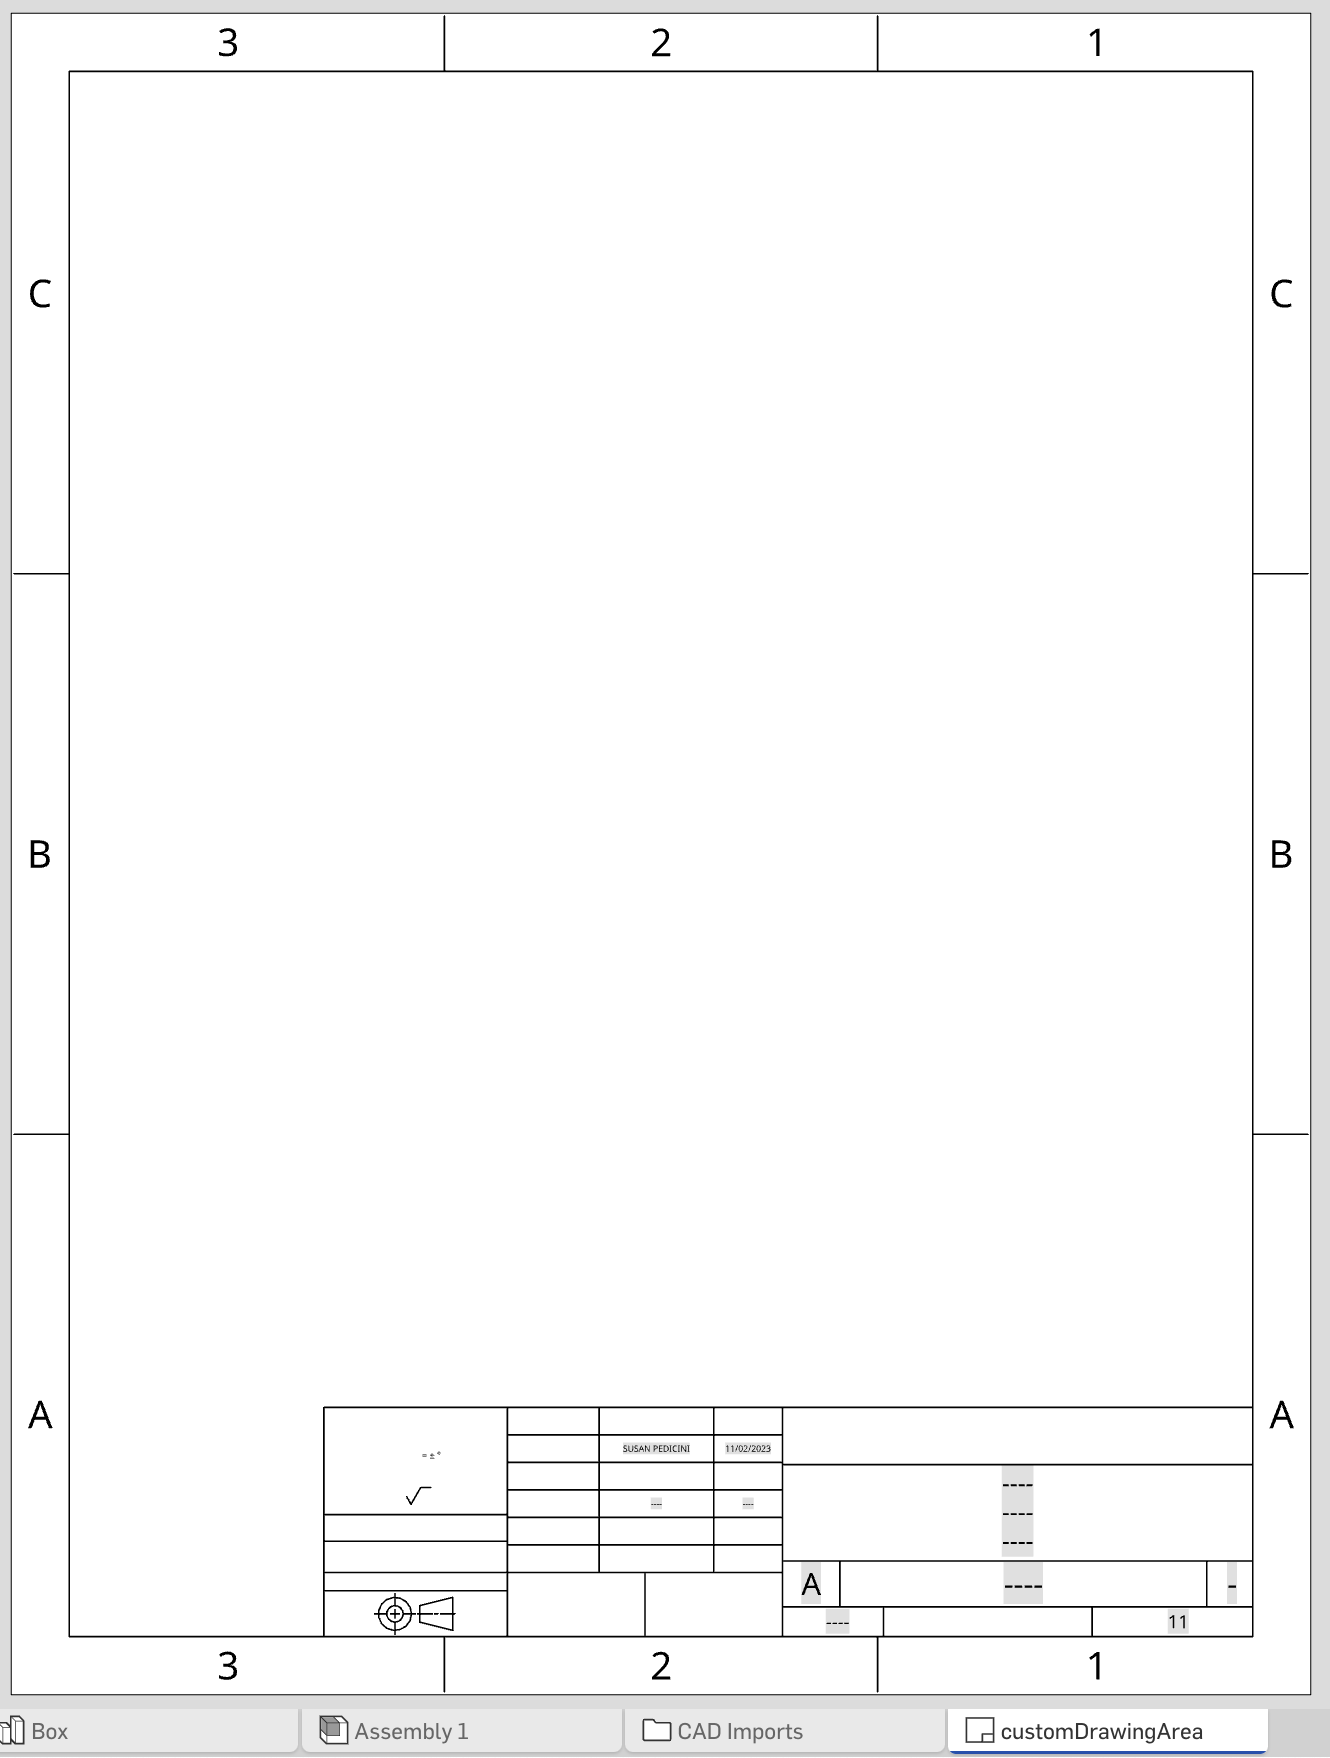
Examples - Add Annotations
Add a note to a drawing
- Open an Onshape drawing. This example uses the drawing created in the Create a drawing from a part tutorial.
- Start to form the modifyDrawing call. Replace the URL parameters with the values from your document, and replace
CREDENTIALSwith your authorization credentials.curl -X 'POST \ 'https://cad.onshape.doc/api/v6/drawings/d/{did}/w/{wid}/e/{eid}/modify' \ -H 'Authorization: Basic CREDENTIALS' \ -H 'Accept: application/json;charset=UTF-8; qs=0.09' \ -H 'Content-Type: application/json;charset=UTF-8; qs=0.09' \ - Add information about the modification. In this example, we’ll create an
Onshape::Noteon the drawing. We must specify themessageNameandformatVersionfor the modification, and then provide the contents and size of the annotation.curl -X 'POST \ 'https://cad.onshape.doc/api/v6/drawings/d/{did}/w/{wid}/e/{eid}/modify' \ -H 'Authorization: Basic CREDENTIALS' \ -H 'Accept: application/json;charset=UTF-8; qs=0.09' \ -H 'Content-Type: application/json;charset=UTF-8; qs=0.09' \ -d '{ "description": "Add a note.", "jsonRequests": [ { "messageName": "onshapeCreateAnnotations", "formatVersion": "2021-01-01", "annotations": [ { "type": "Onshape::Note", "note": { "position": { "type": "Onshape::Reference::Point", "coordinate": [ 1, 10, 0 ] }, "contents": "This is a note", "textHeight": 0.2 } } ] }] }' - Make the call, and then get
idfrom the response body. You’ll need this to poll the modification status to figure out when the modification has completed. - Poll the modification status and wait for the modification to finish.
- Open your drawing and confirm that you see the new note. Note that your drawing may not match this image exactly, depending on your drawing and document properties. This sample document uses Inches for units.
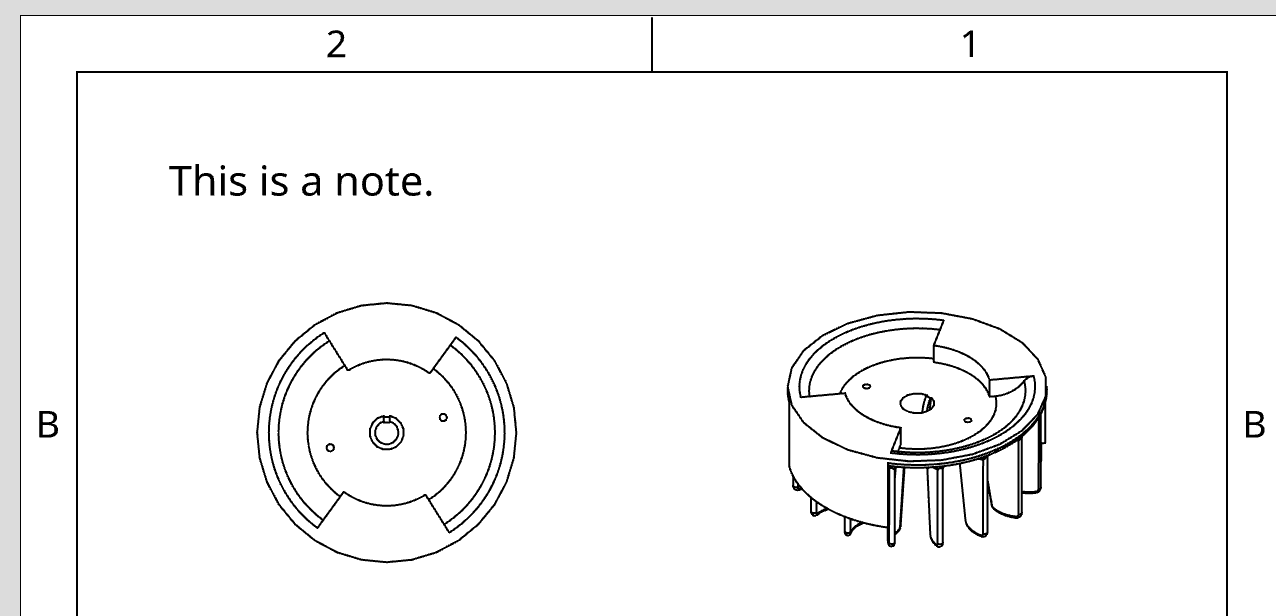
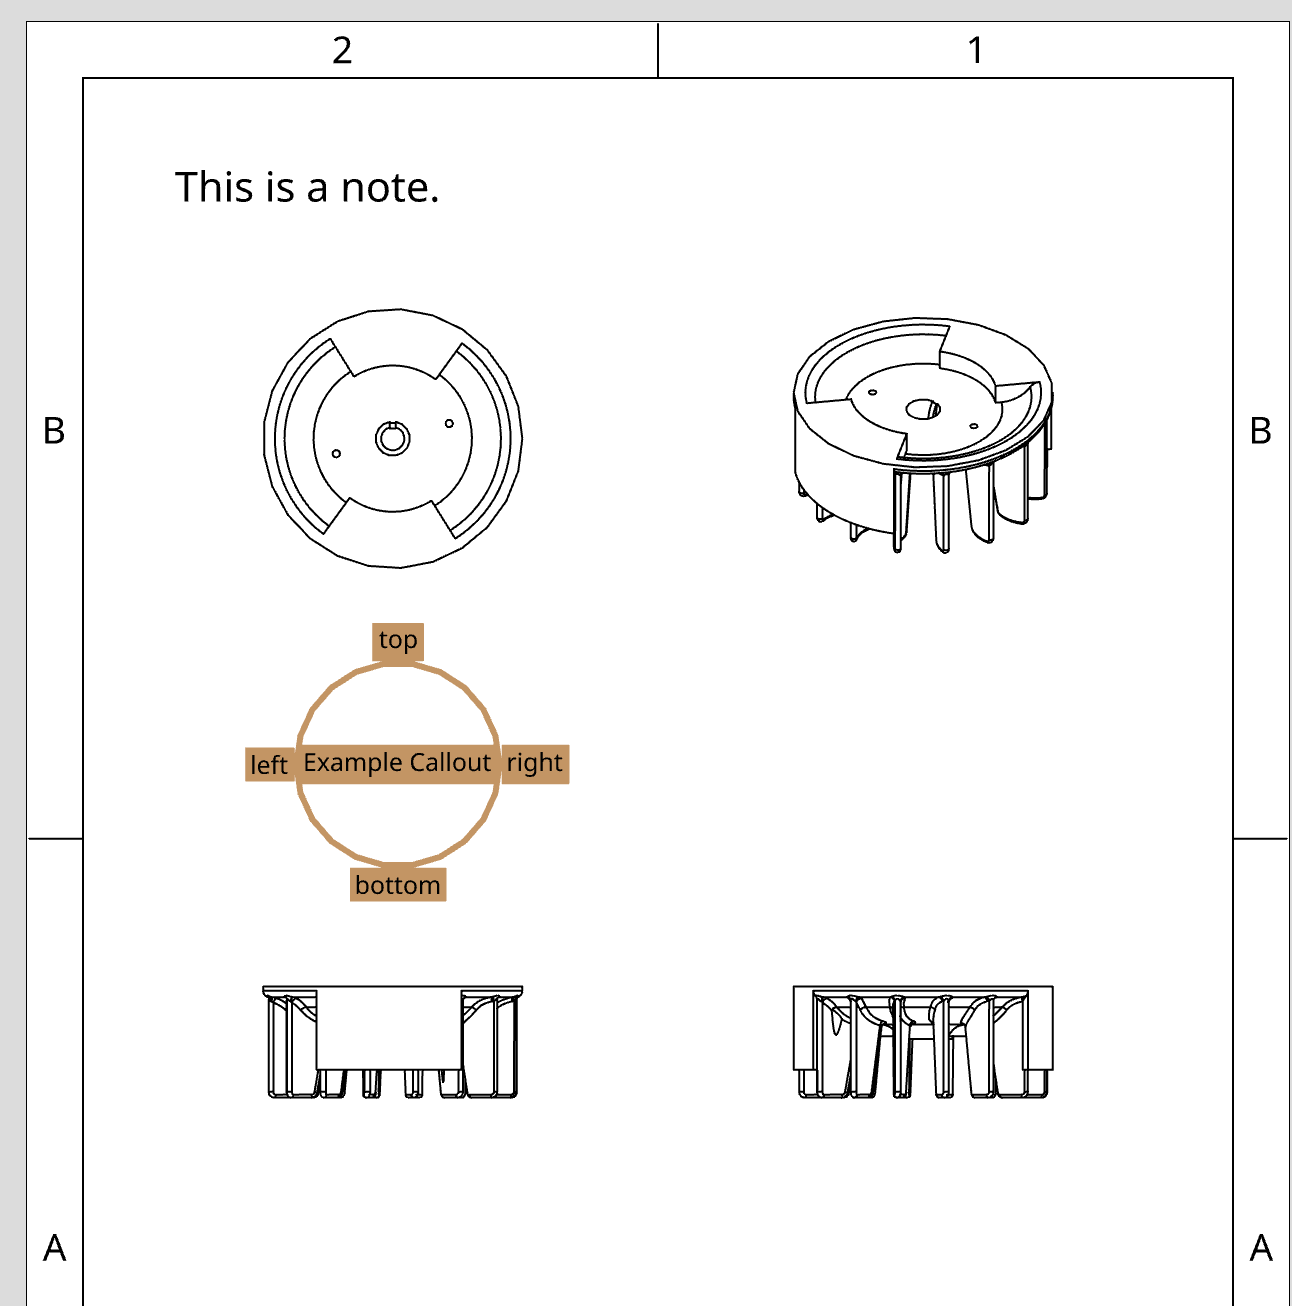
Add a callout to a drawing
- Open an Onshape drawing. This example uses the drawing created in the Create a drawing from a part tutorial.
- Start to form the modifyDrawing call. Replace the URL parameters with the values from your document, and replace
CREDENTIALSwith your authorization credentials.curl -X 'POST \ 'https://cad.onshape.doc/api/v6/drawings/d/{did}/w/{wid}/e/{eid}/modify' \ -H 'Authorization: Basic CREDENTIALS' \ -H 'Accept: application/json;charset=UTF-8; qs=0.09' \ -H 'Content-Type: application/json;charset=UTF-8; qs=0.09' \ - Add information about the modification. In this example, we’ll add an
Onshape::Calloutto the drawing. We must specify themessageNameandformatVersionfor the modification, and then provide the contents and size of the annotation:curl -X 'POST \ 'https://cad.onshape.doc/api/v6/drawings/d/{did}/w/{wid}/e/{eid}/modify' \ -H 'Authorization: Basic CREDENTIALS' \ -H 'Accept: application/json;charset=UTF-8; qs=0.09' \ -H 'Content-Type: application/json;charset=UTF-8; qs=0.09' \ -d '{ "description": "Add a callout.", "jsonRequests": [ { "messageName": "onshapeCreateAnnotations", "formatVersion": "2021-01-01", "annotations": [ { "callout": { "borderShape": "Circle", "borderSize": 0, "contents": "Example Callout", "contentsBottom": "bottom", "contentsLeft": "left", "contentsRight": "right", "contentsTop": "top", "position": { "coordinate": [ 2.5, 6, 0 ], "type": "Onshape::Reference::Point" }, "textHeight": 0.12 }, "type": "Onshape::Callout" } ] }] }' - Make the call, and then get
idfrom the response body. You’ll need this to poll the modification status to figure out when the modification has completed. - Poll the modification status and wait for the modification to finish.
- Open your drawing and confirm that you see the new callout.
Add a centerline to a drawing
- Open an Onshape drawing. This example uses the drawing created in the Create a drawing from a part tutorial.
- Start to form the modifyDrawing call. Replace the URL parameters with the values from your document, and replace
CREDENTIALSwith your authorization credentials.curl -X 'POST \ 'https://cad.onshape.doc/api/v6/drawings/d/{did}/w/{wid}/e/{eid}/modify' \ -H 'Authorization: Basic CREDENTIALS' \ -H 'Accept: application/json;charset=UTF-8; qs=0.09' \ -H 'Content-Type: application/json;charset=UTF-8; qs=0.09' \ - Add information about the modification. In this example, we’ll add an
Onshape::Centerlineto the drawing. We must specify themessageNameandformatVersionfor the modification, and then provide the coordinates of the centerline ends.
- Note: you can Export a Drawing to JSON to get the coordinates,
uniqueIdandviewIdvalues shown in the request below. - Note: if you have access, you can refer to the ODA documentation for more detailed formatting information.
curl -X 'POST \ 'https://cad.onshape.doc/api/v6/drawings/d/{did}/w/{wid}/e/{eid}/modify' \ -H 'Authorization: Basic CREDENTIALS' \ -H 'Accept: application/json;charset=UTF-8; qs=0.09' \ -H 'Content-Type: application/json;charset=UTF-8; qs=0.09' \ -d '{ "description": "Add a centerline", "jsonRequests": [ { "messageName": "onshapeCreateAnnotations", "formatVersion": "2021-01-01", "annotations": [ { "pointToPointCenterline": { "point1": { "coordinate": [ 2, 4, 0 ], "type": "Onshape::Reference::Point", "uniqueId": "point1", "viewId": "51fa8b6040e411dfd17a4cda", "snapPointType": "ModeStart" }, "point2": { "coordinate": [ 7, 6, 1 ], "type": "Onshape::Reference::Point", "uniqueId": "point2", "viewId": "51fa8b6040e411dfd17a4cda", "snapPointType": "ModeEnd" } }, "type": "Onshape::Centerline::PointToPoint" } ] }] }'
- Make the call, and then get
idfrom the response body. You’ll need this to poll the modification status to figure out when the modification has completed. - Poll the modification status and wait for the modification to finish.
- Open your drawing and confirm that you see the new centerline.
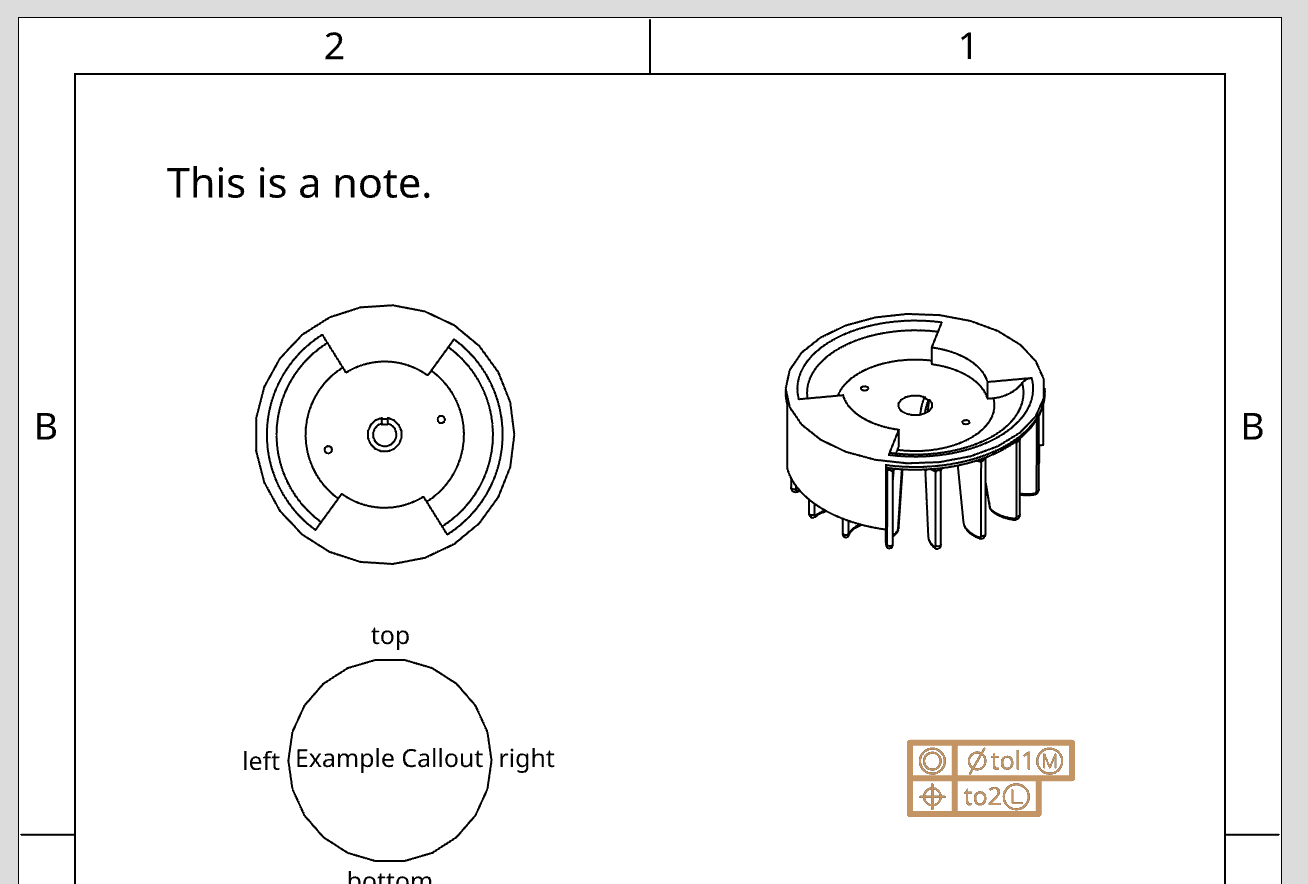
Add a geometric tolerance to a drawing
- Open an Onshape drawing. This example uses the drawing created in the Create a drawing from a part tutorial.
- Start to form the modifyDrawing call. Replace the URL parameters with the values from your document, and replace
CREDENTIALSwith your authorization credentials.curl -X 'POST \ 'https://cad.onshape.doc/api/v6/drawings/d/{did}/w/{wid}/e/{eid}/modify' \ -H 'Authorization: Basic CREDENTIALS' \ -H 'Accept: application/json;charset=UTF-8; qs=0.09' \ -H 'Content-Type: application/json;charset=UTF-8; qs=0.09' \ - Add information about the modification. In this example, we’ll add an
Onshape::GeometricToleranceto the drawing. We must specify themessageNameandformatVersionfor the modification, and then provide the frames and position of the annotation:curl -X 'POST \ 'https://cad.onshape.doc/api/v6/drawings/d/{did}/w/{wid}/e/{eid}/modify' \ -H 'Authorization: Basic CREDENTIALS' \ -H 'Accept: application/json;charset=UTF-8; qs=0.09' \ -H 'Content-Type: application/json;charset=UTF-8; qs=0.09' \ -d '{ "description": "Add a geometric tolerance", "jsonRequests": [ { "messageName": "onshapeCreateAnnotations", "formatVersion": "2021-01-01", "annotations": [ { "geometricTolerance": { "frames": [ "{\\fDrawing Symbols Sans;◎}%%v{\\fDrawing Symbols Sans;∅}tol1{\\fDrawing Symbols Sans;Ⓜ}%%v%%v%%v%%v%%v\n", "{\\fDrawing Symbols Sans;⌖}%%vto2{\\fDrawing Symbols Sans;Ⓛ}%%v%%v%%v%%v%%v\n" ], "position": { "coordinate": [ 6, 6, 0 ], "type": "Onshape::Reference::Point" } }, "type": "Onshape::GeometricTolerance" } ] }] }' - Make the call, and then get
idfrom the response body. You’ll need this to poll the modification status to figure out when the modification has completed. - Poll the modification status and wait for the modification to finish.
- Open your drawing and confirm that you see the new annotation.
Add an inspection symbol to a drawing
- Open an Onshape drawing. This example uses the drawing created in the Create a drawing from a part tutorial.
- Start to form the modifyDrawing call. Replace the URL parameters with the values from your document, and replace
CREDENTIALSwith your authorization credentials.curl -X 'POST \ 'https://cad.onshape.doc/api/v6/drawings/d/{did}/w/{wid}/e/{eid}/modify' \ -H 'Authorization: Basic CREDENTIALS' \ -H 'Accept: application/json;charset=UTF-8; qs=0.09' \ -H 'Content-Type: application/json;charset=UTF-8; qs=0.09' \ - Add information about the modification. In this example, we’ll add an
Onshape::InspectionSymbolto the drawing. We must specify themessageNameandformatVersionfor the modification, and then provide the shape and position of the inspection symbol. (Hint: you can Export a Drawing to JSON to get a list of valid coordinates and handles.)curl -X 'POST \ 'https://cad.onshape.doc/api/v6/drawings/d/{did}/w/{wid}/e/{eid}/modify' \ -H 'Authorization: Basic CREDENTIALS' \ -H 'Accept: application/json;charset=UTF-8; qs=0.09' \ -H 'Content-Type: application/json;charset=UTF-8; qs=0.09' \ -d '{ "description": "Add an inspection symbol", "jsonRequests": [ { "messageName": "onshapeCreateAnnotations", "formatVersion": "2021-01-01", "annotations": [ { "inspectionSymbol": { "borderShape": "Circle", "borderSize": 2, "parentAnnotation": "h:10000577", "parentLineIndex": 0.0, "position": { "coordinate": [ 2.6, 6, 0 ], "type": "Onshape::Reference::Point" }, "textHeight": 2 }, "type": "Onshape::InspectionSymbol" } ] }] }' - Make the call, and then get
idfrom the response body. You’ll need this to poll the modification status to figure out when the modification has completed. - Poll the modification status and wait for the modification to finish.
- Open your drawing and confirm that you see the new inspection symbol.
Add a table to a drawing
- Open an Onshape drawing. This example uses the drawing created in the Create a drawing from a part tutorial.
- Start to form the Drawings/modifyDrawing call. Replace the URL parameters with the values from your document, and replace
CREDENTIALSwith your authorization credentials.curl -X 'POST \ 'https://cad.onshape.doc/api/v6/drawings/d/{did}/w/{wid}/e/{eid}/modify' \ -H 'Authorization: Basic CREDENTIALS' \s -H 'Accept: application/json;charset=UTF-8; qs=0.09' \ -H 'Content-Type: application/json;charset=UTF-8; qs=0.09' \ - Add information about the modification. In this example, we’ll add an
Onshape::Table::GeneralTableto the drawing. We must specify themessageNameandformatVersionfor the modification, and then provide the location, number of rows, and number of columns for the table. (Hint: you can Export a Drawing to JSON to get a list of valid coordinates.)curl -X 'POST \ 'https://cad.onshape.doc/api/v6/drawings/d/{did}/w/{wid}/e/{eid}/modify' \ -H 'Authorization: Basic CREDENTIALS' \ -H 'Accept: application/json;charset=UTF-8; qs=0.09' \ -H 'Content-Type: application/json;charset=UTF-8; qs=0.09' \ -d '{ "description": "New table", "jsonRequests": [ { "formatVersion": "2021-01-01", "messageName": "onshapeCreateAnnotations", "annotations": [ { "table": { "cells": [ { "column": 0, "content": "1.1", "row": 0 }, { "column": 0, "content": "2.1", "row": 1 }, { "column": 1, "content": "1.2", "row": 0 }, { "column": 1, "content": "2.2", "row": 1 } ], "columns": 2, "rows": 2, "showHeaderRow": false, "showTitleRow": false, "position": { "coordinate": [100.0, 400.0, 0.0], "type": "Onshape::Reference::Point" } }, "type": "Onshape::Table::GeneralTable" }] }] }' - Make the call, and then get
idfrom the response body. You’ll need this to poll the modification status to figure out when the modification has completed. - Poll the modification status and wait for the modification to finish.
- Open your drawing and confirm that you see the new table.
Add a datum to a drawing
- Open an Onshape drawing. This example uses the drawing created in the Create a drawing from a part tutorial.
- Start to form the Drawings/modifyDrawing call. Replace the URL parameters with the values from your document, and replace
CREDENTIALSwith your authorization credentials.curl -X 'POST \ 'https://cad.onshape.doc/api/v6/drawings/d/{did}/w/{wid}/e/{eid}/modify' \ -H 'Authorization: Basic CREDENTIALS' \s -H 'Accept: application/json;charset=UTF-8; qs=0.09' \ -H 'Content-Type: application/json;charset=UTF-8; qs=0.09' \ - Add information about the modification. In this example, we’ll add a
datumblock to the drawing. We must specify themessageNameandformatVersionfor the modification, and then provide the info for the datum. (Hint: you can Export a Drawing to JSON to get a list of valid coordinates for your datum’s position.)curl -X 'POST \ 'https://cad.onshape.doc/api/v6/drawings/d/{did}/w/{wid}/e/{eid}/modify' \ -H 'Authorization: Basic CREDENTIALS' \ -H 'Accept: application/json;charset=UTF-8; qs=0.09' \ -H 'Content-Type: application/json;charset=UTF-8; qs=0.09' \ -d '{ "description": "New datum", "jsonRequests": [ { "formatVersion": "2021-01-01", "messageName": "onshapeCreateAnnotations", "annotations": [ { "datum":{ "arrowType": "DatumFilled", // DatumFilled | DatumBlank "contents": "A", // Replace with datum text "datumSize": 0.25, // Datum size "isDangling": false, "isDatumTarget": false, "logicalId":"h:100001DC", // Datum ID "position": { // Datum location "coordinate":[ 6.91, 3.24, -1 ], "type": "Onshape::Reference::Point" }, "targetPosition": { // Datum arrow location "coordinate": [ 0.2, 0.2, -0.1 ], "snapPointType":"ModeNear", "type":"Onshape::Reference::Point", "uniqueId":"F4241", // Unique ID "viewId":"{viewId}" // View ID of the drawing }, "textSize": 0.25 // Datum text size }, "type":"Onshape::Datum" }] }] }' - Make the call, and then get
idfrom the response body. You’ll need this to poll the modification status to figure out when the modification has completed. - Poll the modification status and wait for the modification to finish.
- Open your drawing and confirm that you see the new datum.
Add a surface finish symbol to a drawing
This code adds a surface finish symbol (SFS) to a drawing in empty space.
- To create an SFS attached to an annotation, see: Add an SFS to an annotation
- To attach an SFS to a view edge, see: Associate an annotation with a view edge.
Endpoint
POST /drawings/d/did/w/wid/e/eid/modify
Request Body
{
  "description": "Add an SFS",
  "jsonRequests": [ {
    "messageName": "onshapeCreateAnnotations",
    "formatVersion": "2021-01-01",
    "annotations": [
      {
        "surfaceFinishSymbol": {
          "isAllAround": false,
          "matRemovalAllowance": "",
          "maxRoughness": "",
          "maxRoughnessWidth": "",
          "methodWaviness": "",
          "minRoughness": "",
          "position": {
            "coordinate": [
              5.2,
              5.7,
              0
            ],
            "type": "Onshape::Reference::Point"
          },
          "roughnessCutoff": "",
          "surfaceDirectionLayType": "NotSpecified",
          "surfaceTextType": "Basic",
          "textHeight": 0.12
          },
        "type": "Onshape::SurfaceFinishSymbol"
      }
    ]
  }]
}
Add a surface finish symbol to an annotation
You can create a surface finish symbol (SFS) that’s attached to another annotation by supplying that annotation’s logical ID in the position.logicalId field. In this example, we create the SFS attached to a GDT.
To attach an SFS to a view edge, follow the instructions here: Associate an annotation with a view edge.
Endpoint
POST /drawings/d/did/w/wid/e/eid/modify
Request Body
{
  "description": "Add an SFS to a GDT",
  "jsonRequests": [ {
    "messageName": "onshapeCreateAnnotations",
    "formatVersion": "2021-01-01",
    "annotations": [
      {
        "surfaceFinishSymbol": {
          "isAllAround": false,
          "isDangling": false,
          "matRemovalAllowance": "",
          "maxRoughness": "",
          "maxRoughnessWidth": "",
          "methodWaviness": "",
          "minRoughness": "",
          "position": {
            "coordinate": [
              7.8,
              3.5,
              0.0
            ],
            "logicalId": "{logicalId}",
            "type": "Onshape::Reference::Point"
          },
          "roughnessCutoff": "",
          "surfaceDirectionLayType": "PerpendicularToPlaneOfProjection",
          "surfaceTextType": "RemovalOfMaterialRequired",
          "textHeight": 0.0
        },
        "type": "Onshape::SurfaceFinishSymbol"
      }
    ]
  } ]
}
Add a centermark to a circular edge
You can Export a Drawing to JSON to get a list of valid coordinates and IDs for your drawing.
Endpoint
POST /drawings/d/did/w/wid/e/eid/modify
Request Body
{
  "description": "Add a centermark to a circular edge",
  "jsonRequests": [ {
    "messageName": "onshapeCreateAnnotations",
    "formatVersion": "2021-01-01",
    "annotations": [
      {
        "centermark": {
          "bottomGripPoint": {
            "coordinate": [
              3.1822537578892087,
              3.6563745010106074,
              0.25000000000000008
            ],
            "type": "Onshape::Reference::Point"
          },
          "centerPoint": {
            "coordinate": [
              0.025104875729290184,
              -2.7755575615628916e-17,
              0.025400000000000007
            ],
            "snapPointType": "ModeCenter",
            "type": "Onshape::Reference::Point",
            "uniqueId": "{uniqueIdOfCenterPoint}",
            "viewId": "{drawingViewId}"
          },
          "leftGripPoint": {
            "coordinate": [
              2.993828561038815,
              3.8447996978610008,
              0.25000000000000008
            ],
            "type": "Onshape::Reference::Point"
          },
          "rightGripPoint": {
            "coordinate": [
              3.370678954739602,
              3.8447996978610008,
              0.25000000000000008
            ],
            "type": "Onshape::Reference::Point"
            },
          "topGripPoint": {
            "coordinate": [
              3.1822537578892087,
              4.033224894711394,
              0.25000000000000008
            ],
            "type": "Onshape::Reference::Point"
          }
        },
        "type": "Onshape::Centermark"
      }
    ]
  } ]
}
Add a centermark aligned with a view edge
You can Export a Drawing to JSON to get a list of valid coordinates and IDs for your drawing.
Endpoint
POST /drawings/d/did/w/wid/e/eid/modify
Request Body
{
  "description": "Add a centermark aligned with a view edge",
  "jsonRequests": [ {
    "messageName": "onshapeCreateAnnotations",
    "formatVersion": "2021-01-01",
    "annotations": [
      {
        "centermark": {
          "alignEdge": {
            "deterministicId": "{edgeDeterministicId}",
            "type": "Onshape::Reference::Edge",
            "uniqueId": "{edgeUniqueId}",
            "viewId": "{drawingViewId}"
          },
          "bottomGripPoint": {
            "coordinate": [
              2.8352194500430278,
              3.245579835836262,
              0.25000000000000008
            ],
            "type": "Onshape::Reference::Point"
          },
          "centerPoint": {
            "coordinate": [
              0,
              -0.02296483610015257,
              0.025400000000000007
            ],
            "snapPointType": "ModeCenter",
            "type": "Onshape::Reference::Point",
            "uniqueId": "{centerPointUniqueId}",
            "viewId": "{drawingViewId}"
          },
          "leftGripPoint": {
            "coordinate": [
              2.5409071315113667,
              3.2455798358362619,
              0.25000000000000008
            ],
            "type": "Onshape::Reference::Point"
          },
          "rightGripPoint": {
            "coordinate": [
              2.8352194500430278,
              3.539892154367923,
              0.25000000000000008
            ],
            "type": "Onshape::Reference::Point"
          },
          "topGripPoint": {
            "coordinate": [
              2.5409071315113667,
              3.5398921543679227,
              0.25000000000000008
            ],
            "type": "Onshape::Reference::Point"
          }
        },
      "type": "Onshape::Centermark"
      }
    ]
  } ]
}
Add a centermark with an extension line
You can set the length of extension lines by passing individual grip points or by passingextensionLineLength. Export a Drawing to JSON to get a list of valid coordinates and IDs for your drawing.
Endpoint
POST /drawings/d/did/w/wid/e/eid/modify
Request Body
{
  "description": "Add a centermark with an extension line",
  "jsonRequests": [
    {
      "messageName": "onshapeCreateAnnotations",
      "formatVersion": "2021-01-01",
      "annotations": [
        {
          "centermark": {
            "centerPoint": {
              "coordinate": [
                0,
                -0.02296483610015257,
                0.025400000000000007
              ],
              "snapPointType": "ModeCenter",
              "type": "Onshape::Reference::Point",
              "uniqueId": "{centerPointUniqueId}",
              "viewId": "{drawingViewId}"
            },
            "extensionLineLength": 2
          },
          "type": "Onshape::Centermark"
        }
      ]
    }
  ]
}
Examples - Edit Annotations
Edit an annotation
You can edit an annotation using the Drawings/modifyDrawing API in the same way that you create an annotation. You’ll use the onshapeEditAnnotations message in place of onshapeCreateAnnotations, and you’ll need to supply the logicalId for the annotation. You must use the same type that you used to create the annotation.
Note You can create a
logicalIdalias when you create an annotation, and refer to that alias in other drawing modifications. Currently, these aliases are not returned in a drawing export. For example, if you send"logicalId:" "myDrawingNote"as part of the request when creating a note annotation, you can later usemyDrawingNoteas thelogicalIdwhen editing the annotation.
Endpoint
POST /drawings/d/did/w/wid/e/eid/modify
Request Body
{
  "description": "Update a note on a drawing.",
  "jsonRequests": [ {
    "messageName": "onshapeEditAnnotations",
    "formatVersion": "2021-01-01",
    "annotations": [
      {
        "type": "{see Type list below}",
        "note": {
          "contents": "This is new note text.",
          "logicalId": "{logicalId}"
        }
      }
    ]
  }]
}
Onshape::Callout
Onshape::Note
Onshape::GeometricTolerance
Onshape::Centerline::PointToPoint
Onshape::Centerline::LineToLine
Onshape::Centerline::TwoPointCircular
Onshape::Centerline::ThreePointCircular
Onshape::Dimension::LineToLine
Onshape::Dimension::PointToPoint
Onshape::Dimension::PointToLine
Onshape::Dimension::Diametric
Onshape::Dimension::Radial
Onshape::Dimension::LineToLineAngular
Onshape::Dimension::ThreePointAngular
Onshape::InspectionSymbol
Example
- Open an Onshape drawing. This example uses the drawing created in the Create a drawing from a part tutorial.
- Follow the steps for exporting a Drawing to JSON. In the JSON response, find the
logicalIdfor the note you want to modify. - Add your headers and the JSON body, including the required fields mentioned above, and the new text in the
contentsfield.curl -X 'POST \ 'https://cad.onshape.doc/api/v6/drawings/d/{did}/w/{wid}/e/{eid}/modify' \ -H 'Authorization: Basic CREDENTIALS' \ -H 'Accept: application/json;charset=UTF-8; qs=0.09' \ -H 'Content-Type: application/json;charset=UTF-8; qs=0.09' \ -d '{ "description": "Update a note on a drawing.", "jsonRequests": [ { "messageName": "onshapeEditAnnotations", "formatVersion": "2021-01-01", "annotations": [ { "type": "Onshape::Note", "note": { "contents": "This is new note text.", "logicalId": "{logicalId}" } } ] }] }' - Once the modification is done, open your drawing and confirm that you see the new text.
Attach an annotation to a parent
To attach an annotation to a parent, you can send the parentAnnotation field in your request body. The new annotation’s position must still be provided. The position determines where the annotation is placed, while the parentAnnotation determines when the annotation moves; an annotation that isn’t attached to a parent can be moved freely. An annotation attached to a parent moves when the parent annotation moves.
This example request body creates a geometric tolerance annotation attached to a parent annotation with logical ID h:100000B1.
Note Surface finish symbols behave differently. See Add a SFS to an annotation for steps.
Endpoint
POST /drawings/d/did/w/wid/e/eid/modify
Request Body
{
  "description": "Create a GDT attached to a parent",
  "jsonRequests": [ {
    "messageName": "onshapeCreateAnnotations",
    "formatVersion": "2021-01-01",
    "annotations": [
      {
        "geometricTolerance": {
          "frames": [
            "{\\fDrawing Symbols Sans;◎}%%v{\\fDrawing Symbols Sans;∅}tol1{\\fDrawing Symbols Sans;Ⓜ}%%v%%v%%v%%v%%v\n",
            "{\\fDrawing Symbols Sans;⌖}%%vto2{\\fDrawing Symbols Sans;Ⓛ}%%v%%v%%v%%v%%v\n"
          ],
          "parentAnnotation": "h:100000B1",
          "position": {
            "coordinate": [
              6,
              6,
              0
            ],
            "type": "Onshape::Reference::Point"
          }
        },
        "type": "Onshape::GeometricTolerance"
      }
    ]
  }]
}
Associate a leader with a view edge
Add the leaderPosition object to your request body to create a leader associated with a view edge.
{
  "leaderPosition": {
    "coordinate": [
      0.1,
      5.6,
      0.1
    ],
    "deterministicId": "{deterministicId}",
    "snapPointType": "ModeMid",
    "type": "Onshape::Reference::Point",
    "uniqueId": "{uniqueId}",
    "viewId": "{viewId}"
  }
}
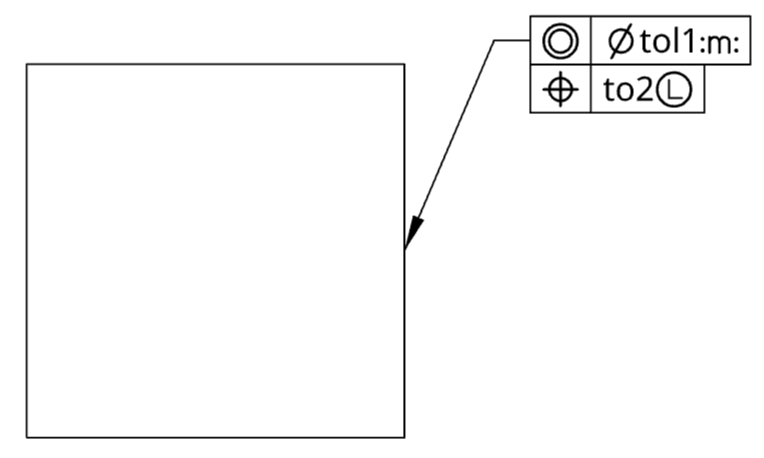
Endpoint
POST /drawings/d/did/w/wid/e/eid/modify
Request Body
{
  "description": "Add a geometric tolerance",
  "jsonRequests": [ {
    "messageName": "onshapeCreateAnnotations",
    "formatVersion": "2021-01-01",
    "annotations": [
      {
        "geometricTolerance": {
          "frames": [
            "{\\fDrawing Symbols Sans;◎}%%v{\\fDrawing Symbols Sans;∅}tol1{\\fDrawing Symbols Sans;:m:}%%v%%v%%v%%v%%v\n",
            "{\\fDrawing Symbols Sans;⌖}%%vto2{\\fDrawing Symbols Sans;Ⓛ}%%v%%v%%v%%v%%v\n"
          ],
          "position": {
            "coordinate": [
              6,
              6,
              0
            ],
            "type": "Onshape::Reference::Point"
          },
          "leaderPosition": {
            "coordinate": [
              0.1,
              5.6,
              0.1
            ],
            "deterministicId": "{deterministicId}",
            "snapPointType": "ModeMid",
            "type": "Onshape::Reference::Point",
            "uniqueId": "{uniqueId}",
            "viewId": "{viewId}"
          }
        },
        "type": "Onshape::GeometricTolerance"
      }
    ]
  }]
}
Workflow
- Call getDrawingViews on your drawing to get the
viewIdof the view to add the annotation to. - Call getDrawingViewJsonGeometry to get the
uniqueIdanddeterministicIdof the edge to add the annotation to. - Call modifyDrawing with the request body shown above to create the annotation.
Associate an annotation with a view edge without a leader
Add the following information to the annotation’s position object to associate the annotation with a view edge:
{
  "deterministicId": "{deterministicId}",
  "snapPointType": "ModeNear",
  "type": "Onshape::Reference::Point",
  "uniqueId": "{uniqueId}",
  "viewId": "{viewId}"
}
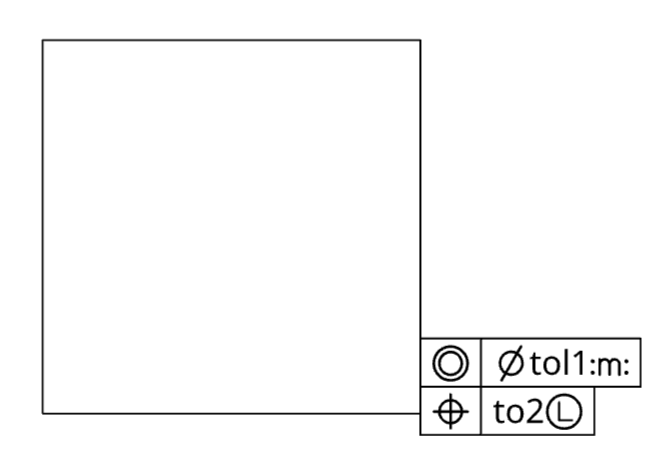
Endpoint
POST /drawings/d/did/w/wid/e/eid/modify
Request Body
{
  "description": "Add a geometric tolerance",
  "jsonRequests": [ {
    "messageName": "onshapeCreateAnnotations",
    "formatVersion": "2021-01-01",
    "annotations": [
      {
        "geometricTolerance": {
          "frames": [
            "{\\fDrawing Symbols Sans;◎}%%v{\\fDrawing Symbols Sans;∅}tol1{\\fDrawing Symbols Sans;:m:}%%v%%v%%v%%v%%v\n",
            "{\\fDrawing Symbols Sans;⌖}%%vto2{\\fDrawing Symbols Sans;Ⓛ}%%v%%v%%v%%v%%v\n"
          ],
          "position": {
            "coordinate": [
              0.05703643988890697,
              -0.04311684802152582,
              0.025400000000000004
            ],
            "deterministicId": "{deterministicId}",
            "snapPointType": "ModeNear",
            "type": "Onshape::Reference::Point",
            "uniqueId": "{uniqueId}",
            "viewId": "{viewId}"
          }
        },
        "type": "Onshape::GeometricTolerance"
      }
    ]
  }]
}
Workflow
- Call getDrawingViews on your drawing to get the
viewIdof the view to add the annotation to. - Call getDrawingViewJsonGeometry to get the
uniqueIdanddeterministicIdof the edge to add the annotation to. - Call modifyDrawing with the request body shown above to create the annotation.
Specify a snap point
You can use the modifyDrawing to choose the snap points for annotations. Available types of snap points are:
 ModeApint       // Apparent intersection
 ModeCenter      // Center point
 ModeEnd         // End point
 ModeIns         // Insertion point
 ModeIntersec    // Intersection
 ModeMid         // Midpoint
 ModeNear        // Nearest point
 ModeNode        // Node
 ModePar         // Parallel
 ModePerp        // Perpendicular
 ModeQuad        // Quadrant
 ModeStart       // Start point
 ModeTan         // Tangent point
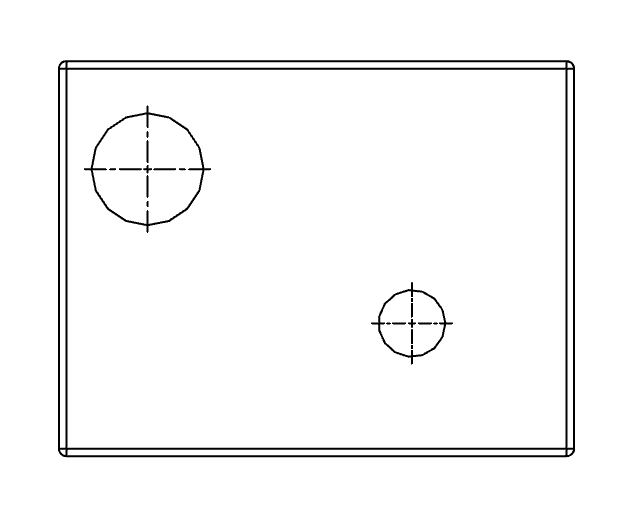
- Create a sketch in Onshape with two circles, then extrude both circles.
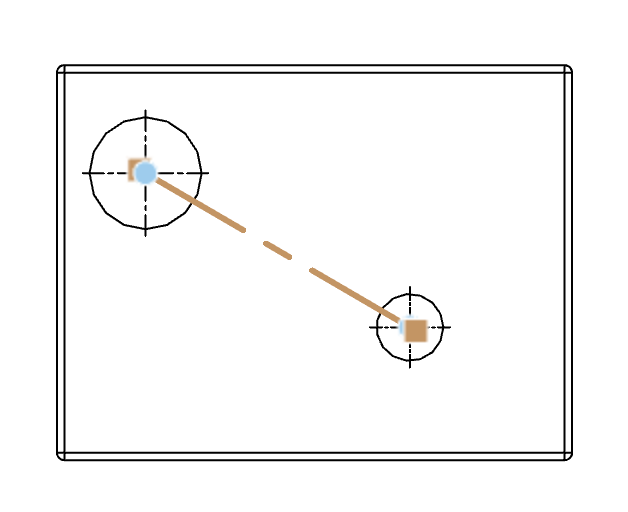
- Create a drawing of the part’s front view. We’ll use the Drawings API to a point to point centerline snapped to the centers of the holes.
- Next, we’ll need to get the view ID of the drawing. Call the Drawing/getDrawingViews_1 endpoint on your document to get a list of all views in the drawing, and copy the
viewIdfrom the response:
curl -X 'GET' \
  'https://cad.onshape.com/api/v8/drawings/d/{did}/w/{wid}/e/{eid}/views' \
  -H 'Authorization: Basic CREDENTIALS' \s
  -H 'accept: application/json;charset=UTF-8; qs=0.09' \
  -H 'Content-Type: application/json;charset=UTF-8; qs=0.09'
- Use the
viewIdfrom the last step to get theuniqueId(oredgeId) of each circle’s center from the Drawing/getDrawingViewJsonGeometry_1) endpoint:
curl -X 'GET' \
  'https://cad.onshape.com/api/v8/drawings/d/{did}/w/{wid}/e/{eid}/views/{viewId}/jsongeometry' \
  -H 'Authorization: Basic CREDENTIALS' \s
  -H 'accept: application/json;charset=UTF-8; qs=0.09' \
- Start to form the modifyDrawing call. Replace the URL parameters with the values from your document, and replace
CREDENTIALSwith your authorization credentials.curl -X 'POST \ 'https://cad.onshape.doc/api/v6/drawings/d/{did}/w/{wid}/e/{eid}/modify' \ -H 'Authorization: Basic CREDENTIALS' \ -H 'Accept: application/json;charset=UTF-8; qs=0.09' \ -H 'Content-Type: application/json;charset=UTF-8; qs=0.09' \ -d { } - Add information about the modification. In this example, we’ll add a
pointToPointCenterlineto the drawing. Make sure to update the request body values as follows:
messageName:"onshapeCreateAnnotation"formatVersion:"2021-01-01"uniqueId: From Step 4viewId: From Step 3coordinates: The values must be sent as part of the request, but are ignored.curl -X 'POST \ 'https://cad.onshape.doc/api/v8/drawings/d/{did}/w/{wid}/e/{eid}/modify' \ -H 'Authorization: Basic CREDENTIALS' \s -H 'Accept: application/json;charset=UTF-8; qs=0.09' \ -H 'Content-Type: application/json;charset=UTF-8; qs=0.09' \ -d { "description": "creating a snap point", "jsonRequests": [ { "messageName": "onshapeCreateAnnotations", "formatVersion": "2021-01-01", "annotations": [ { "pointToPointCenterline": { "point1": { "coordinate": [0,0,0], "type": "Onshape::Reference::Point", "uniqueId": "{uniqueId1}", "viewId": "{viewId}", "snapPointType": "ModeCenter" }, "point2": { "coordinate": [0,0,0], "type": "Onshape::Reference::Point", "uniqueId": "{uniqueId2}", "viewId": "{viewId}", "snapPointType": "ModeCenter" } }, "type": "Onshape::Centerline::PointToPoint" } ] }] }
- Return to your document and see that the centerline has been added to the document at the snap points.
Reassociate a centermark with a new edge
You can change the associated edge of a centermark. Export a Drawing to JSON to get a list of valid coordinates and IDs for your drawing.
Endpoint
POST /drawings/d/did/w/wid/e/eid/modify
Request Body
{
  "description": "Reassociate a centermark with a new edge",
  "jsonRequests": [
    {
      "messageName": "onshapeEditAnnotations",
      "formatVersion": "2021-01-01",
      "annotations": [
        {
          "centermark": {
            "centerPoint": {
              "coordinate": [
                0.025104875729290184,
                -2.7755575615628916e-17,
                0.025400000000000007
              ],
              "snapPointType": "ModeCenter",
              "type": "Onshape::Reference::Point",
              "uniqueId": "{newEdgeUniqueId}",
              "viewId": "{drawingViewId}"
            },
            "logicalId": "{centermarkLogicalId}"
          },
          "type": "Onshape::Centermark"
        }
      ]
    }
  ]
}
Examples - Sketches
Sketch a circle
Endpoint
POST /drawings/d/did/w/wid/e/eid/modify
Request Body
{
  "messageName": "onshapeCreateAnnotations",
  "formatVersion": "2021-01-01",
  "annotations": [
    {
      "circle": {
        "center": {
          "coordinate": [
            6.9,
            6.1,
            0
          ],
          "type": "Onshape::Reference::Point"
        },
        "radius": 1.0
      },
      "type": "Onshape::Circle"
    }
  ]
}
Sketch a three-point circle
Endpoint
POST /drawings/d/did/w/wid/e/eid/modify
Request Body
{
  "messageName": "onshapeCreateAnnotations",
  "formatVersion": "2021-01-01",
  "annotations": [
    {
      "circle": {
        "point1": {
          "coordinate": [
            8.5,
            6.2,
            0
          ],
          "type": "Onshape::Reference::Point"
        },
        "point2": {
          "coordinate": [
            9.2,
            6.2,
            0
          ],
          "type": "Onshape::Reference::Point"
        },
        "point3": {
          "coordinate": [
            8.9,
            5.6,
            0
          ],
          "type": "Onshape::Reference::Point"
        }
      },
      "type": "Onshape::Circle"
    }
  ]
}
Sketch a line
Endpoint
POST /drawings/d/did/w/wid/e/eid/modify
Request Body
{
  "messageName": "onshapeCreateAnnotations",
  "formatVersion": "2021-01-01",
  "annotations": [
    {
      "line": {
        "endPoint": {
          "coordinate": [
            6.1,
            4.7,
            0
          ],
          "type": "Onshape::Reference::Point"
        },
        "startPoint": {
          "coordinate": [
            6.1,
            3.6,
            0
          ],
          "type": "Onshape::Reference::Point"
        }
      },
      "type": "Onshape::Line"
    }
  ]
}
Sketch an arc
Endpoint
POST /drawings/d/did/w/wid/e/eid/modify
Request Body
{
  "messageName": "onshapeCreateAnnotations",
  "formatVersion": "2021-01-01",
  "annotations": [
    {
      "arc": {
        "center": {
          "coordinate": [
            1.7,
            1.8,
            0
          ],
          "type": "Onshape::Reference::Point"
        },
        "endAngle": 5.9,
        "radius": 0.5,
        "startAngle": 2.4
      },
      "type": "Onshape::Arc"
    }
  ]
}
Sketch a spline
Endpoint
POST /drawings/d/did/w/wid/e/eid/modify
Request Body
{
  "messageName": "onshapeCreateAnnotations",
  "formatVersion": "2021-01-01",
  "annotations": [
    {
      "spline": {
        "points": [
          {
            "coordinate": [
              9.3,
              3.5,
              0
            ],
            "type": "Onshape::Reference::Point"
          },
          {
            "coordinate": [
              9.8,
              4.3,
              0
            ],
            "type": "Onshape::Reference::Point"
          },
          {
            "coordinate": [
              10.4,
              4.9,
              0
            ],
            "type": "Onshape::Reference::Point"
          },
          {
            "coordinate": [
              10.3,
              5.8,
              0
            ],
            "type": "Onshape::Reference::Point"
          }
        ]
      },
      "type": "Onshape::Spline"
    }
  ]
}
Create a sketch point
Endpoint
POST /drawings/d/did/w/wid/e/eid/modify
Request Body
{
  "messageName": "onshapeCreateAnnotations",
  "formatVersion": "2021-01-01",
  "annotations": [
    {
      "sketchPoint": {
        "position": {
          "coordinate": [
            5.7,
            2.3,
            0
          ],
          "type": "Onshape::Reference::Point"
        }
      },
      "type": "Onshape::SketchPoint"
    }
  ]
}
Create a sketch grouped with a view
Specify the viewId field in the sketch object (e.g., circle, line, arc, etc.)
Endpoint
POST /drawings/d/did/w/wid/e/eid/modify
Circle Request Body
{
  "messageName": "onshapeCreateAnnotations",
  "formatVersion": "2021-01-01",
  "annotations": [
    {
      "circle": {
        "center": {
          "coordinate": [
            6.9,
            6.1,
            0
          ],
          "type": "Onshape::Reference::Point"
        },
        "radius": 1.0,
        "viewId": "{viewId}"
      },
      "type": "Onshape::Circle"
    }
  ]
}
Edit a sketch
Specify the properties to edit in the sketch object (e.g., circle, line, arc, etc.) for the given sketch’s logical ID. The following example edits the center coordinate for an arc.
{
  "messageName": "onshapeEditAnnotations",
  "formatVersion": "2021-01-01",
  "annotations": [
    {
      "arc": {
        "center": {
          "coordinate": [
            1.7,
            1.8,
            0
          ],
          "type": "Onshape::Reference::Point"
        },
        "endAngle": 5.9,
        "logicalId": "{logicalId}",
        "radius": 0.5,
        "startAngle": 2.4,
        "viewId": "{viewId}"
      },
      "type": "Onshape::Arc"
    }
  ]
}
Edit a spline point
Specify both the logical ID of the spline and the spline point.
{
  "messageName": "onshapeEditAnnotations",
  "formatVersion": "2021-01-01",
  "annotations": [
    {
      "spline": {
        "splinePoint": {
          "logicalId": "{splinePointLogicalId}",
          "position": {
            "coordinate": [
              9.9,
              7.8,
              0
            ],
            "type": "Onshape::Reference::Point"
          },
          "splineLogicalId": "{splineLogicalId}"
        },
        "type": "Onshape::SplinePoint"
      }
    }
  ]
}
Examples - Views
Notes:
See supported fields in our sample code. Currently, only
TopLevelandProjectedview types are supported for creating and editing via the Onshape API. Other view types listed are available for export only.
Add a view
The code below adds a view of a part to a drawing.
- Call getPartsWMVE to get a list of part IDs in an element.
- Remove the
idTagfield from the request body to specify a Part Studio or assembly view.
Endpoint
POST /drawings/d/did/w/wid/e/eid/modify
Request Body
{
  "description": "Add a part view",
  "jsonRequests": [
    {
    "messageName": "onshapeCreateViews",
    "formatVersion": "2021-01-01",
    "description": "Add views",
    "views": [
        {
            "viewType": "TopLevel",
            "position": {"x": 7,"y": 6},
            "scale": {"scaleSource": "Custom", "numerator": 3, "denumerator": 1},
            "orientation": "front",
            "reference": {
                "elementId": "{partStudioOrAssemblyElementId}",
                "idTag": "{partId}"
            }
        }
      ]
    }
   ]
}
Add projected views
The code below adds three views as children of the view created in the last example. Export a Drawing to JSON to obtain the logicalId of the parent view.
Endpoint
POST /drawings/d/did/w/wid/e/eid/modify
Request Body
{
  "description": "Add a part view",
  "jsonRequests": [
    {
    "messageName": "onshapeCreateViews",
    "formatVersion": "2021-01-01",
    "description": "Add views",
    "views": [
        {
            "viewType": "Projected",
            "position": {"x": 16,"y":6},
            "parentView": {"logicalId" : "{parentViewLogicalId}"},
            "name": "ChangedViewName",
            "showViewLabel": true
        },
        {
            "viewType": "Projected",
            "position": {"x": 7,"y":13},
            "parentView": {"logicalId" : "{parentViewLogicalId}"},
            "showShadedView": true,
            "showCentermarks": false
        },
        {
            "viewType": "Projected",
            "position": {"x": 16,"y":13},
            "parentView": {"logicalId" : "{parentViewLogicalId}"},
            "scale": {"scaleSource": "Custom", "numerator": 2, "denumerator": 1},
            "showHiddenLines": true
        }
      ]
    }
   ]
}
Edit a view
You can edit a view by specifying the view’s logical ID or view ID in the request. Logical IDs are given higher priority.
This code edits the four views added in the previous example. Export a Drawing to JSON to obtain the logicalIds of the views to edit.
Endpoint
POST /drawings/d/did/w/wid/e/eid/modify
Request Body
{
  "description": "Edit views",
  "jsonRequests": [
    {
      "messageName": "onshapeEditViews",
      "formatVersion": "2021-01-01",
      "description": "Edit views",
      "views": [
          {
              "logicalId": "{view1LogicalId}",
              "renderMode": "quality",
              "showHiddenLines": true
          },
          {
              "logicalId": "{view2LogicalId}",
              "suppressAlignmentWithParent": true,
              "rotation": "45 * Math.PI/180",
          },
          {
              "viewId": "{view3ViewId}",
              "showShadedView": false,
              "showCentermarks": true,
              "showViewLabel": true,
              "showScaleLabel": true,
              "label": "Top View"
          },
          {
              "logicalId": "{view4ViewId}",
              "scale": {"scaleSource": "Parent"},
              "showHiddenLines": false,
              "sheet": {"index": 2}
          }
      ]
    }
  ]
}
Examples - Dimensions
Add a dimension to a drawing
- Open an Onshape drawing. This example uses the drawing created in the Create a drawing from a part tutorial.
- Start to form the modifyDrawing call. Replace the URL parameters with the values from your document, and replace
CREDENTIALSwith your authorization credentials.curl -X 'POST \ 'https://cad.onshape.doc/api/v6/drawings/d/{did}/w/{wid}/e/{eid}/modify' \ -H 'Authorization: Basic CREDENTIALS' \ -H 'Accept: application/json;charset=UTF-8; qs=0.09' \ -H 'Content-Type: application/json;charset=UTF-8; qs=0.09' \ - Add information about the modification. In this example, we’ll add an
Onshape::Dimensionto the drawing. We must specify themessageNameandformatVersionfor the modification, and then provide the coordinates and formatting options for the dimension. (Hint: you can Export a Drawing to JSON to get a list of valid coordinates and handles.)curl -X 'POST \ 'https://cad.onshape.doc/api/v6/drawings/d/{did}/w/{wid}/e/{eid}/modify' \ -H 'Authorization: Basic CREDENTIALS' \ -H 'Accept: application/json;charset=UTF-8; qs=0.09' \ -H 'Content-Type: application/json;charset=UTF-8; qs=0.09' \ -d '{ "description": "Add a dimension", "jsonRequests": [ { "messageName": "onshapeCreateAnnotations", "formatVersion": "2021-01-01", "annotations": [ { "radialDimension": { "centerPoint": { "coordinate": [ 0.2800021171569824, 0.014964947476983043, 0.079502 ], "type": "Onshape::Reference::Point", "uniqueId": "point1", "viewId": "e11c38795c04ca55047f7ea7", "snapPointType": "ModeCenter" }, "chordPoint": { "coordinate": [ 0.2920149764955524, 0.010030535983985095, 0.079502 ], "type": "Onshape::Reference::Point", "uniqueId": "point2", "viewId": "e11c38795c04ca55047f7ea7", "snapPointType": "ModeNear" }, "formatting": { "dimdec": 2, "dimlim": false, "dimpost": "R<>", "dimtm": 0, "dimtol": false, "dimtp": 0, "type": "Onshape::Formatting::Dimension" }, "textOverride": "", "textPosition": { "coordinate": [ 191.80537349378181, 89.76274130852224, 0 ], "type": "Onshape::Reference::Point" } }, "type": "Onshape::Dimension::Radial" } ] }] }' - Make the call, and then get
idfrom the response body. You’ll need this to poll the modification status to figure out when the modification has completed. - Poll the modification status and wait for the modification to finish.
- Open your drawing and confirm that you see the new dimension.
Add a chamfer dimension to a drawing
- Open an Onshape drawing. This example uses the drawing created in the Create a drawing from a part tutorial.
- Start to form the modifyDrawing call. Replace the URL parameters with the values from your document, and replace
CREDENTIALSwith your authorization credentials.curl -X 'POST \ 'https://cad.onshape.doc/api/v6/drawings/d/{did}/w/{wid}/e/{eid}/modify' \ -H 'Authorization: Basic CREDENTIALS' \ -H 'Accept: application/json;charset=UTF-8; qs=0.09' \ -H 'Content-Type: application/json;charset=UTF-8; qs=0.09' \ - Add information about the modification. In this example, we’ll add an
Onshape::Dimension::Chamferto the drawing. We must specify themessageNameandformatVersionfor the modification, and then provide the information for the dimension. (Hint: you can Export a Drawing to JSON to get a list of valid coordinates and handles.)curl -X 'POST \ 'https://cad.onshape.doc/api/v6/drawings/d/{did}/w/{wid}/e/{eid}/modify' \ -H 'Authorization: Basic CREDENTIALS' \ -H 'Accept: application/json;charset=UTF-8; qs=0.09' \ -H 'Content-Type: application/json;charset=UTF-8; qs=0.09' \ -d '{ "description": "Add a chamfer dimension", "jsonRequests": [ { "messageName": "onshapeCreateAnnotations", "formatVersion": "2021-01-01", "annotations": [ { "chamferDimension": { "displayedValue": ".250 X 45.0°", // Display value "edge1End": { "coordinate": [ 0.0, -0.0063499999999999945, 0.012700000000000003 ], "snapPointType": "ModeEnd", "type": "Onshape::Reference::Point", "uniqueId": "{edge1Id}", // Unique ID of the edge "viewId": "{viewId}" // View ID of the drawing }, "edge1Start": { "coordinate": [ 0.0063500000000000015, 0.0, 0.012700000000000003 ], "snapPointType": "ModeStart", "type": "Onshape::Reference::Point", "uniqueId": "{edge1Id}", // Unique ID of the edge "viewId": "{viewId}" // View ID of the drawing }, "edge2End": { "coordinate": [ 0.07619999999999998, 0.0, 0.012700000000000003 ], "snapPointType": "ModeEnd", "type": "Onshape::Reference::Point", "uniqueId": "{edge2Id}", // Unique ID of the edge "viewId": "{viewId}" // View ID of the drawing }, "edge2Start": { "coordinate": [ 0.0063500000000000015, 0.0, 0.012700000000000003 ], "snapPointType": "ModeStart", "type": "Onshape::Reference::Point", "uniqueId": "{edge2Id}", // Unique ID of the edge "viewId": "{viewId}" // View ID of the drawing }, "firstChamferOverride": "", // Override the first value in the displayedValue field "formatting": { "dimdec": 3.0, "dimlim": false, "dimpost": " POST", "dimtm": 0.0, "dimtol": false, "dimtp": 0.0, "type": "Onshape::Formatting::Dimension" }, "logicalId": "h:10000124", "measurementAngle": 0.7853981633974478, // Angle of the chamfer "measurementLength": 0.2500000000000002, // Length of the chamfer "prefix": "PRE ", // Text to appear before the display value "secondChamferOverride": "", // Override the second value in the displayedValue field "suffix": " POST", // Text to appear after the display value "textAbove": "ABOVE", // Text to appear above the display value "textBelow": "BELOW", // Text to appear below the display value "textPosition": { // Location of display value "coordinate": [ 1.114880743466248, 6.783806096154582, 0.0 ], "type": "Onshape::Reference::Point" } }, "type": "Onshape::Dimension::Chamfer" } ] }] }' - Make the call, and then get
idfrom the response body. You’ll need this to poll the modification status to figure out when the modification has completed. - Poll the modification status and wait for the modification to finish.
- Open your drawing and confirm that you see the new chamfer dimension.
Add text or symbols to a dimension
You can add text or symbols to display with any dimension:
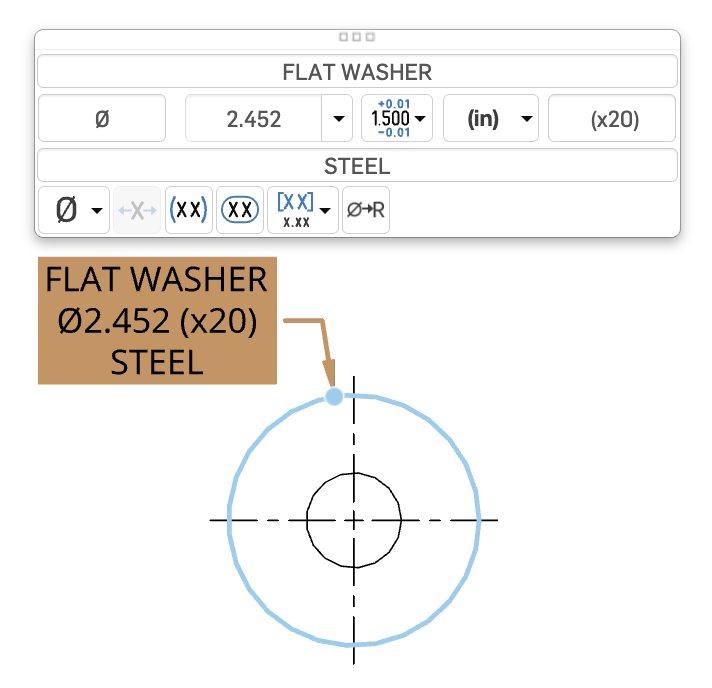
Add the following fields to any dimension definition.
{
  "prefix": "%%c",
  "suffix": " (x20)",
  "textAbove": "FLAT WASHER",
  "textBelow": "STEEL"
}
Endpoint
POST /drawings/d/did/w/wid/e/eid/modify
Request Body
{
  "messageName": "onshapeCreateAnnotations",
  "formatVersion": "2021-01-01",
  "annotations": [
    {
      "lineToLineDimension": {
        // ...
        "prefix": "%%c",
        "suffix": " (x20)",
        "textAbove": "FLAT WASHER",
        "textBelow": "STEEL"
        // ...
      },
      "type": "Onshape::Dimension::LineToLine"
    }
  ]
}
If editing an existing dimension, export the Drawing to JSON to obtain the dimension’s logical ID.
{
  "messageName": "onshapeEditAnnotations",
  "formatVersion": "2021-01-01",
  "annotations": [
    {
      "pointToPointDimension": {
        "logicalId": "h:10000675",
        "prefix": "Prefix",
        "suffix": "Suffix",
        "textAbove": "Above",
        "textBelow": "Below"
      },
      "type": "Onshape::Dimension::PointToPoint"
    }]
}
Examples - Tolerances
Add a dimension with a symmetrical tolerance
Export a Drawing to JSON to obtain the deterministic, unique, and view IDs to specify.
Endpoint
POST /drawings/d/did/w/wid/e/eid/modify
Request Body
{
  "messageName": "onshapeCreateAnnotations",
  "formatVersion": "2021-01-01",
  "annotations": [
    {
      "pointToPointDimension": {
        "point1": {
          "coordinate": [
            -0.022788484925716336,
            0.06710318401608831,
            0.004825999999999999
          ],
          "deterministicId": "JIV",
          "snapPointType": "ModeEnd",
          "type": "Onshape::Reference::Point",
          "uniqueId": "F4245",
          "viewId": "2b2608befce5281dc1f651e9"
        },
        "point2": {
          "coordinate": [
            0.06483851512571645,
            0.06710318401608831,
            0.004825999999999999
          ],
          "deterministicId": "JIV",
          "snapPointType": "ModeStart",
          "type": "Onshape::Reference::Point",
          "uniqueId": "F4245",
          "viewId": "2b2608befce5281dc1f651e9"
        },
        "textPosition": {
          "coordinate": [
            4.8346992569387219,
            5.660045658601707,
            0
          ],
          "type": "Onshape::Reference::Point"
        },
        "tolerance": {
          "type": "Symmetrical",
          "upperValue": 2.14
        }
      },
      "type": "Onshape::Dimension::PointToPoint"
    }
  ]
}
Add a dimension with a basic tolerance
Export a Drawing to JSON to obtain the IDs of the edges and views.
Endpoint
POST /drawings/d/did/w/wid/e/eid/modify
Request Body
{
  "messageName": "onshapeCreateAnnotations",
  "formatVersion": "2021-01-01",
  "annotations": [
    {
      "lineToLineDimension": {
        "edge1": {
          "deterministicId": "JIV",
          "type": "Onshape::Reference::Edge",
          "uniqueId": "F4245",
          "viewId": "2b2608befce5281dc1f651e9"
        },
        "edge2": {
          "deterministicId": "JJV",
          "type": "Onshape::Reference::Edge",
          "uniqueId": "F4243",
          "viewId": "2b2608befce5281dc1f651e9"
        },
        "rotation": 0,
        "textOverride": "",
        "textPosition": {
          "coordinate": [
            4.731016024253847,
            3.189199999999999,
            0
          ],
          "type": "Onshape::Reference::Point"
        },
        "tolerance": {
          "type": "Basic"
        }
      },
      "type": "Onshape::Dimension::LineToLine"
    }
  ]
}
Add a dimension with a deviation tolerance
Export a Drawing to JSON to obtain the IDs to specify.
Endpoint
POST /drawings/d/did/w/wid/e/eid/modify
Request Body
{
  "messageName": "onshapeCreateAnnotations",
  "formatVersion": "2021-01-01",
  "annotations": [
    {
      "pointToPointDimension": {
        "point1": {
          "coordinate": [
            -0.022788484925716308,
            0.06710318401608836,
            0.004825999999999999
          ],
          "deterministicId": "JIV",
          "snapPointType": "ModeEnd",
          "type": "Onshape::Reference::Point",
          "uniqueId": "F4245",
          "viewId": "2b2608befce5281dc1f651e9"
        },
        "point2": {
          "coordinate": [
            0.0648385151257165,
            0.06710318401608836,
            0.004825999999999999
          ],
          "deterministicId": "JIV",
          "snapPointType": "ModeStart",
          "type": "Onshape::Reference::Point",
          "uniqueId": "F4245",
          "viewId": "2b2608befce5281dc1f651e9"
        },
        "rotation": 0,
        "textPosition": {
          "coordinate": [
            6.379999999999999,
            9.903619353521464,
            0
          ],
          "type": "Onshape::Reference::Point"
        },
        "tolerance": {
          "lowerValue": 1.52,
          "type": "Deviation",
          "upperValue": 4.25
        }
      },
      "type": "Onshape::Dimension::PointToPoint"
    }
  ]
}
Add a dimension with a limit tolerance
Export a Drawing to JSON to obtain the IDs to specify.
Endpoint
POST /drawings/d/did/w/wid/e/eid/modify
Request Body
{
  "messageName": "onshapeCreateAnnotations",
  "formatVersion": "2021-01-01",
  "annotations": [
    {
      "pointToPointDimension": {
        "point1": {
          "coordinate": [
            -0.022788484925716308,
            0.06710318401608836,
            0.004825999999999999
          ],
          "deterministicId": "JIV",
          "snapPointType": "ModeEnd",
          "type": "Onshape::Reference::Point",
          "uniqueId": "F4245",
          "viewId": "2b2608befce5281dc1f651e9"
        },
        "point2": {
          "coordinate": [
            0.0648385151257165,
            0.06710318401608836,
            0.004825999999999999
          ],
          "deterministicId": "JIV",
          "snapPointType": "ModeStart",
          "type": "Onshape::Reference::Point",
          "uniqueId": "F4245",
          "viewId": "2b2608befce5281dc1f651e9"
        },
        "rotation": 0,
        "textPosition": {
          "coordinate": [
            6.379999999999999,
            9.492751572521588,
            0
          ],
          "type": "Onshape::Reference::Point"
        },
        "tolerance": {
          "lowerValue": 2.5,
          "type": "Limit",
          "upperValue": 4.5
        }
      },
      "type": "Onshape::Dimension::PointToPoint"
    }
  ]
}
Add a dimension with a minimum tolerance
Export a Drawing to JSON to obtain the IDs to specify.
Endpoint
POST /drawings/d/did/w/wid/e/eid/modify
Request Body
{
  "messageName": "onshapeCreateAnnotations",
  "formatVersion": "2021-01-01",
  "annotations": [
    {
      "pointToPointDimension": {
        "point1": {
          "coordinate": [
            -0.022788484925716308,
            0.06710318401608836,
            0.004825999999999999
          ],
          "deterministicId": "JIV",
          "snapPointType": "ModeEnd",
          "type": "Onshape::Reference::Point",
          "uniqueId": "F4245",
          "viewId": "2b2608befce5281dc1f651e9"
        },
        "point2": {
          "coordinate": [
            0.0648385151257165,
            0.06710318401608836,
            0.004825999999999999
          ],
          "deterministicId": "JIV",
          "snapPointType": "ModeStart",
          "type": "Onshape::Reference::Point",
          "uniqueId": "F4245",
          "viewId": "2b2608befce5281dc1f651e9"
        },
        "textPosition": {
          "coordinate": [
            6.379999999999999,
            9.61398841181059,
            0
          ],
          "type": "Onshape::Reference::Point"
        },
        "tolerance": {
          "type": "MIN"
        }
      },
      "type": "Onshape::Dimension::PointToPoint"
    }
  ]
}
Add a dimension with a maximum tolerance
Export a Drawing to JSON to obtain the IDs to specify.
Endpoint
POST /drawings/d/did/w/wid/e/eid/modify
Request Body
{
  "messageName": "onshapeCreateAnnotations",
  "formatVersion": "2021-01-01",
  "annotations": [
    {
      "pointToPointDimension": {
        "point1": {
        "coordinate": [
            -0.022788484925716308,
            0.06710318401608836,
            0.004825999999999999
          ],
          "deterministicId": "JIV",
          "snapPointType": "ModeEnd",
          "type": "Onshape::Reference::Point",
          "uniqueId": "F4245",
          "viewId": "2b2608befce5281dc1f651e9"
        },
        "point2": {
          "coordinate": [
            0.0648385151257165,
            0.06710318401608836,
            0.004825999999999999
          ],
          "deterministicId": "JIV",
          "snapPointType": "ModeStart",
          "type": "Onshape::Reference::Point",
          "uniqueId": "F4245",
          "viewId": "2b2608befce5281dc1f651e9"
        },
        "textPosition": {
          "coordinate": [
            2.6531471291300536,
            6.378399999999999,
            0
          ],
          "type": "Onshape::Reference::Point"
        },
        "tolerance": {
          "type": "MAX"
        }
      },
      "type": "Onshape::Dimension::PointToPoint"
    }
  ]
}
Add a dimension with a fit class tolerance
You can add three types of fit class tolerance to a dimension (Fit | FitWithTolerance | FitToleranceOnly):
{
  "tolerance": {
    "fitType": "Clearance | Transition | Interference | Userdefined",
    "holeClass": "H8",
    "precision": 6,
    "shaftClass": "e7",
    "type": "Fit | FitWithTolerance | FitToleranceOnly"
  }
}
Endpoint
POST /drawings/d/did/w/wid/e/eid/modify
Request Body
{
  "messageName": "onshapeCreateAnnotations",
  "formatVersion": "2021-01-01",
  "annotations": [
    {
      "lineToLineDimension": {
        // ...
        "tolerance": {
          "fitType": "Clearance",
          "holeClass": "H8",
          "precision": 6,
          "shaftClass": "e7",
          "type": "FitWithTolerance"
        }
      },
      "type": "Onshape::Dimension::LineToLine"
    }
  ]
}
If editing an existing dimension, export the Drawing to JSON to obtain the dimension’s logical ID.
{
  "messageName": "onshapeEditAnnotations",
  "formatVersion": "2021-01-01",
  "annotations": [
    {
      "pointToPointDimension": {
        "logicalId": "h:10000675",
        "tolerance": {
          "fitType": "Interference",
          "holeClass": "H7",
          "precision": 6,
          "shaftClass": "f6",
          "type": "FitToleranceOnly"
        }
      },
      "type": "Onshape::Dimension::PointToPoint"
    }
  ]
}
Add a tolerance to an existing dimension
Export a Drawing to JSON to obtain the dimension’s logical ID.
Endpoint
POST /drawings/d/did/w/wid/e/eid/modify
Request Body
{
  "messageName": "onshapeEditAnnotations",
  "formatVersion": "2021-01-01",
  "annotations": [
    {
    "pointToPointDimension": {
      "logicalId": "h:10000A0A",
      "tolerance": {
        "lowerValue": 2.14000001,
        "type": "Deviation",
        "upperValue": 2.140000001
      }
    },
    "type": "Onshape::Dimension::PointToPoint"
    }
  ]
}
Edit a dimension tolerance type
Export a Drawing to JSON to obtain the dimension’s logical ID.
Endpoint
POST /drawings/d/did/w/wid/e/eid/modify
Request Body
{
  "messageName": "onshapeEditAnnotations",
  "formatVersion": "2021-01-01",
  "annotations": [
    {
    "lineToLineDimension": {
      "logicalId": "h:10000A3D",
      "tolerance": {
        "type": "None"
      }
    },
    "type": "Onshape::Dimension::LineToLine"
    }
  ]
}
Examples - Other
Find dangling entities
To identify dangling entities, you can export a drawing to JSON and search for any entities where isDangling is set to true.
- Make a copy of this public document so you can export the drawing. Make a note of the document ID, workspace ID, and element ID of the drawing in your new document. These will be your
{did},{wid}, and{eid}fields for this example, unless otherwise specified.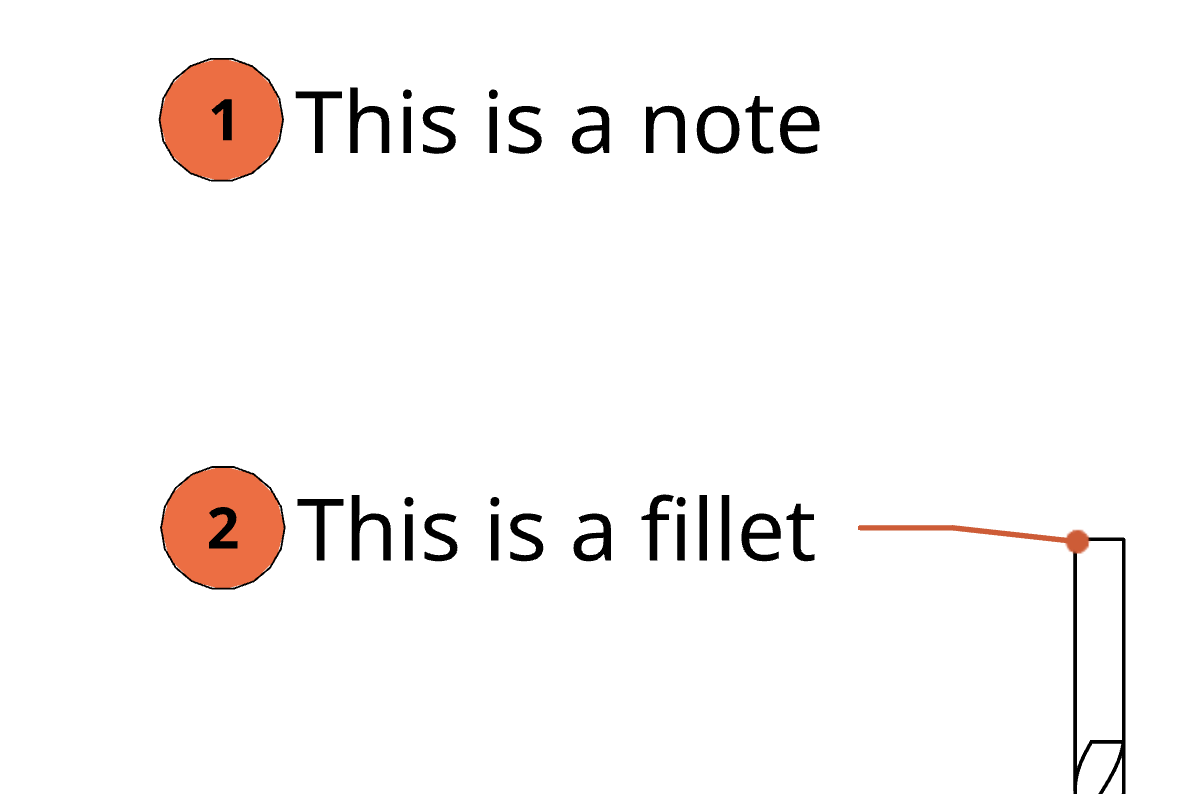 When this drawing was created, the drill bit part included a fillet. That fillet has since been deleted, so the attached note (
This is a fillet) and inspection item (2) are now dangling. Since this is a simple drawing with only a few annotations, it is easy to visually identify the dangling entities. However, in large or complex drawings, it can be helpful to obtain a list of dangling entities from the JSON export. - Use the createDrawingTranslation endpoint to export the drawing to JSON. See the Export a Drawing to JSON tutorial for help. Your call should look like this:
curl -X 'POST' \ 'https://cad.onshape.com/api/v10/drawings/d/{did}/w/{wid}/e/{eid}/translations' \ -H 'Accept: application/json;charset=UTF-8; qs=0.09' \ -H 'Authorization: Basic CREDENTIALS' \ -H 'Content-Type: application/json;charset=UTF-8; qs=0.09' \ -d '{ "formatName": "DRAWING_JSON" }' - Open the
DRILL_BIT.jsonfile from your document or by calling the BlobElement/downloadFileWorkspace endpoint on the new JSON element. - In the JSON, search for the
isDanglingfield. You’ll see that the first two annotations (This is a noteand inspection symbolnumber: 1.0) are not dangling.{ "note": { "contents": "{\\pxql;This is a note}", "isDangling": false, "logicalId": "h:100000EA", "position": { "coordinate": [ 1.9878571202278066, 7.1981053727755056, 0.0 ], "type": "Onshape::Reference::Point" }, "textHeight": 0.12 }, "type": "Onshape::Note" }, { "inspectionSymbol": { "borderShape": "Circle", "borderSize": 2.0, "isDangling": false, "itemParsing": "eByRow", "logicalId": "h:100000EB", "number": 1.0, "parentAnnotation": "h:100000EA", "parentLineIndex": 0, "position": { "coordinate": [ 1.8438571202278065, 7.135399026040281, 0.0 ], "type": "Onshape::Reference::Point" }, "textHeight": 0.08 }, "type": "Onshape::InspectionSymbol" }
If you scroll further, however, you’ll see that the next set of annotations (This is a fillet and inspection symbol number: 2.0) have isDangling set to true. These annotations are dangling and must be corrected in the drawing.
  {
    "note": {
        "contents": "{\\pxqr;This is a fillet}",
        "isDangling": true,
        "leaderPosition": {
            "coordinate": [
                -0.0054142135623728715,
                0.24941421356237314,
                1.496198998029996e-17
            ],
            "snapPointType": "ModeMid",
            "type": "Onshape::Reference::Point",
            "uniqueId": "F426D",
            "viewId": "4868551da0b69cd0712723ae"
        },
        "logicalId": "h:100000EF",
        "position": {
            "coordinate": [
                2.995234893572328,
                6.3423785618475375,
                0.0
            ],
            "type": "Onshape::Reference::Point"
        },
        "textHeight": 0.12
    },
    "type": "Onshape::Note"
},
{
    "inspectionSymbol": {
        "borderShape": "Circle",
        "borderSize": 2.0,
        "isDangling": true,
        "itemParsing": "eByRow",
        "logicalId": "h:100000F7",
        "number": 2.0,
        "parentAnnotation": "h:100000EF",
        "parentLineIndex": 0,
        "position": {
            "coordinate": [
                1.8469297164606113,
                6.342509182410414,
                0.0
            ],
            "type": "Onshape::Reference::Point"
        },
        "textHeight": 0.08
    },
    "type": "Onshape::InspectionSymbol"
  }
- In the drawing, select the dangling note and inspection symbol, and press the
deletekey. - Repeat steps 2 through 4 above for the updated drawing. Notice that all
isDanglingfields are now set tofalse.
📘 Note
Not all drawing objects support the
isDanglingfield. If theisDanglingfield is not returned for an object or annotation in your drawing, no conclusions can be drawn from the API about the dangling status of the object.
Export a drawing to JSON
In this example, we’ll export a drawing from this public document to JSON. Exporting a Drawing to JSON is useful when you need to gather information about that drawing (for example, finding valid coordinates on which to place an inspection symbol).
📘 Notes
- Notes are exported with RTF15 formatting.
- Flags are not currently exported with notes.
- Geometric tolerance frame fields are separated with
%%v.- Geometric tolerance prefix and suffix fields are currently not exported.
Make a copy of this public document so you can export the drawing. Make a note of the documentId, workspaceId, and elementId of the drawing in your new document. These will be your
{did},{wid}, and{eid}fields for this example, unless otherwise specified.Validate that JSON is a supported export file type for Drawings by calling Drawing/getDrawingTranslatorFormats and confirming that
"name": "DRAWING_JSON"appears in the response for the drawing element in your copied document.
requestcurl -X 'GET' \ 'https://cad.onshape.com/api/v6/drawings/d/{did}/w/{wid}/e/{eid}/translationformats' \ -H 'accept: application/json;charset=UTF-8; qs=0.09' \ -H 'Authorization: Basic CREDENTIALS'response
[
  {
    "name": "DRAWING_JSON",
    "translatorName": "drawing_json",
    "couldBeAssembly": false
  },
  ...
]
Initialize the export by calling Drawing/createDrawingTranslation. Replace
{did},{wid}, and{eid}with the document, workspace, and element IDs from your copied document. Do NOT include the curly braces ({}) in the final call.curl -X 'POST' \ 'https://cad.onshape.com/api/v6/drawings/d/{did}/w/{wid}/e/{eid}/translations' \ -H 'accept: application/json;charset=UTF-8; qs=0.09' \ -H 'Authorization: Basic CREDENTIALS' \ -H 'Content-Type: application/json;charset=UTF-8; qs=0.09' \ -d '{ "formatName": "DRAWING_JSON" }'- Note that the API takes a JSON as part of the request body, in which you can specify options for the export.
- The only required JSON field is
formatName, in which we’ve specified the format as found in thegetDrawingTranslatorFormatsresponse body. - The
formatNamevalue must match thenamefield from the previous step exactly, including casing.
In the response, copy the
translationIdvalue from theidfield. This is the ID of the translation itself.{ "requestState": "ACTIVE", "requestElementId": "{eid}", "resultExternalDataIds": null, "versionId": null, "workspaceId": "{wid}", "documentId": "{did}", "resultElementIds": null, "resultDocumentId": "{did}", "failureReason": null, "resultWorkspaceId": "{wid}", "name": "GEARBOX_CHUCK", "id": "{translationId}", "href": "https://cad.onshape.com/api/v9/translations/{translationId}" }Next, poll the Translation/getTranslation response until
requestStatechanges fromACTIVEtoDONEorFAILED.{ "requestState": "DONE", "requestElementId": "{eid}", "resultExternalDataIds": {resultElementId}, "versionId": null, "workspaceId": "{wid}", "documentId": "{did}", "resultElementIds": {resultElementId}, "resultDocumentId": "{did}", "failureReason": null, "resultWorkspaceId": "{wid}", "name": "GEARBOX_CHUCK", "id": "{translationId}", "href": "https://cad.onshape.com/api/v9/translations/{translationId}" }Once
requestState=DONE, the JSON is uploaded to the Onshape document in a new element (tab). The element ID of the JSON blob will either appear in theresultExternalDataIdsorresultElementIdsfield in the response.Now, we can call BlobElement/downloadFileWorkspace to retrieve the exported results.
curl -X 'GET' \ 'https://cad.onshape.com/api/v6/blobelements/d/{did}/w/{wid}/e/{resultElementId}' \ -H 'Authorization: Basic CREDENTIALS' \ -H 'accept: application/octet-stream'- Use the
{resultElementId}value from the translation response as the element ID. Do not include the curly braces in your call. - Note that you can also open your document, click the
GEARBOX_CHUCK.JSONtab, and download the file from there.
- Use the
Find bounding box details
- Export a drawing to JSON.
- For each bounding box in the drawing, the response includes a
boundingBoxPointsfield that specifies the box coordinates.
Additional Resources
- Guide to Onshape APIs
- [Guide to the API Explorer](/ docs/api-intro/explorer)
- API Explorer: Drawings
- Onshape Help: Drawings