API Explorer
We document all available Onshape REST API endpoints in our Glassworks API Explorer:
https://cad.onshape.com/glassworks/explorer/
Videos & Courses
You can also watch our API Explorer instructional video below, or view the full course content in the Onshape Learning Center. Additional example videos are embedded throughout this page.
Glassworks API Explorer
Video Key Takeaways
- Onshape API endpoints are accessible through the Glassworks API Explorer.
- Glassworks endpoints are organized into sections.
- Glassworks allows GET, POST, and DELETE requests.
Authenticate
You can authenticate in the API Explorer in one of three ways:
- Onshape:
- Open Onshape in a new tab in your browser.
- Sign in with your Onshape credentials. Onshape will pass your credentials to the API Explorer.
- API Keys:
- Click Authorize in the top-right of the API Explorer page and scroll to the bottom of the dialog.

- Provide your API access key in the Username field and your secret key in the Password field. See API Keys for help creating your API Keys. Do NOT enter your Onshape credentials.
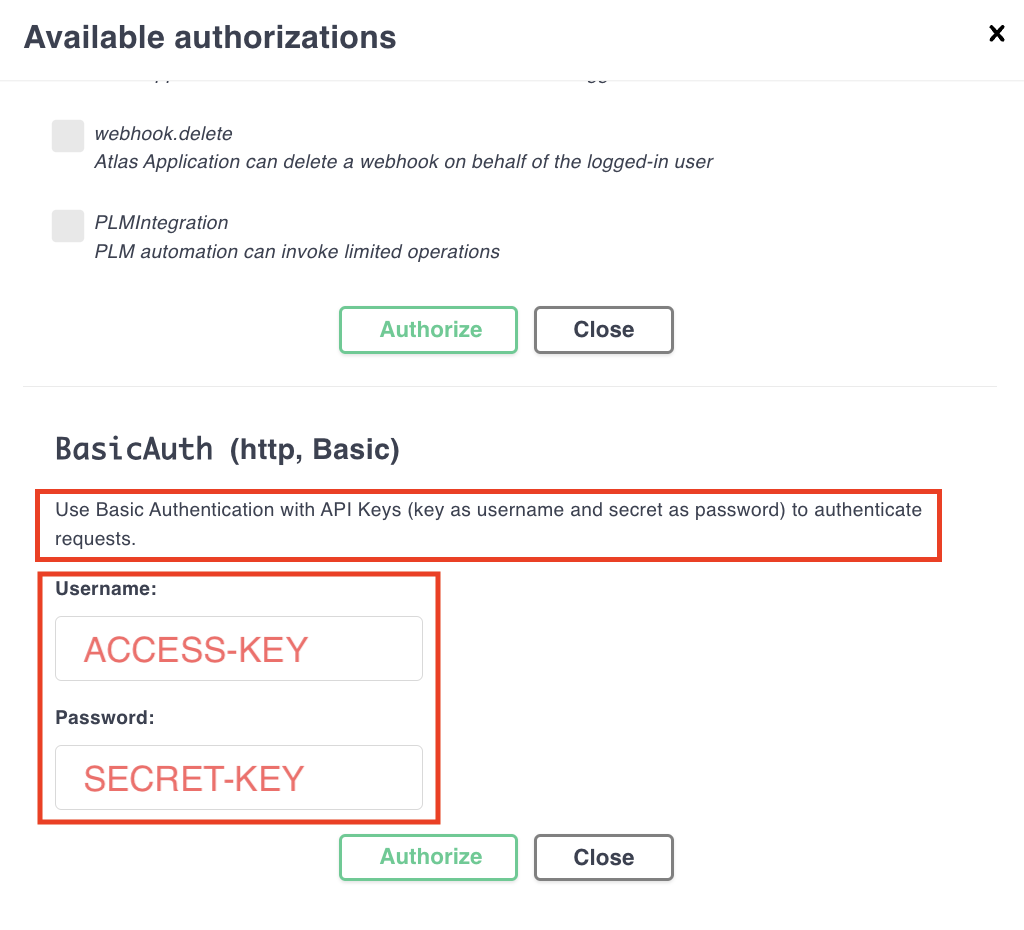
- Click Authorize, and then click Close.
- Click Authorize in the top-right of the API Explorer page and scroll to the bottom of the dialog.
- Oauth:
- Click Authorize in the top-right of the API Explorer page.

- Fill out the OAuth fields. See OAuth for more information on authenticating with OAuth2.
- Click Authorize, and then click Close.
- Click Authorize in the top-right of the API Explorer page.
Make a GET request
This API Explorer site enables you to run API requests directly within its interface and provides the output from the API call. To try an endpoint in the API Explorer, follow these steps or follow along with the video below:
- Open this public Onshape document in your browser: https://cad.onshape.com/documents/e60c4803eaf2ac8be492c18e/w/d2558da712764516cc9fec62/e/6bed6b43463f6a46a37b4a22
- Open the API Explorer in a new browser tab: https://cad.onshape.com/glassworks/explorer/
- Note: For Enterprise accounts, substitute
cadin this URL with your company name.
- Note: For Enterprise accounts, substitute
- Scroll down to Document.
- Click to expand the
getDocumentendpoint. (Hint: it appears in the API Ref asGET /documents/{did}). - Go back to the public document you opened in Step 2, and copy the document ID from the Onshape URL (
e60c4803eaf2ac8be492c18e).
- Paste the document ID into the
didfield in the API Explorer.- Note: If you can’t edit the
didfield, click the Try it out button. This will toggle to a Cancel button when the fields are editable.
- Note: If you can’t edit the
- Scroll down and click Execute.
- Note: If you receive a
403error, see the Authenticate section for help.
- Note: If you receive a
- Scroll to the bottom of the 200 response body. We have correctly returned
Onshape API Guideas the document name.
IMPORTANT NOTE: The documentation in the API Explorer reflects the supported interface. Some API calls may, for historical reasons, return additional undocumented fields. Unless the return fields are documented in the API Explorer, you should NOT use them, as they may be removed without warning. Your application should always ignore unexpected or undocumented return data. Onshape reserves the right to add, remove or change any undocumented fields.
Video example: GET Request
Video Key Takeaways
- A GET request to the
/documents/{did}will contain a lot of information about the particular document. - The thumbnail section contains thumbnail images of the document in several different sizes.
- Document ID for this example:
7f718ac6ad66ac140097429b
Make a POST request
- Make a copy of this public document, and make a note of the copied document and workspace IDs in the URL.
- In the Glassworks API Explorer, expand the createAssembly endpoint. Note that in addition to URL parameters, this endpoint takes a request body. Like in the GET request, the URL parameters tell Onshape which document you’re working with. But instead of returning information about the document in the response, we will POST the data in the request body to the document.
- Enter the document ID from your copied document into the
didfield. - Enter the workspace ID from your copied document into the
widfield. - In the request body, specify a name for your Assembly by supplying a string in the
namefield. In this example, we’ll call itmyNewAssembly.{ "name": "myNewAssembly" }
- Enter the document ID from your copied document into the
- Click Execute.
- Note: If you receive a
403error, see the Authenticate section for help.
- Note: If you receive a
- Return to your copied document and observe that the new assembly tab has been added.
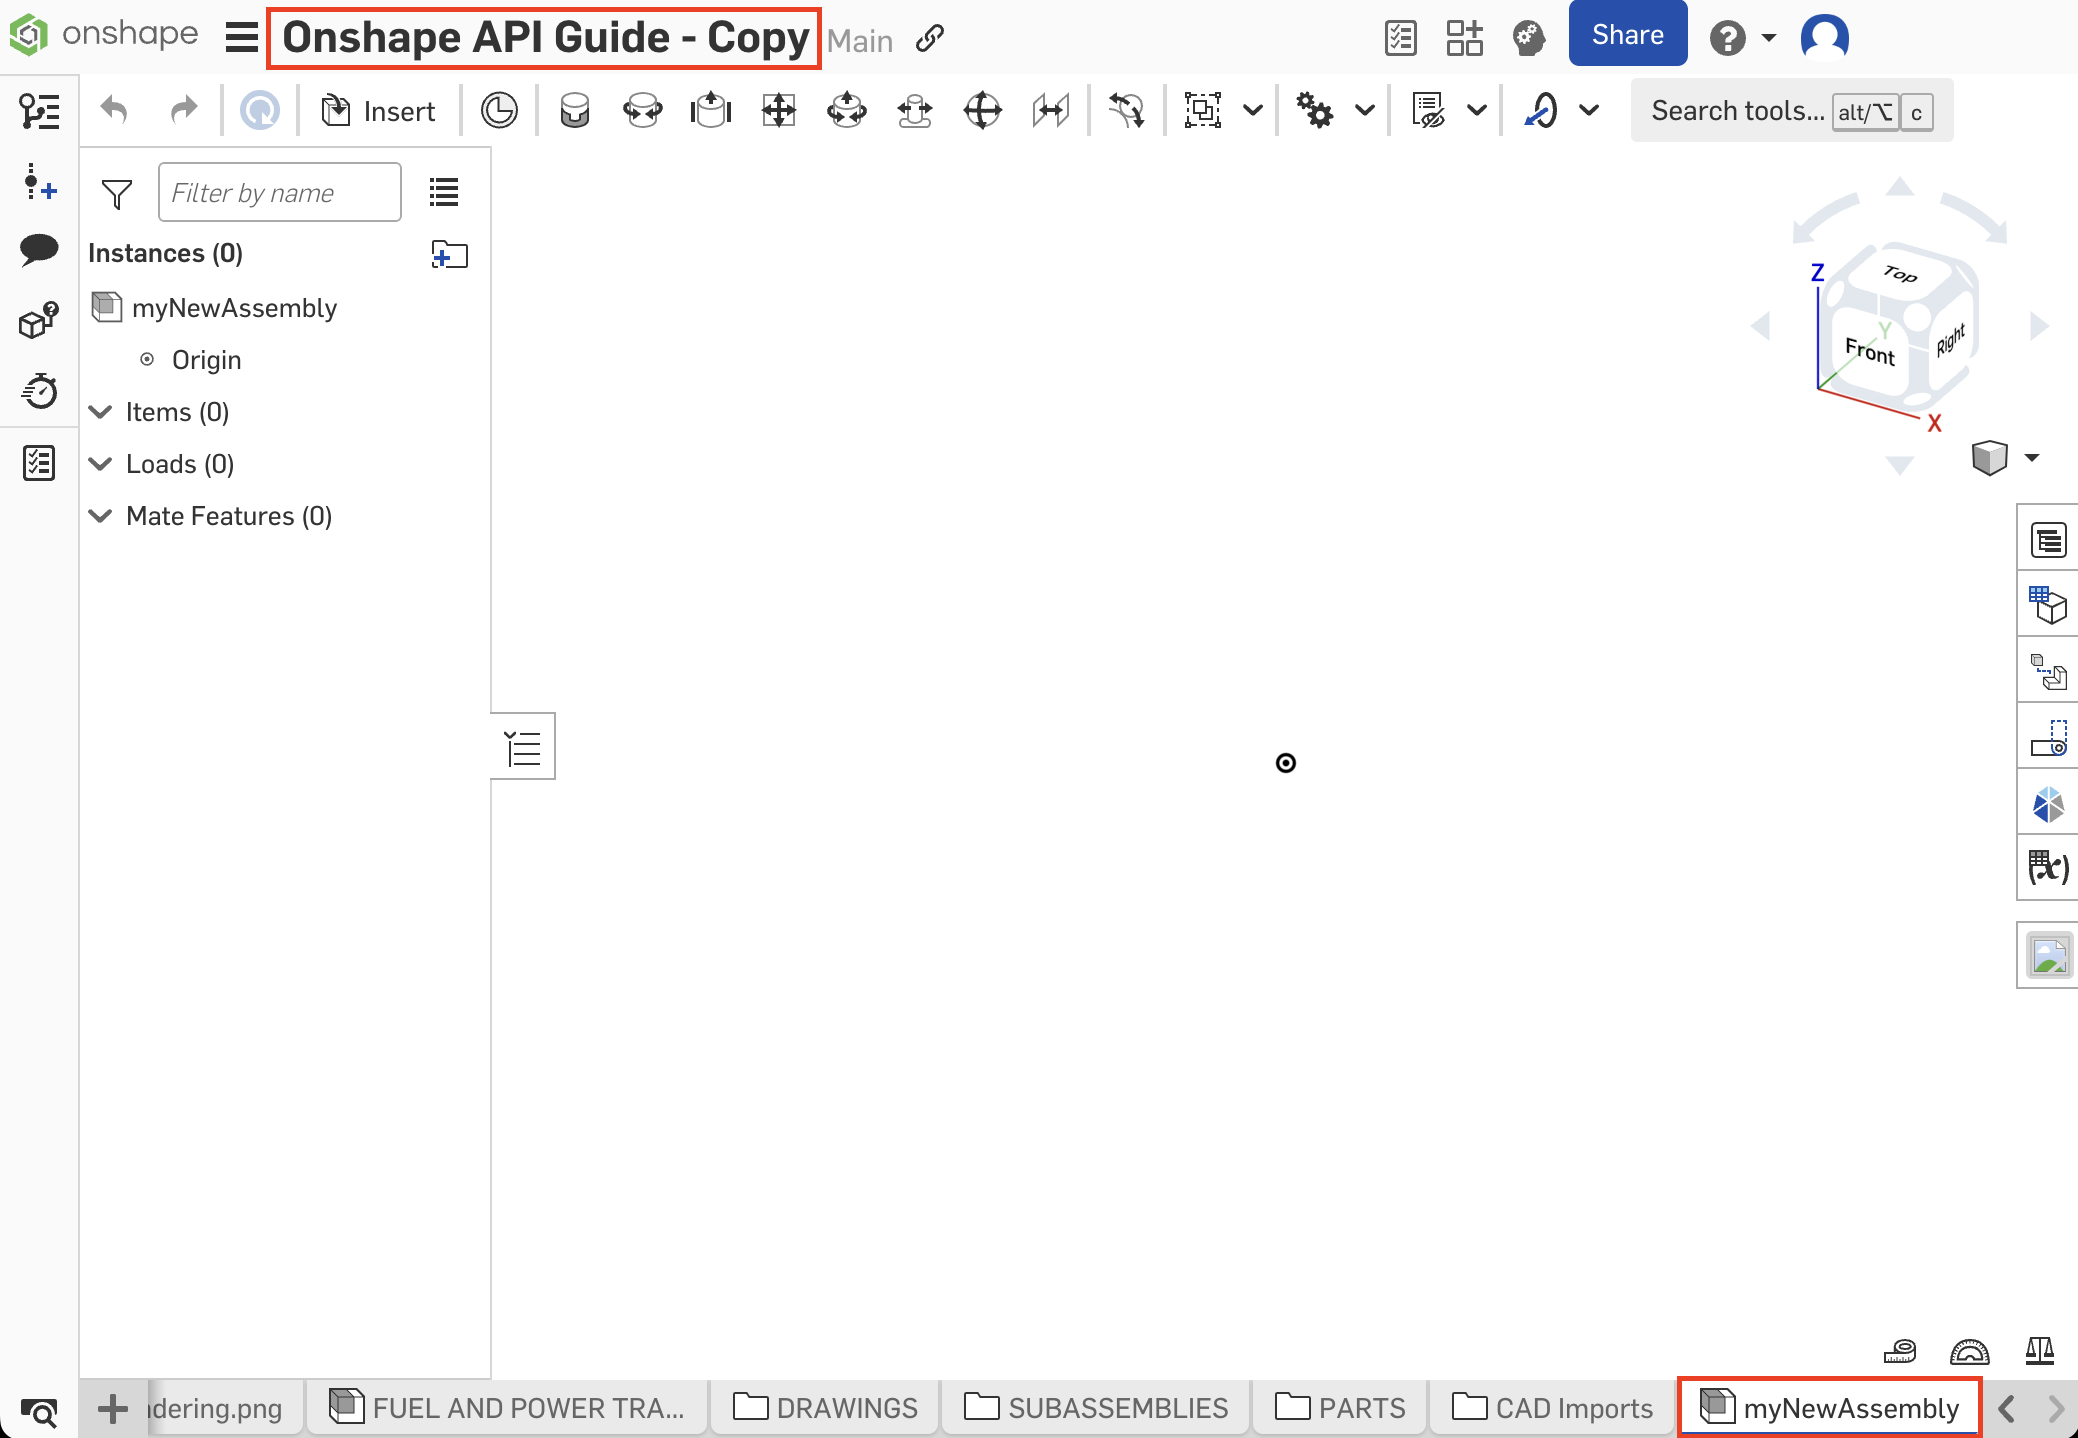
Video example: POST Request
Video Key Takeaways
- POST requests send data to the Onshape servers with the intent of updating information.
- POST requests usually include data in JSON format, sent in the request body.
Use the Auto-fill feature
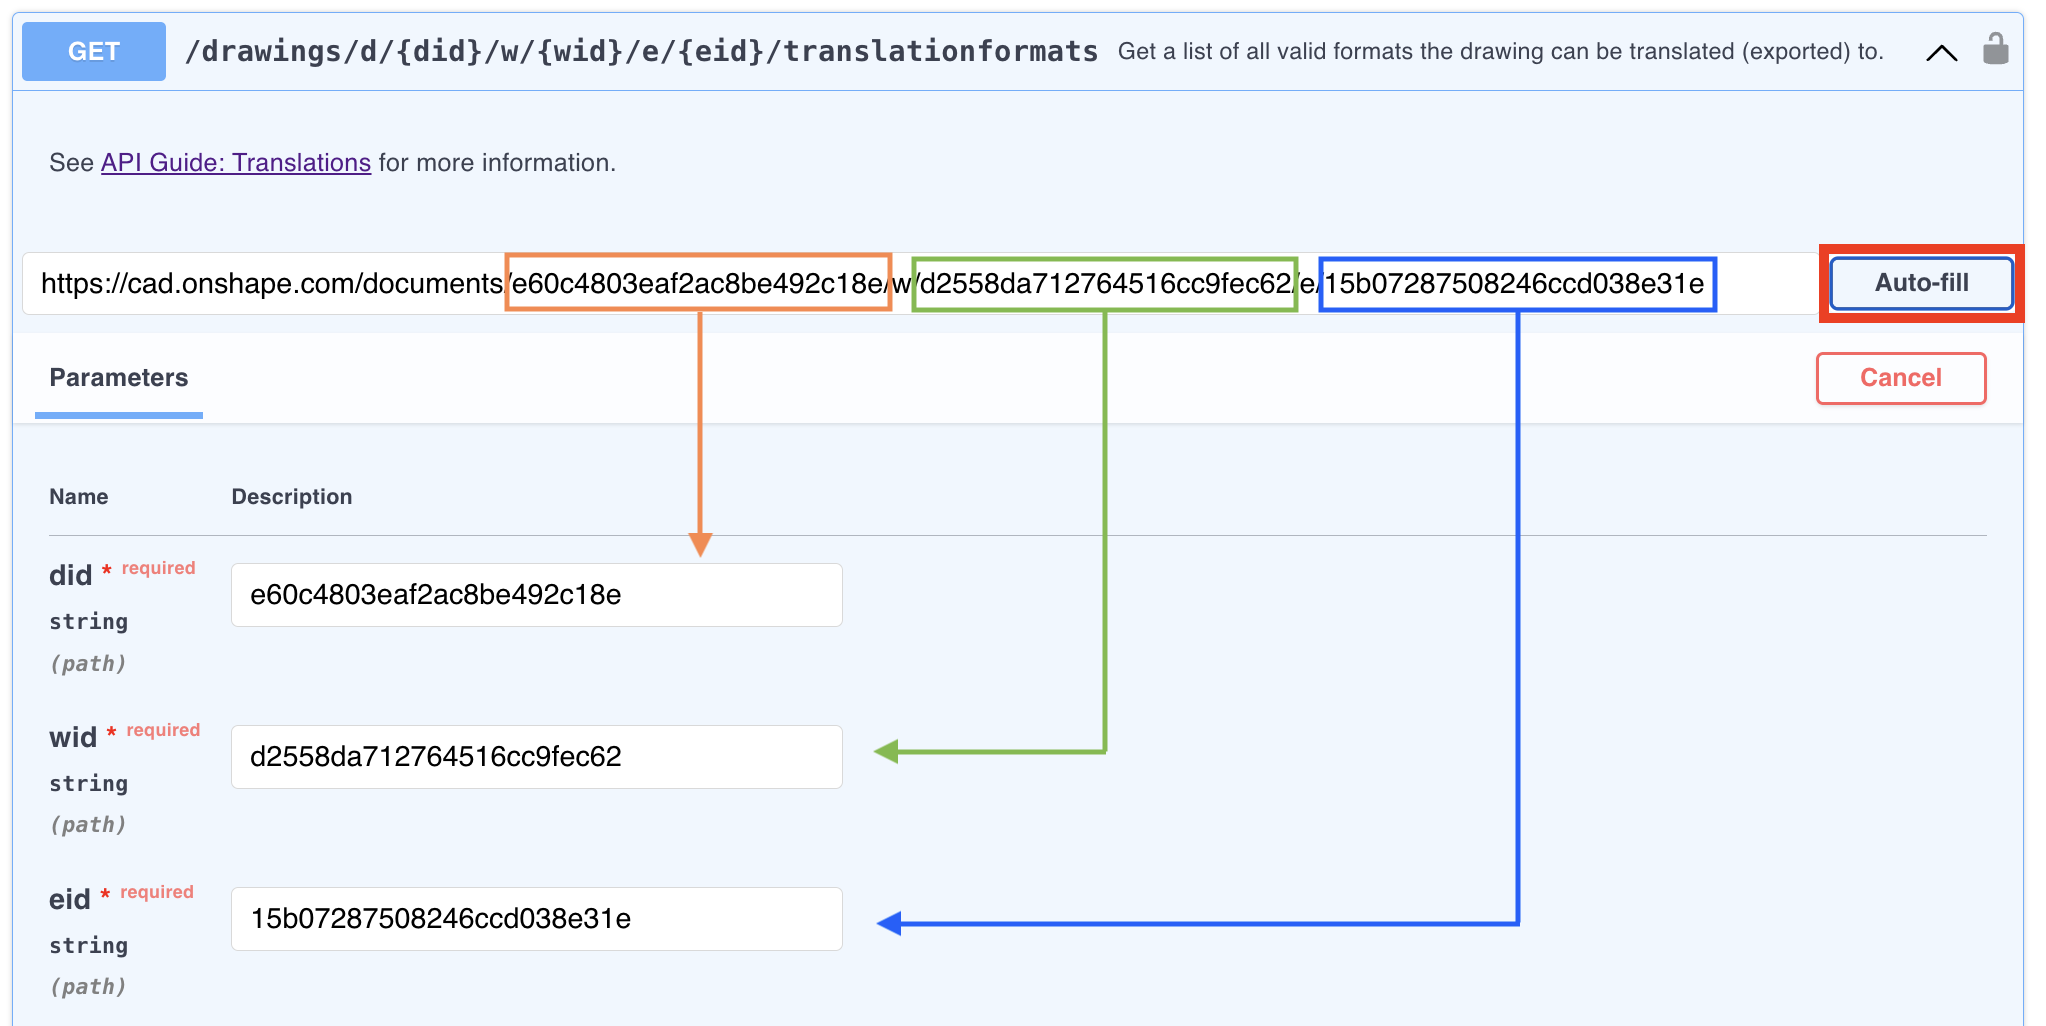
- Copy the URL of this drawing: https://cad.onshape.com/documents/e60c4803eaf2ac8be492c18e/w/d2558da712764516cc9fec62/e/15b07287508246ccd038e31e
- Expand the getDrawingTranslatorFormats endpoint in the API Explorer.
- Paste the URL into the
Onshape URLfield. - Click Auto-fill. The document ID, workspace ID, and element ID are pushed from the URL into the correct fields.
- Confirm all fields are filled out as expected. Not every parameter can be extracted from an Onshape URL, so there may be more fields to fill out.
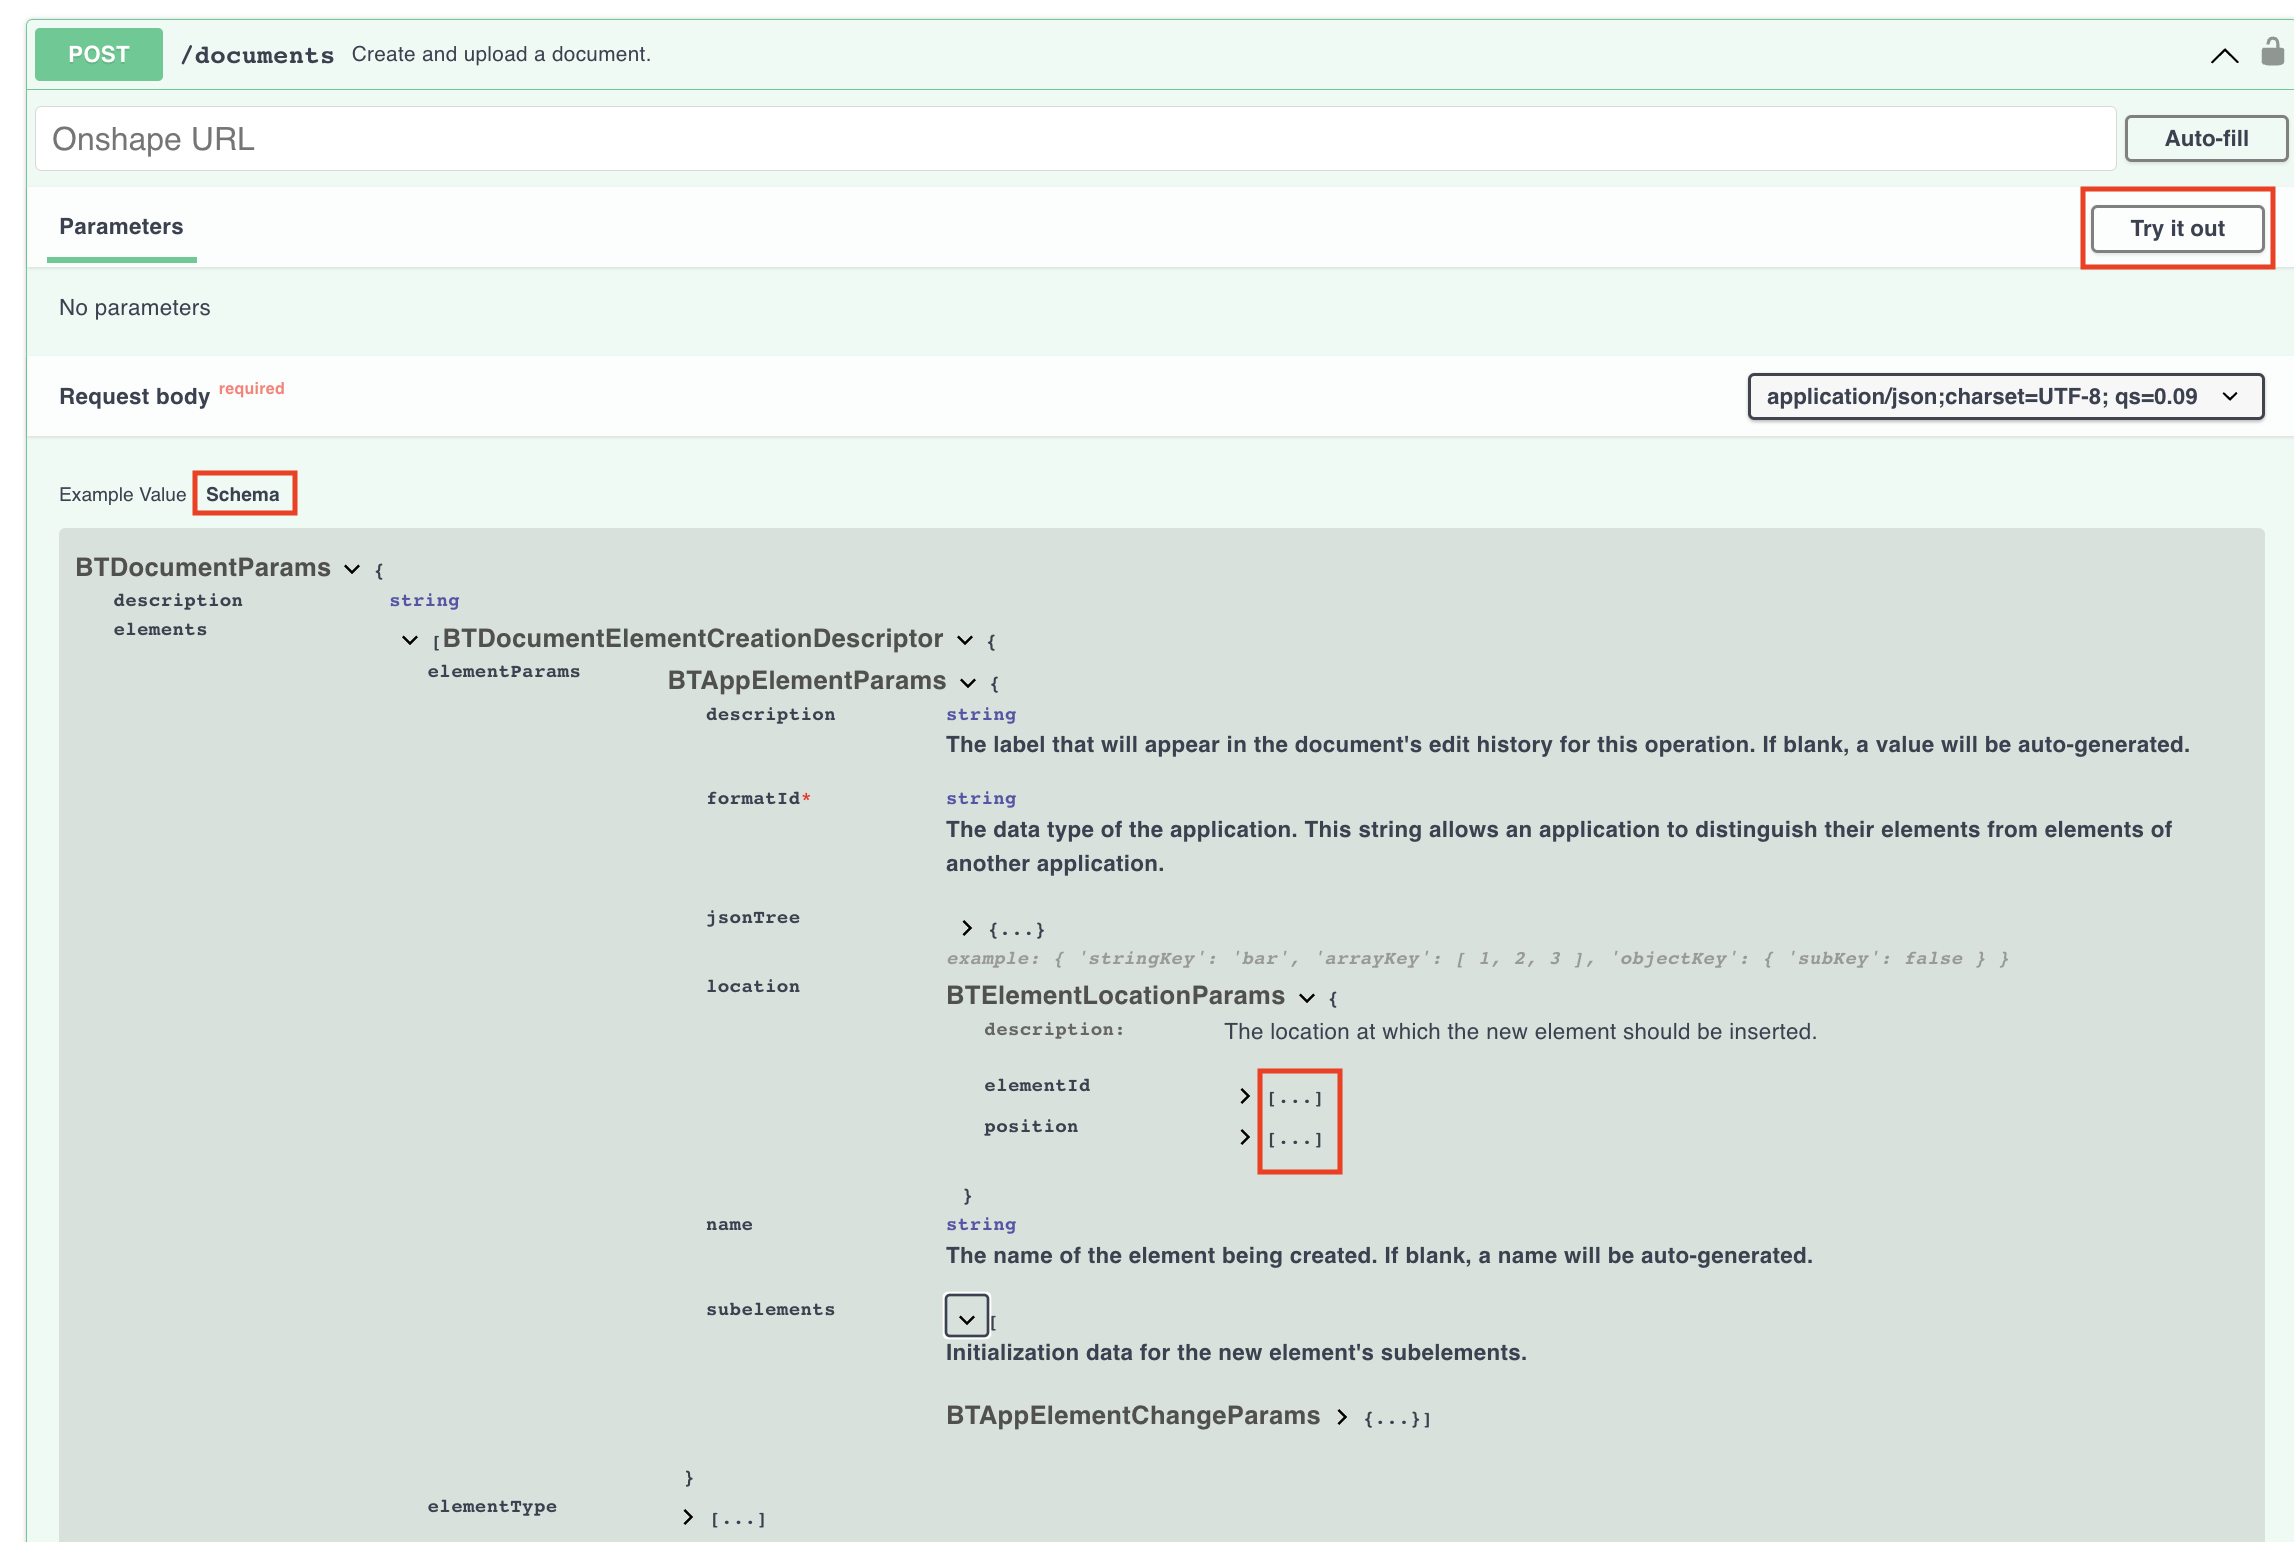
View response body docs
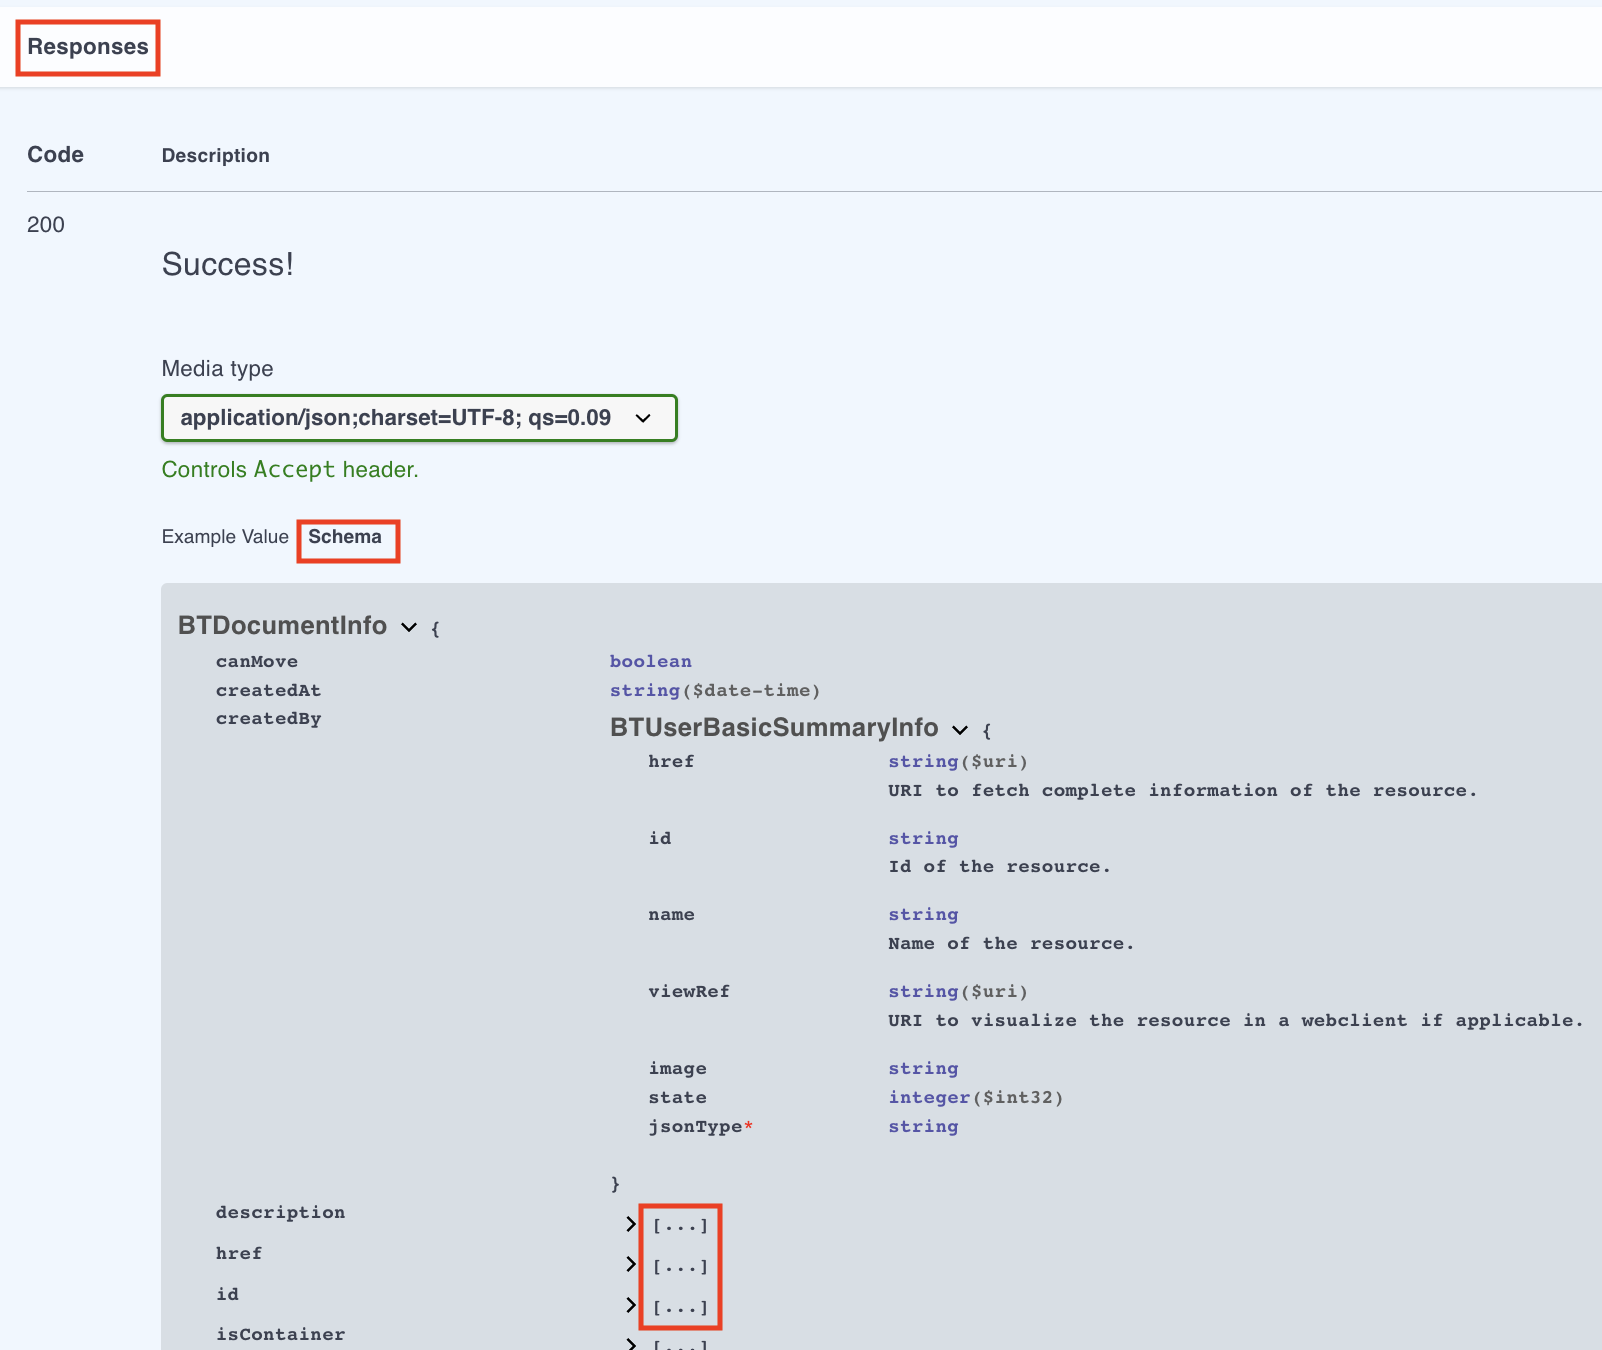
- Expand the endpoint you want to use the in API Explorer.
- Scroll down to the Responses section.
- Click Schema.
- Click the
[...]symbols to expand the docs for the response JSON.
View request body docs
- Expand the endpoint you want to use the in API Explorer.
- Click the Cancel button to make the schema viewable.
- Click Schema.
- Click the
[...]symbols to expand the docs for the response JSON.
Copy a cURL
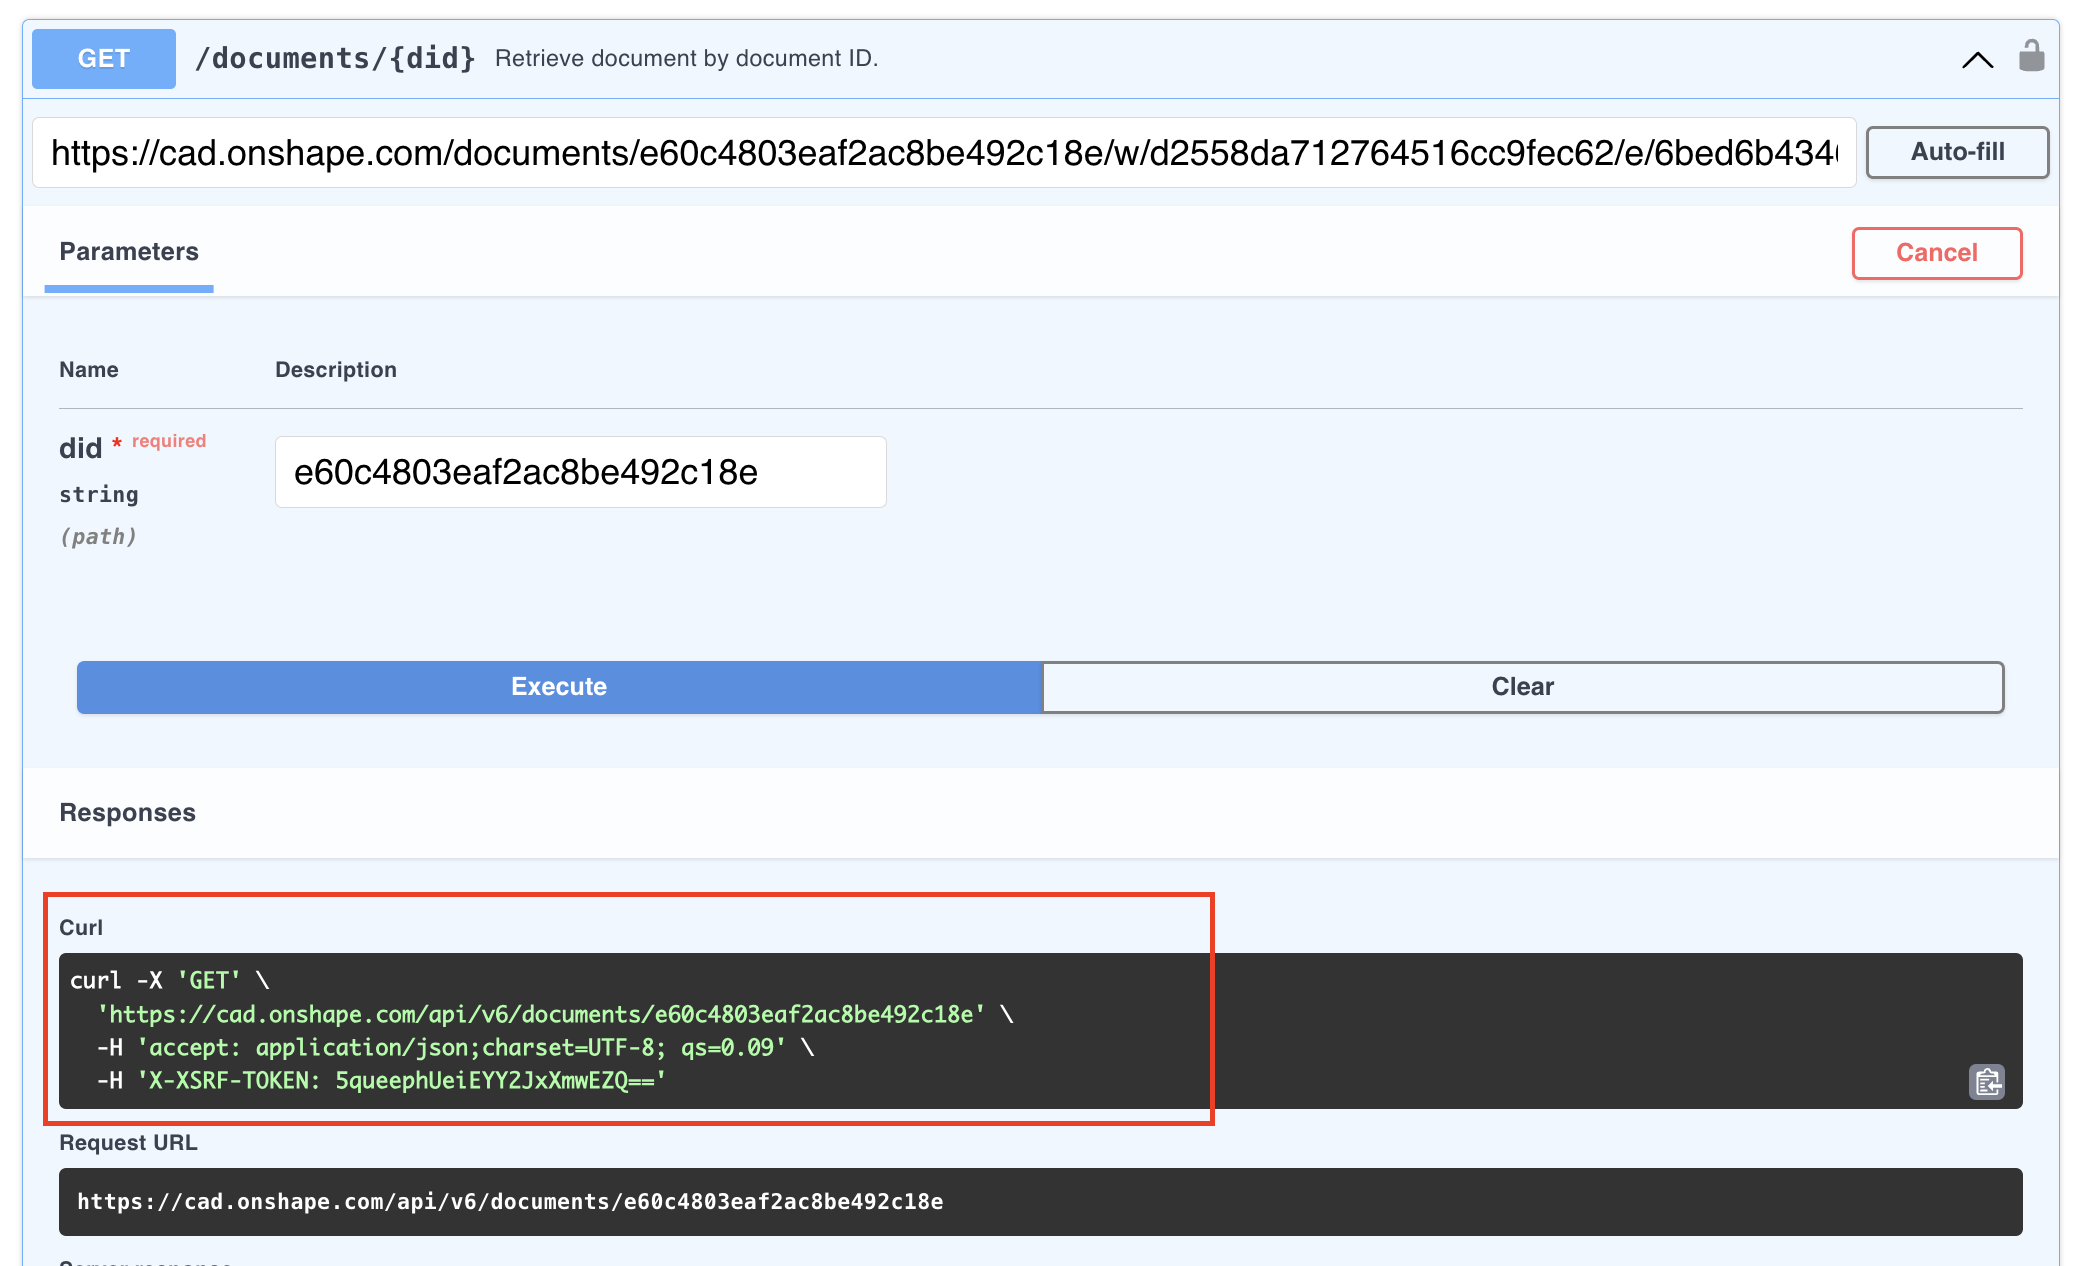
- Expand the endpoint you want to use in the API Explorer.
- Fill out the parameter fields.
- Click Execute in the API Explorer.
- Copy the curl from the Curl field.
Troubleshooting
- If the parameter fields in the API Explorer are grayed out, click the Try it Out! button to toggle it to a Cancel button. The parameter fields should become editable.
- If you can’t see the request body JSON docs, click the Cancel button to toggle it back to the Try it Out! button.
- If you see authentication issues, review the Authenticate section above.