API Keys
📘 Note
All applications submitted to the Onshape App Store (Onshape Apps) must follow the instructions on the OAuth2 page and use OAuth2 for authorization. Automation scripts (or applications not meant for the Onshape App Store) may use either OAuth2 or API Keys for authentication. OAuth2 allows applications to call Onshape APIs on behalf of the users of the application; API keys will only perform operations on behalf of the Onshape user who generated the API keys.
API keys are useful for small applications meant for personal use, allowing developers to avoid the overhead of the OAuth workflow. Creating an app is very easy with API keys: create an API key with the Developer Portal, set up a function to build your API key header as in the samples, and make your API calls.
Keep in mind:
- API keys are used to authenticate an application, NOT its users.
- OAuth2 authenticates an application AND users of the application by ensuring the users are authorized to access Onshape.
We use API keys for authenticating requests instead of cookies for several reasons:
- Security: Each request is signed with unique headers so that we can be sure it’s coming from the right place.
- Scope: API keys can be scoped to specific actions. See Scopes below for details.
- Revocation: API keys are revokable. If a server with API secret keys is compromised, you can revoke the API key so it can no longer be used. Cookies require a password reset that must be updated everywhere.
- OAuth: The API key system we’re now using for HTTP requests is the same process developers follow when building full-blown OAuth applications; there’s no longer a disconnect between the two.
Once you create an API key, it will only be valid in the stack on which it was created. An API key created on your company stack (i.e., companyName.onshape.com) will not function on the production stack (cad.onshape.com).
📘 Note
Enterprise administrators can also manage API keys for the Enterprise from within their Developer settings. See Onshape Help: Enterprise Developer Settings for details.
Create API keys
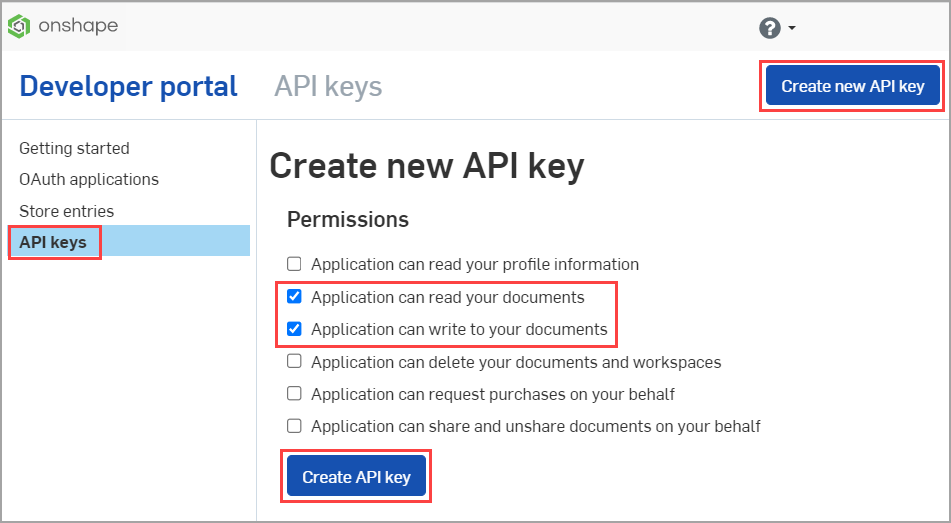
- Go to https://cad.onshape.com/appstore/dev-portal.
- In the left pane, click API keys.
- Click the Create new API key button in the upper-right.
- Select an Enterprise for your app, if applicable.
- Check the permissions for your app. See Scopes below.
- Click the Create API key button.

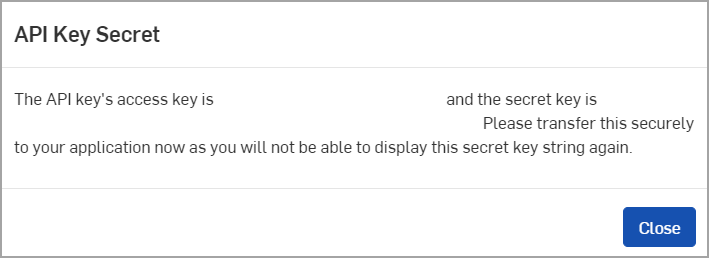
- Copy both the access key and secret key from the pop-up window, save them somewhere, then click the Close button.IMPORTANT NOTE: You will not be able to find the secret key again, so save it somewhere safe!

- The details for your application appear.

- Now that you have a key pair, see Generate a Request Signature for information on signing your requests to use our API.
Once you have your access key and secret, you will want to avoid giving others access to them, since they’re tied directly to your personal Onshape account. Think of your API key as a username and password pair. Do not place them directly in the code for your application, especially if others might see it. The samples we provide here use a separate configuration file to contain this information, but there are other ways to keep the access key and secret safe, like setting them as environment variables.
Scopes
There are several scopes available for API keys (equivalent to OAuth scopes):
- Application can read your profile information (
OAuth2ReadPII) - Check to allow the app access to information on your profile - Application can read your documents (
OAuth2Read) - Check to allow the app to read your documents but not update them. - Application can write to your documents (
OAuth2Write) - Check to allow the app write access to your documents. - Application can delete your documents and workspaces (
OAuth2Delete) - Check to allow the app access to delete content, including documents, workspaces, teams, comments, etc. - Application can request purchases on your behalf (
OAuth2Purchase) - Check to allow the app the ability to make purchase for you. - Application can share and unshare documents on your behalf (
OAuth2Share) - Check to allow the app the ability to share and unshare your documents.
Authenticate with API keys
Please select an option for authentication:
- Basic Authorization: Lowest security. For local testing only.
- Request Signature: Medium security. For testing and internal use.
- OAuth2: Highest security. Required for all Onshape Apps.
Basic authorization
For local testing, you can provide a basic authentication via your API Keys. Depending on your library of choice, you may need to encode your keys for basic authorization.
To base-64-encode your keys:
- Open your terminal/command prompt and run the following command, replacing
ACCESS_KEYandSECRET_KEYwith the access key and secret key you created earlier. Remember to include the colon (:) between the keys. You will receive a long, base-64-encoded string as output.- MacOS:
printf ACCESS_KEY:SECRET_KEY | base64 - Windows:
powershell "[convert]::ToBase64String([Text.Encoding]::UTF8.GetBytes(\"ACCESS_KEY:SECRET_KEY\"))" - For example, given an access key of
abcdefghi0123456789jkland secret key ofabcdefghijklmnopqrstuvwxzy0123456789abcdefghijkl, the corresponding command would be:- MacOS
printf abcdefghi0123456789jkl:abcdefghijklmnopqrstuvwxzy0123456789abcdefghijkl | base64 - Windows
powershell "[convert]::ToBase64String([Text.Encoding]::UTF8.GetBytes(\"abcdefghijklmnopqrstuvwxzy0123456789abcdefghijkl:abcdefghijklmnopqrstuvwxzy0123456789abcdefghijkl\"))"
- MacOS
- MacOS:
- Make note of the output string; these are your credentials.
- Add the authorization header to your code, replacing
CREDENTIALSwith the string you received in Step 2:
For example:-H 'Authorization: Basic CREDENTIALS' \-H 'Authorization: Basic ZnBpZnE1cm92d2VjeHZRU0k0MmxHbn0m4r5ydXNXczRPRUJLWTduS1NObVhoMzlrN2dzVE5QWEdqb0gzSUU4dFVnTlREdDZaYQ==' \
See our Quick Start Guide for an example of using Basic Authorization in an app.
Request signature
For additional security, you can include your API Keys as part of a request signature. This provides more security than the Basic Authorization above, but less security than OAuth2.
To ensure that a request is coming from you, we have a process for signing requests that you must follow for API calls to work. Everything is done via HTTP headers that you’ll need to set:
- Date: A standard date header giving the time of the request; must be accurate within 5 minutes of request. Example:
Mon, 11 Apr 2016 20:08:56 GMT - On-Nonce: A string that satisfies the following requirements:
- At least 16 characters
- Alphanumeric
- Unique for each request
- Authorization: This is where the API keys come into play. You’ll sign the request by implementing this algorithm:
- Input: Method, URL, On-Nonce, Date, Content-Type, AccessKey, SecretKey
- Output: String of the form:
On <AccessKey>:HmacSHA256:<Signature> - Steps to generate the signature portion:
- Parse the URL and get the following:
- The path, e.g.
/api/documents(no query params!) - The query string, e.g.
a=1&b=2- NOTE: If no query parameters are present, use an empty string
- The path, e.g.
- Create a string by appending the following information in order. Each field should be separated by a newline (
\n) character, and the string must be converted to lowercase:- HTTP method
- On-Nonce header value
- Date header value
- Content-Type header value
- URL pathname
- URL query string
- Using SHA-256, generate an HMAC digest, using the API secret key first and then the above string, then encode it in Base64.
- Create the
On <AccessKey>:HmacSHA256:<Signature>string and use that in the Authorization header in your request.
- Parse the URL and get the following:
Below is an example function to generate the authorization header, using Node.js’s standard crypto and url libraries:
// ...at top of file
var u = require('url');
var crypto = require('crypto');

/**
* Generates the "Authorization" HTTP header for using the Onshape API
*
* @param {string} method - Request method; GET, POST, etc.
* @param {string} url - The full request URL
* @param {string} nonce - 25-character nonce (generated by you)
* @param {string} authDate - UTC-formatted date string (generated by you)
* @param {string} contentType - Value of the "Content-Type" header; generally "application/json"
* @param {string} accessKey - API access key
* @param {string} secretKey - API secret key
*
* @return {string} Value for the "Authorization" header
*/
function createSignature(method, url, nonce, authDate, contentType, accessKey, secretKey) {
    var urlObj = u.parse(url);
    var urlPath = urlObj.pathname;
    var urlQuery = urlObj.query ? urlObj.query : ''; // if no query, use empty string

    var str = (method + '\n' + nonce + '\n' + authDate + '\n' + contentType + '\n' +
        urlPath + '\n' + urlQuery + '\n').toLowerCase();

    var hmac = crypto.createHmac('sha256', secretKey)
        .update(str)
        .digest('base64');

    var signature = 'On ' + accessKey + ':HmacSHA256:' + hmac;
    return signature;
}
Redirects
Some API endpoints return 307 redirects. You must generate an Authorization header for the redirect as well, but please note that the server portion of the URL might be different, the redirect URL may contain query parameters that must be encoded in the Authorization header, etc.
Delete API keys
- Click the Delete API Key button next to the key pair you wish to delete.
- Confirm that you are deleting the correct set of API keys. This cannot be undone. Click Delete to confirm.
Get help
If you need information or have a question unanswered in this documentation, email api-support@onshape.com or check out the forums.