OAuth2
All applications must authenticate with OAuth2 to be approved in the Onshape App Store for distribution.
What is OAuth2?
The OAuth (Open authorization) protocol was developed by the Internet Engineering Task Force, an open standards organization that develops and promotes voluntary Internet standards (particularly the technical standards that comprise the Internet protocol suite) to enable secure, delegated access to an application’s resources.
The OAuth2 protocol enables an application to access a resource that is under the control of someone else. In order to access that resource, a token is required. The token represent the delegated rights of access (that is, what rights this application has, such as read/write/update, scope, rights to different resources, and more).
This means the application can be accessed by a third-party system without that system impersonating the user that controls the resource.
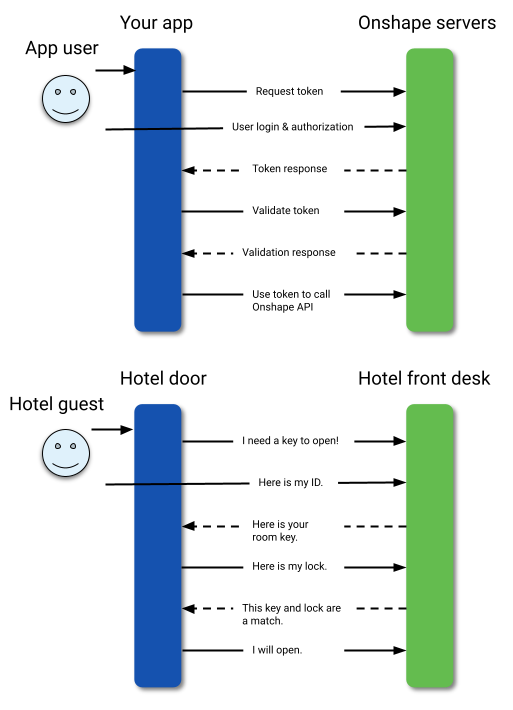
A good analogy is the hotel check-in process. When you arrive at the front desk of a hotel, you provide an ID and a form of payment. Then, you are given a key card that opens a specific door. When you reach that door, you swipe the key card and are granted access. The door itself doesn’t know who you are or anything about you, it just knows that the key card was encoded correctly, and it allows you access. At some point, the key card expires, and the door no longer lets you into the room. This is the same for access tokens in the OAuth2 flow.
With the OAuth2 protocol, you register your application with the third party, and you are given a set of keys. These keys get exchanged for an access token that grants you access to resources in the third-party application. The token expires regularly; you must get a new token to access the application again. For this, you are provided with a refresh token. Sending the refresh token to the authentication server updates your access token and gives you a new refresh token.
Keep in mind:
- API keys are used to authenticate an application, NOT its users.
- OAuth2 authenticates an application AND users of the application by ensuring the users are authorized to access Onshape.
OAuth2 & Onshape
The first step in the OAuth flow is for the Onshape user to request that Onshape let the third-party application access Onshape.
Once the user has authorized the application, they are redirected to a predefined URL (called a redirect URL) with a code that will requests an access token from Onshape. Therefore, the redirect URL should contain a script that can capture the authorization code.
You will use the access token to authenticate requests to the Onshape API. The token expires after preset amount of time. To get a new valid access token after one has expired, you must use the refresh token to request a new access token. Refreshing the access token also provides you with an updated refresh token to use in the next refresh access token request. Make sure to store both the the access token and the refresh token, and update them with each refresh of the token. The authorization token must accompany any call to the API, this is done by adding the token to an Authorization field in the header of each request:
Authorization: Bearer <accessToken>
If correctly authenticated, most responses from the REST API call return JSON data (though some return binary data), with an HTTP response code of 200 Success, 204 - No Content, or 301 - Permanent Redirect. 301 responses will include a redirect for you to follow.
In the event that the authorization code is incorrect (for instance, if it expired), you will receive an HTTP 401 response. This response means that the client request has not been completed, since it lacks valid authentication credentials for the requested resource. In this event, your code for each call to the REST API should include a catch clause for a 401 exception. Once caught, you can refresh the token and make the request again. Pay close attention to the Content-Type header for what data to parse and expect.
When integrating with Onshape, OAuth tokens give third-party applications (such as desktop applications or web services) access to users’ data as defined by the permissions scope (such as users’ documents or profile information). Using OAuth terminology, Onshape acts as both the authorization and resource server, while the desktop or web-based application is the client. Resource owners have the option of granting or denying access to applications.
Once obtained, an OAuth token will work for third-party APIs under /api. Do NOT attempt to use an OAuth token to fetch the URLs typically displayed in a web browsers location bar.
More resources
- Digital Ocean - A good resource for learning more about OAuth2.
- RFC 6749 - The reference for the OAuth framework as a whole. Most of this document describes how to implement the OAuth exchanges described by the reference within the context of Onshape and client applications.
- RFC 6750 - Describes the exchange of OAuth access tokens between clients and OAuth servers.
Authentication Workflow
This OAuth tutorial demonstrates how to recreate the authentication process in Node.js found in the gltf-viewer-app sample code. The final code in Node.js and other languages can be found at the end of this page.
1: Register the app
Enterprise/Company/Classroom administrators should register and manage OAuth applications from within their Onshape Settings. See: Onshape Help: Developer Settings.
Individuals on private accounts should register and manage their apps from the Onshape Developer Portal. See: Create an application.
- All applications created in the Onshape Settings are owned by the company and count towards the company's API Limits.
- All applications created in the Developer Portal are owned by the user and count towards the user's API Limits.
2: Get the user authorization code
We’ll start by loading the basic libraries required to run this sample. We’ll use Passport to authenticate requests through plugins known as strategies. In this example, we’ll use an Onshape-developed plugin called passport-onshape, but you can define your own strategy to use with Passport, if you prefer. You can find more information on Passport here.
- Create a directory for your app, and then install Passport and passport-onshape:
npm install passport
npm install passport-onshape
- Next, create a file called
app.jsand add the following definitions to the top of the file:
// App definitions
const path = require('path');
const uuid = require('uuid');

const express = require('express');
const session = require('express-session');
const bodyParser = require('body-parser');

const passport = require('passport');
const OnshapeStrategy = require('passport-onshape');

const config = require('./config');
- Next, tell Express to use Passport and initialize it. Note: you can replace the Express code with code for the web server of your choice.
// Tell Express to use Passport, and initialize it.
const app = express();

app.use(express.static(path.join(__dirname, 'public')));
app.use(express.static(path.join(__dirname, 'dist')));
app.use(bodyParser.json());

app.set('trust proxy', 1); // To allow to run correctly behind Heroku when deployed

app.use(session({
    secret: config.sessionSecret,
    saveUninitialized: false,
    resave: false,
    cookie: {
        name: 'app-gltf-viewer',
        sameSite: 'none',
        secure: true,
        httpOnly: true,
        path: '/',
        maxAge: 1000 * 60 * 60 * 24 // 1 day
    }
}));
app.use(passport.initialize());
app.use(passport.session());
- Next, we’ll store the Onshape user information so it can be retrieved from
req.userin each call. Passport uses theserializeUserfunction to persist user data (after successful authentication) into the session. The functiondeserializeUseris used to retrieve user data from session.
//Store the Onshape user information
passport.serializeUser((user, done) => done(null, user));
passport.deserializeUser((obj, done) => done(null, obj));
- Initialize Passport with the Onshape Strategy:
//Initialize Passport with the Onshape Strategy
passport.use(new OnshapeStrategy({
        clientID: config.oauthClientId,
        clientSecret: config.oauthClientSecret,
        callbackURL: config.oauthCallbackUrl,
        authorizationURL: `${config.oauthUrl}/oauth/authorize`,
        tokenURL: `${config.oauthUrl}/oauth/token`,
        userProfileURL: `${config.oauthUrl}/api/users/sessioninfo`
    },
    (accessToken, refreshToken, profile, done) => {
        profile.accessToken = accessToken;
        profile.refreshToken = refreshToken;
        return done(null, profile);
    }
));
- Open your environment variables file (e.g.,
.env,.bashrc,.bash_profile,.zshrc,etc.) and add the following environment variables, then save and close the file.
authorizationURL : https://oauth.onshape.com/oauth/authorize
tokenURL : https://oauth.onshape.com/oauth/token
userProfileURL : https://cad.onshape.com/api/users/sessioninfo
The callback function will provide us with the accessToken, the refreshToken, and the user’s Onshape profile once authentication has been successfully passed. We can now use this to update our database with user-specific information.
Note that if you store the accessToken and refreshToken in the database along with the user record, you must update it each time that the access codes are refreshed.
- Next, we define our endpoint where the authorization flow starts (in this case,
/oauthSignin). This is the endpoint that we previously defined in the Onshape application setup. This will redirect to an Onshape page in order for the user to confirm (or deny) the applications access to the Onshape resources.
//Define the Onshape API endpoint
app.use('/oauthSignin', (req, res) => {
    /* These 5 lines are specific to the glTF Viewer sample app. You can replace them with the input for whatever Onshape endpoints you are using in your app */
    const state = {
        docId: req.query.documentId,
        workId: req.query.workspaceId,
        elId: req.query.elementId
    };
    req.session.state = state;
    return passport.authenticate('onshape', { state: uuid.v4(state) })(req, res);
}, (req, res) => {

 });
3: Exchange the code for an access token
Fortunately, if you are using Passport, there isn’t much to do once the user grants authorization. The return URL will contain the one-time authorization token, which Passport will extract and exchange for an access token and a refresh token, which are available in Passport callback function.
- Add the following code to
app.js:
//Exchange the code for an access token
app.use('/oauthRedirect', passport.authenticate('onshape', { failureRedirect: '/grantDenied' }), (req, res) => {
    /* This code is specific to the glTF Viewer sample app. You can replace it with the input for whatever Onshape endpoints you are using in your app. */
    res.redirect(`/?documentId=${req.session.state.docId}
&workspaceId=${req.session.state.workId}&elementId=
    ${req.session.state.elId}`);
});
- If the user clicks Deny instead of Authorize Application, they are taken to a page that notifies them that access to the application was denied. We can see that in the
failureRedirectargument. Add the following toapp.js:
//Handle denied access
app.get('/grantDenied', (req, res) => {
    res.sendFile(path.join(__dirname, 'public', 'html', 'grantDenied.html'));
})
Now we have received the access token, and it can be accessed from res.user.accessToken on this page or from req.user.accessToken from any other page you redirect to from here.
4: Use the access token
- Add the following to the bottom of
app.js. You can see that the access token is used as an Authorization header:
//Use the access token as an Authorization header
makeOnshapeAPICall: async (req, res) => {
        try {
            const apiUrl = "https://cad.onshape.com/api/documents?ownerType=1&sortColumn=createdAt&sortOrder=desc&offset=0&limit=20"; //You can replace this with any Onshape API endpoint URL.
            const resp = await fetch(normalizedUrl, { headers: { Authorization: `Bearer ${req.user.accessToken}` }});
            const data = await resp.text();
            const contentType = resp.headers.get('Content-Type');
            res.status(resp.status).contentType(contentType).send(data);
        } catch (err) {
            res.status(500).json({ error: err });
        }
    }
Note: in the glTF Viewer sample app, this code appears in utils.js instead of app.js.
5: Refresh the token
When the access token expires, it must be refreshed by making another POST request to https://oauth.onshape.com/oauth/token with the following URL-encoded form body (with Content-Type application/x-www-form-urlencoded):
grant_type=refresh_token&refresh_token=\<refresh_token\>&client_id=\<client_id\>&client_secret=\<client_secret\>
As with the authorization code data, the parameters in the form body must be URL-encoded. The response to this POST request will be a JSON-encoded structure with a new access_token value that can be used for the next 60 minutes.
Refresh tokens are valid for the lifetime of the user’s grant. If a user who previously granted access to your application decides to revoke the grant, the refresh token is invalidated. If the user decides to re-grant application access, a new refresh token is generated and returned along with the access token.
- Add the following to
app.js:
/** After landing on the home page, we check if a user had already signed in. If no user has signed in, we redirect the request to the OAuth sign-in page. If a user had signed in previously, we will attempt to refresh the access token of the user. After successfully refreshing the access token, we will simply take the user to the landing page of the app. If the refresh token request fails, we will redirect the user to the OAuth sign-in page again. */
app.get('/', (req, res) => {
    if (!req.user) {
        return res.redirect(`/oauthSignin${req._parsedUrl.search ? req._parsedUrl.search : ""}`);
    } else {
        refreshAccessToken(req.user).then((tokenJson) => {
            // Dereference the user object and update the access token and refresh token in the in-memory object.
            let usrObj = JSON.parse(JSON.stringify(req.user));
            usrObj.accessToken = tokenJson.access_token;
            usrObj.refreshToken = tokenJson.refresh_token;
            // Update the user object in PassportJS. No redirections will happen here, this is a purely internal operation.
            req.login(usrObj, () => {
                return res.sendFile(path.join(__dirname, 'public', 'html', 'index.html'));
            });
        }).catch(() => {
            // Refresh token failed, take the user to OAuth sign in page.
            return res.redirect(`/oauthSignin${req._parsedUrl.search ? req._parsedUrl.search : ""}`);
        });
    }
});

//Refresh the access token
const refreshAccessToken = async (user) => {
    const body = 'grant_type=refresh_token&refresh_token=' + user.refreshToken + '&client_id=' + config.oauthClientId + '&client_secret=' + config.oauthClientSecret;
    let res = await fetch(config.oauthUrl + "/oauth/token", {
        method: 'POST',
        headers: {
            'Content-Type': 'application/x-www-form-urlencoded'
        },
        body: body
    });
    if (res.ok) {
        return await res.json();
    } else {
        throw new Error("Could not refresh access token, please sign in again.");
    }
}

app.use('/api', require('./api'));
module.exports = app;
- Save the file.
- To see the authentication working in practice, you can follow the instructions in the glTF Viewer README to deploy the glTF Viewer app.
6: Grant authorization
For apps published in the Onshape App Store, the Onshape user must grant authorization to your application to access the Onshape data. This must be done by each user of your app.
To grant the application access to a user’s data in Onshape, the Onshape user must follow the steps below:
- Sign in to
cad.onshape.com.- Note: Use
https://companyName.onshape.comfor Enterprise accounts. See Enterprise users below for more information.
- Note: Use
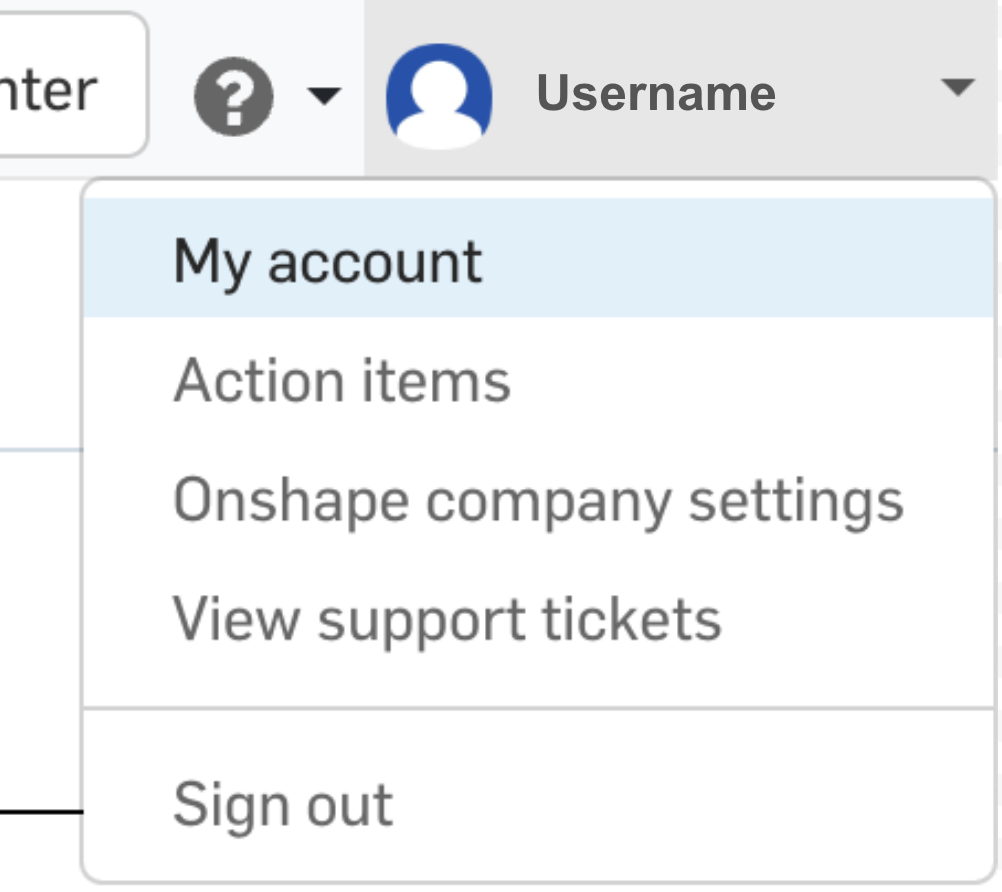
- Click their name in the top-right corner of the Onshape window, and then click My account in the dropdown menu.
- Click Applications in the left sidebar.
- Note that the gltf-viewer app will not appear in this list until it has been deployed and subscribed to as described in the glTF Viewer README.
- Click Grant next to your app name to grant it access to their Onshape data. The Onshape user can click Revoke at any time to prevent your app from accessing their Onshape data.
- The user will see the Authorize application screen shown below and will need to confirm their authorization grant by clicking Authorize application. The user is then redirected to the Redirect URL you specified in your code. Your app can now access the user’s Onshape resources and profile.
Notes
Installed desktop applications
OAuth is designed for interactions between two servers using a browser. However, it can also be used by an installed desktop (or mobile) application. The application must perform a similar role to that of a third party server: it must exchange the code for an access token structure.
To enable this, Onshape allows two special forms of redirect URI to be registered:
http://localhost:<port>Causes the browser to attempt to load a page from the host upon which it is running. The code parameter will be supplied exactly the same as outlined above. If the application can listen on the registered port and behave as a simple web server for the redirect URL, it can retrieve the code in the same way as a deployed web server.urn:ietf:wg:oauth:2.0:oobCauses the browser to display a simple page after a request has been granted instead of going to a new URL. The page contains simple instructions to copy and paste code into an application field. The browser will also update the title of the window to contain the code. An application could also look for browsers with window titles containing the stringSuccess code=<code>and automatically grab the code from the browser window title. If an error occurs (e.g., the grant is denied), the browser window title will containError description=<error string>.
Enterprise users
When a user authorizes an OAuth app to access Onshape on their behalf, they get a bearer token that corresponds to their session and the allowed scopes.
However, if the user has a seat in the Enterprise, additional information is needed to determine whether to allow the bearer token to access enterprise data for the user or simply return non-enterprise data. We use the company_id field for this distinction.
There are two ways of setting the company_id correctly to access enterprise data:
- During the authorization process, select the name and URL of the enterprise instead of
cad.onshape.com. This will correctly associate your bearer token with thecompany_id. - If you have an integrated app, call the Company/findCompany endpoint to obtain the
idfrom thecompanyobject. Append thiscompany_idas a query parameter to the/authorizeURL while initiating the OAuth workflow. (Note: you may be asked to authenticate yourself again.)
3rd-party cookies
3rd-party cookies must be enabled in the browser for Onshape apps to work correctly.
Debugging
Debugging OAuth can be a little tricky. Some tips are below:
- Make sure you are correctly URL encoding the values supplied to the oauth/authorize and oauth/token endpoints.
- Use a
GET /oauth/authorizebut aPOST /oauth/tokenand make sure that the GET uses query parameters but that thePOSTuses a URL-encoded form body. - If you supply a
redirect_urito/oauth/authorize, you must also supply it as an additional parameter in thePOSTto/oauth/token - Use a tool such as Burp or Charles to deliberately ‘man-in-the-middle’ the connection requests between your server and Onshape, and verify that you are performing the correct REST operations (GET vs. POST) and correctly URL-encoding the parameter values.
Final Code
The above example uses Node.js to authenticate an Onshape app. This section includes the code for using OAuth2 with other coding languages.
Node.js
Prerequisites
npm install passport
npm install passport-onshape
Environment variables
authorizationURL : <https://oauth.onshape.com/oauth/authorize>
tokenURL : <https://oauth.onshape.com/oauth/token>
userProfileURL : <https://cad.onshape.com/api/users/sessioninfo>
app.js
//App definitions
const path = require('path');
const uuid = require('uuid');

const express = require('express');
const session = require('express-session');
const bodyParser = require('body-parser');

const passport = require('passport');
const OnshapeStrategy = require('passport-onshape');

const config = require('./config');

//Tell Express to use Passport, and initialize it.
const app = express();

app.use(express.static(path.join(__dirname, 'public')));
app.use(express.static(path.join(__dirname, 'dist')));
app.use(bodyParser.json());

app.set('trust proxy', 1); // To allow to run correctly behind Heroku when deployed.

app.use(session({
    secret: config.sessionSecret,
    saveUninitialized: false,
    resave: false,
    cookie: {
        name: 'app-gltf-viewer',
        sameSite: 'none',
        secure: true,
        httpOnly: true,
        path: '/',
        maxAge: 1000 * 60 * 60 * 24 // 1 day
    }
}));
app.use(passport.initialize());
app.use(passport.session());

//Store the Onshape user information
passport.serializeUser((user, done) => done(null, user));
passport.deserializeUser((obj, done) => done(null, obj));

//Initialize Passport with the Onshape Strategy
passport.use(new OnshapeStrategy({
        clientID: config.oauthClientId,
        clientSecret: config.oauthClientSecret,
        callbackURL: config.oauthCallbackUrl,
        authorizationURL: `${config.oauthUrl}/oauth/authorize`,
        tokenURL: `${config.oauthUrl}/oauth/token`,
        userProfileURL: `${config.oauthUrl}/api/users/sessioninfo`
    },
    (accessToken, refreshToken, profile, done) => {
        profile.accessToken = accessToken;
        profile.refreshToken = refreshToken;
        return done(null, profile);
    }
));

//Define the Onshape API endpoint
app.use('/oauthSignin', (req, res) => {
    /* These 5 lines are specific to the glTF Viewer sample app. You can replace them with the input for whatever Onshape endpoints you are using in your app. */
    const state = {
        docId: req.query.documentId,
        workId: req.query.workspaceId,
        elId: req.query.elementId
    };
    req.session.state = state;
    return passport.authenticate('onshape', { state: uuid.v4(state) })(req, res);
}, (req, res) => {

});

app.use('/oauthRedirect', passport.authenticate('onshape', { failureRedirect: '/grantDenied' }), (req, res) => {
    /* This code is specific to the glTF Viewer sample app. You can replace it with the input for whatever Onshape endpoints you are using in your app. */
    res.redirect(`/?documentId=${req.session.state.docId}&workspaceId=${req.session.state.workId}&elementId=${req.session.state.elId}`);
});

//Handle denied access
app.get('/grantDenied', (req, res) => {
    res.sendFile(path.join(__dirname, 'public', 'html', 'grantDenied.html'));
})

/** After landing on the home page, we check if a user had already signed in. If no user has signed in, we redirect the request to the OAuth sign-in page. If a user had signed in previously, we will attempt to refresh the access token of the user. After successfully refreshing the access token, we will simply take the user to the landing page of the app. If the refresh token request fails, we will redirect the user to the OAuth sign-in page again. */
app.get('/', (req, res) => {
    if (!req.user) {
        return res.redirect(`/oauthSignin${req._parsedUrl.search ? req._parsedUrl.search : ""}`);
    } else {
        refreshAccessToken(req.user).then((tokenJson) => {
            // Dereference the user object, and update the access token and refresh token in the in-memory object.
            let usrObj = JSON.parse(JSON.stringify(req.user));
            usrObj.accessToken = tokenJson.access_token;
            usrObj.refreshToken = tokenJson.refresh_token;
            // Update the user object in PassportJS. No redirections will happen here, this is a purely internal operation.
            req.login(usrObj, () => {
                return res.sendFile(path.join(__dirname, 'public', 'html', 'index.html'));
            });
        }).catch(() => {
            // Refresh token failed, take the user to OAuth sign in page.
            return res.redirect(`/oauthSignin${req._parsedUrl.search ? req._parsedUrl.search : ""}`);
        });
    }
});

//Refresh the access token
const refreshAccessToken = async (user) => {
    const body = 'grant_type=refresh_token&refresh_token=' + user.refreshToken + '&client_id=' + config.oauthClientId + '&client_secret=' + config.oauthClientSecret;
    let res = await fetch(config.oauthUrl + "/oauth/token", {
        method: 'POST',
        headers: {
            'Content-Type': 'application/x-www-form-urlencoded'
        },
        body: body
    });
    if (res.ok) {
        return await res.json();
    } else {
        throw new Error("Could not refresh access token, please sign in again.");
    }
}

app.use('/api', require('./api'));
module.exports = app;

//Use the access token in an Authorization header.
makeOnshapeAPICall: async (req, res) => {
        try {
            const apiUrl = "https://cad.onshape.com/glassworks/explorer/#/Document/getDocuments"; //You can replace this with any Onshape API endpoint URL.
            const resp = await fetch(normalizedUrl, { headers: { Authorization: `Bearer ${req.user.accessToken}` }});
            const data = await resp.text();
            const contentType = resp.headers.get('Content-Type');
            res.status(resp.status).contentType(contentType).send(data);
        } catch (err) {
            res.status(500).json({ error: err });
        }
    }
Python
This Python code only works on a local machine. To deploy the code, you can replace the Flask code with the web server of your choice.
Prerequisites
pip3 install flask
pip3 install requests_oauthlib
app.py
from flask import Flask, request, redirect, session, url_for
from flask.json import jsonify
from requests_oauthlib import OAuth2Session
import os

app = Flask(__name__)
app.secret_key = b'F\xf5\xe5\xc0\xbe\tg\x7f\xac\x89\x87e\xc24\xe8m\x1c\xd9\xda\x96G,\x90i'

os.environ['OAUTHLIB_INSECURE_TRANSPORT'] = "1"

client_id = <Client ID of your application>
client_secret = <Client Secret of your application>
authorization_base_url = "https://oauth.onshape.com/oauth/authorize"
token_url = "https://oauth.onshape.com/oauth/token"
redirect_url = "http://localhost:5000/token"

@app.route('/')
def home():
  onshape = OAuth2Session(client_id, redirect_uri=redirect_url)
  auth_url, state = onshape.authorization_url(authorization_base_url)
  session['oauth_state'] = state
  return redirect(auth_url)

@app.route('/token', methods=["GET"])
def token():
  onshape = OAuth2Session(client_id, state=session['oauth_state'], redirect_uri=redirect_url)
  token = onshape.fetch_token(token_url, client_secret=client_secret, authorization_response=request.url)
  session['oauth_token'] = token
  return redirect(url_for('.documents'))

@app.route('/documents', methods=["GET"])
def documents():
  extra = {
    'client_id': client_id,
    'client_secret': client_secret,
  }
  onshape = OAuth2Session(client_id, token=session['oauth_token'], redirect_uri=redirect_url)
  session['oauth_token'] = onshape.refresh_token(token_url, **extra)
  return jsonify(onshape.get('https://cad.onshape.com/api/v6/documents?q=Untitled&ownerType=1&sortColumn=createdAt&sortOrder=desc&offset=0&limit=20').json())

if __name__ == "__main__":
  app.run()