Sync Releases and Revisions
This tutorials builds off the Sync Data and Metadata tutorial. Please complete that one before starting on this one.
In this case, we’ll be looking at the ability for Onshape to sync its release data with an external system and for that system to send information back to Onshape with regards to released data.
This specific business case will look at what happens when you wish for a PLM system to control the release of data instead of Onshape having that control – this is in fact a common use case.
Overview
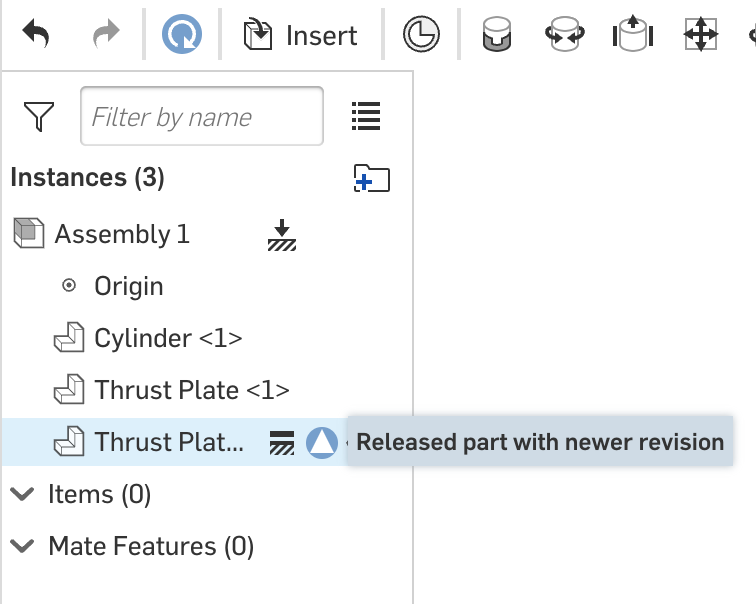
We have mentioned before that Onshape has the ability to release data – it is totally integrated to Onshape since there is no division between CAD capabilities and PDM capabilities in Onshape – they are all part of the same solution. See Versions and Releases for more information on how Onshape manages releases. There is importance in releasing data through Onshape. Onshape uses visual cues to show which parts are released in an assembly for instance and which parts might have a newer revision. Onshape can also add/remove watermarks to drawings and update the title block depending on release states. Also, the BOM table can pull a parts release data and display it. All this is dependent upon a release process being completed in Onshape.
Many organizations have implemented Product Lifecycle management systems (PLM). One of the key benefits of a PLM system is that it manages more than just engineering data originating from the engineering department, it deals with all the data related to the product – from concept through retirement. Therefore, it is a system that is used by many groups and departments throughout the organization.
Often, in release processes or Engineering Change processes, additional input and approvals are required from various departments downstream from engineering. PLM systems are very good at routing the data for approval to users from multiple departments and groups throughout the organization. Onshape, on the other hand, is very focused on the engineering department and the data generated there. While it certainly has the capabilities to bring other groups into approval processes, it is not considered a process centric enterprise-wide system with the capabilities of a PLM system.
Many companies will have well established processes that have been modeled in their PLM system, it is much easier for us to integrate into those processes than reinvent the wheel in Onshape.
This section looks at how we might have the best of both worlds, initiate release processes in Onshape and update our Onshape visual cues as well as have the PLM system manage the actual approvals and release.
This section uses concepts such as OAuth and web hooks that we have introduced in detail in previous sections, therefore feel free to reference those sections for more information on these topics.
Step 1: Initiate Release
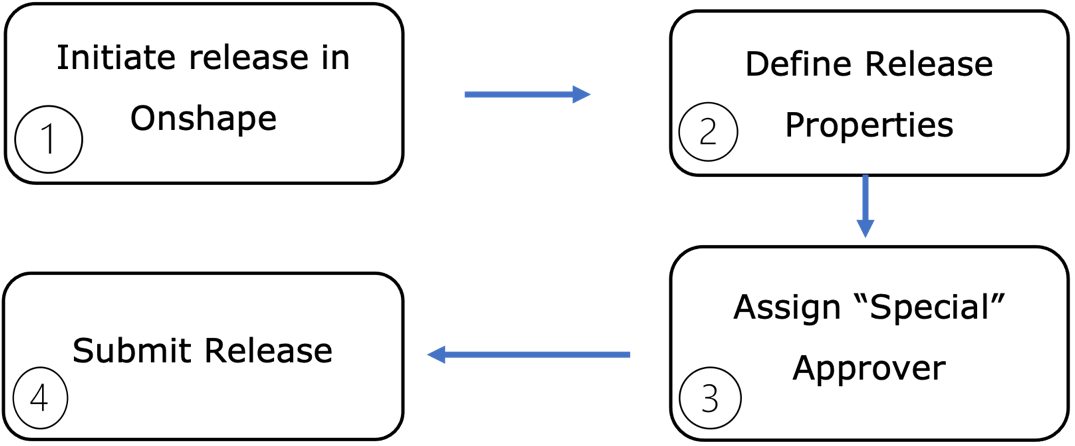
In this first step we are using Onshape’s out-of-the-box capabilities to initiate a release candidate – just as we would if we were releasing natively in Onshape.
We start by initiating the release on all the data that is required. In this step you should use a custom workflow that simply has one approval node.
Define the mandatory and any other release properties in the release candidate window.
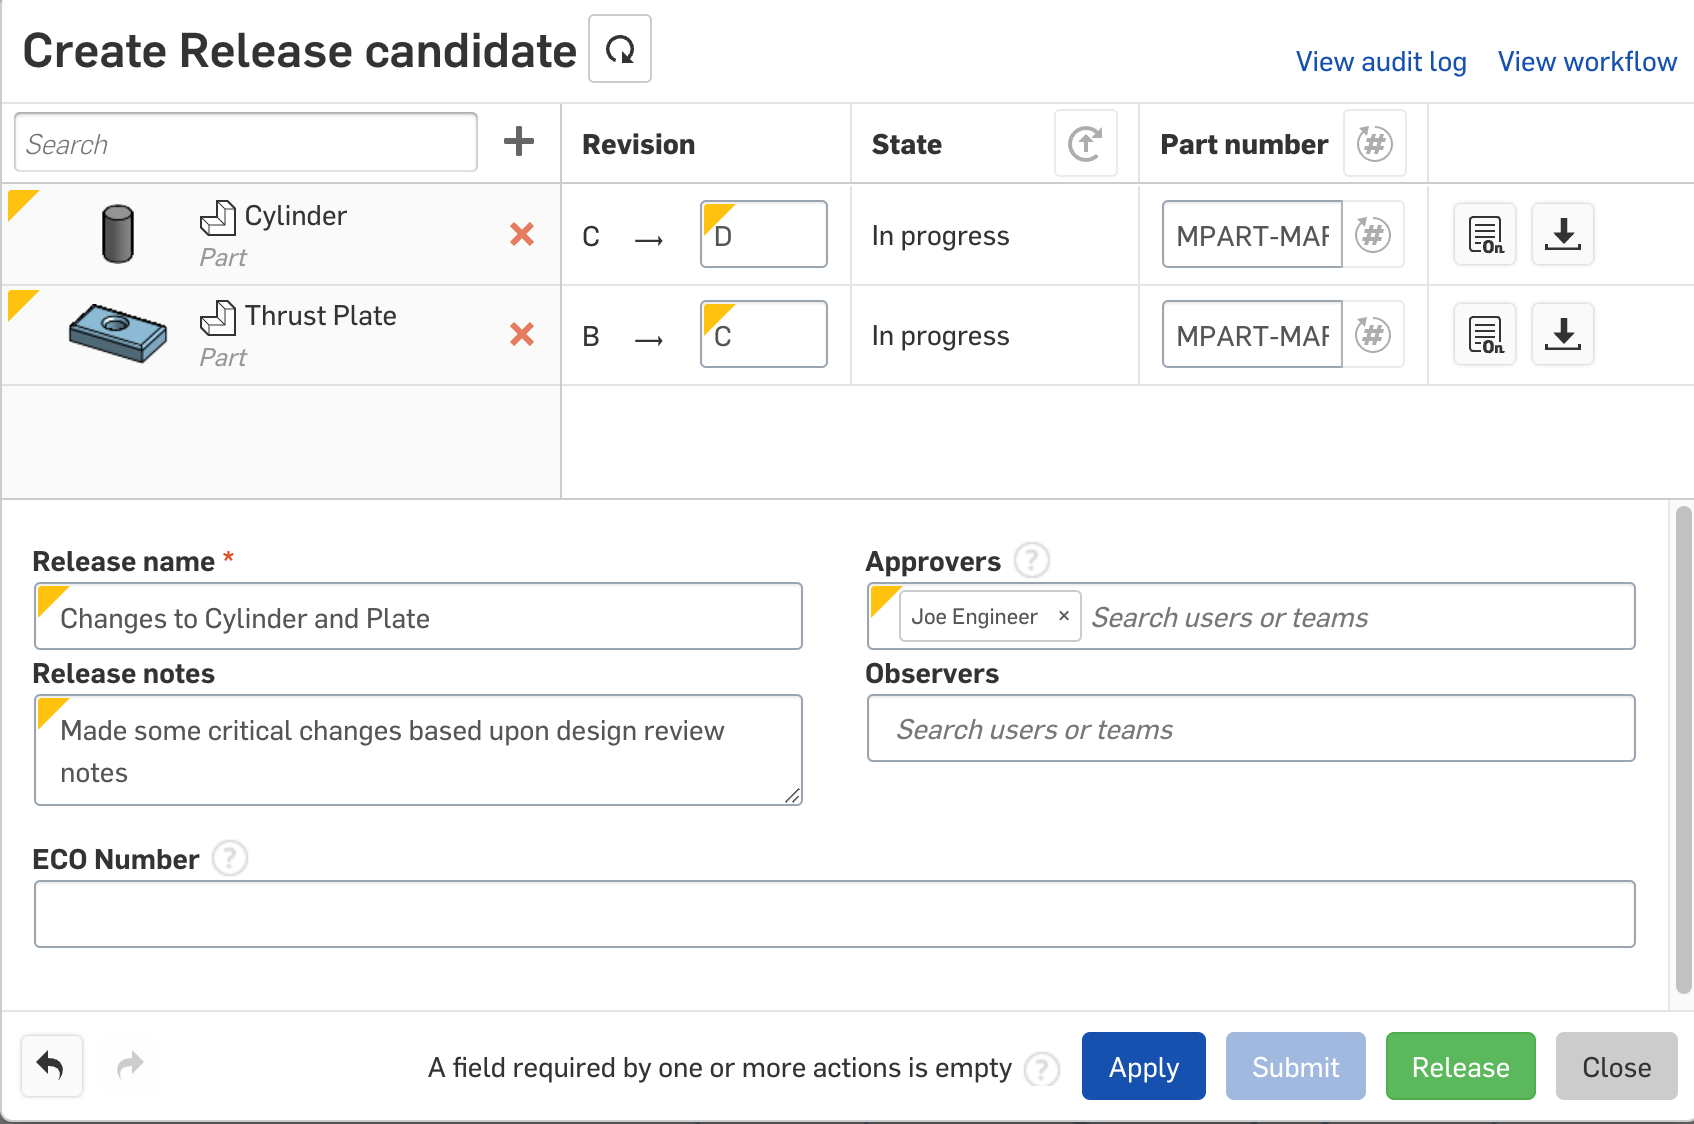
Figure 40 - Initiating a release candidate
Since an approver is required, we must provide a fictitious user/approver that has been defined in the system – this could be named “Release Approver” for instance. The process will be sent to this approver even though they are not a real person and will not be able to approve the release. Instead, our release process will be approved by an external source.
Finally, when everything is defined, submit the release. The window will close. Since the release is pending approval, the parts involved in the release will enter the state of “Pending” as shown here:
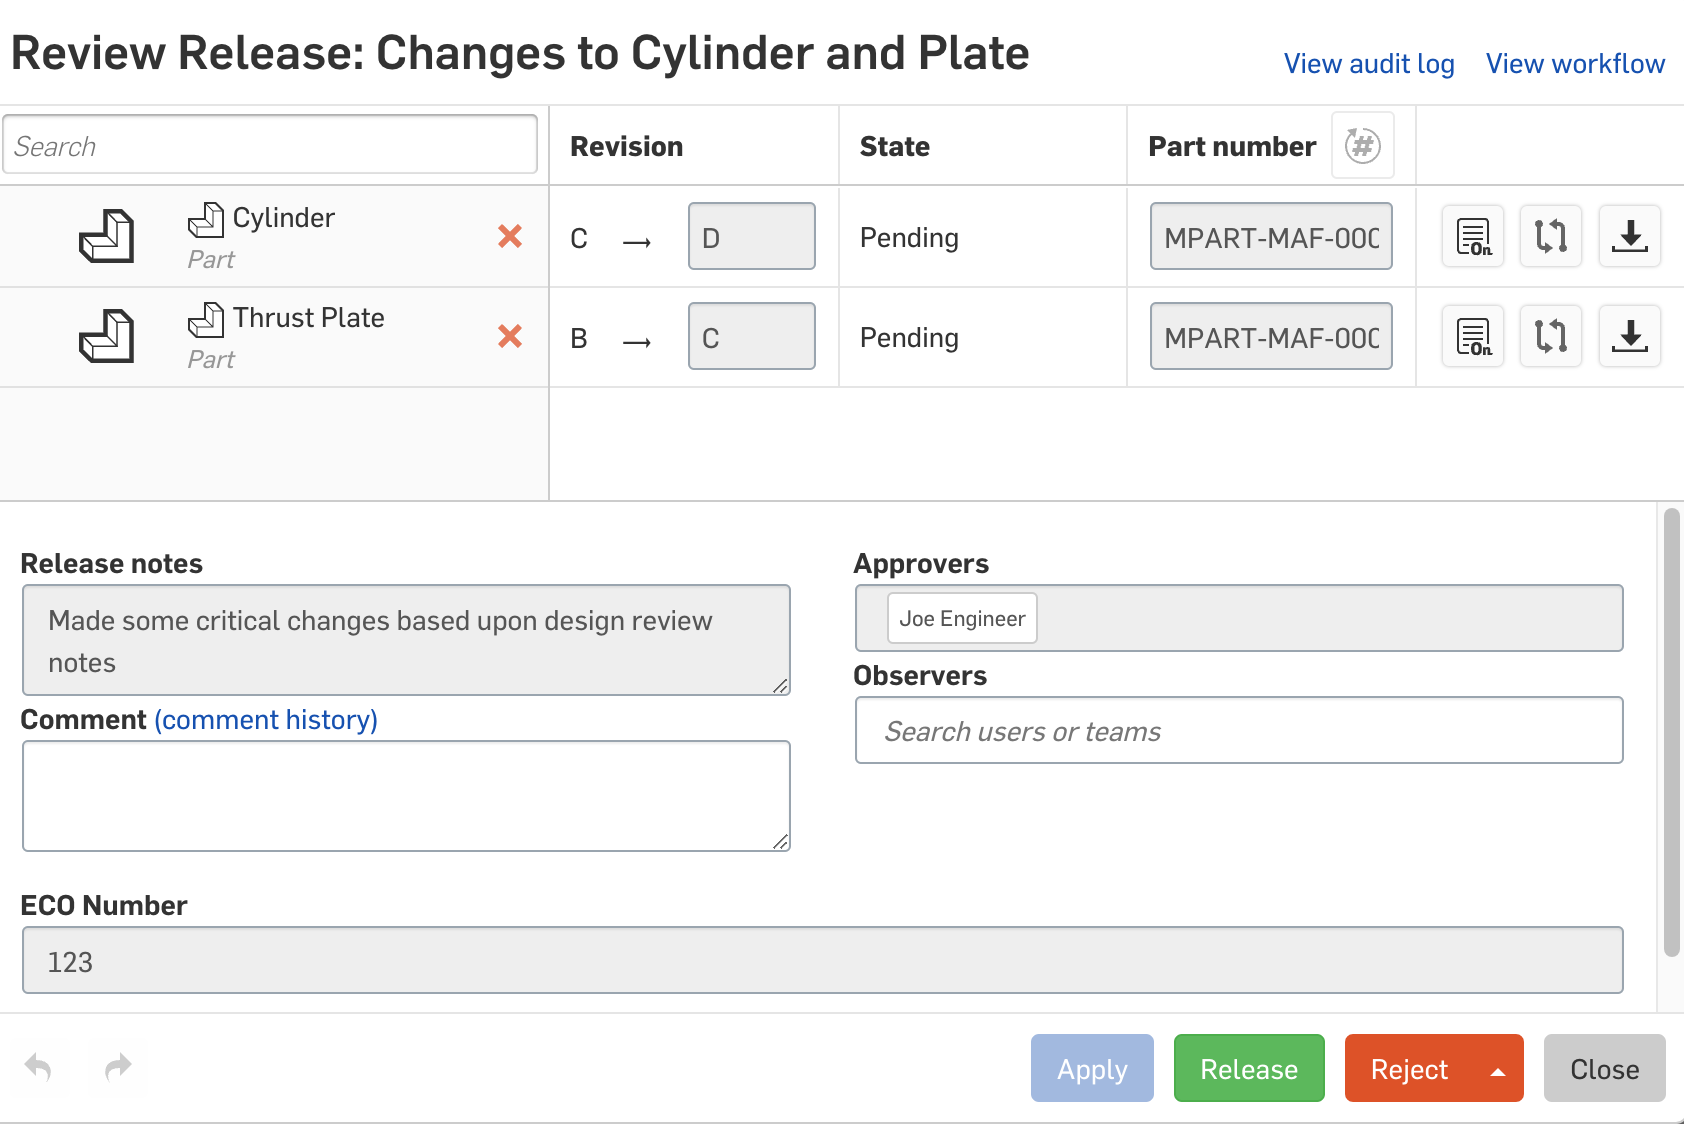
Figure 41 - Pending Release
They will remain in this state until the release has been completed.

It is important to note that unlike traditional PDM systems where the files are locked for change until the release is completed or rejected, Onshape does not lock the files. As mentioned previously, Onshape views the releases as a point in time. As far as Onshape is concerned, time moves forward, parts can change and at a specific point in time, the parts are in a state of pending. It is important to mention that this does in fact prevent another release from being initiated on the parts until the previous release has been completed.
Step 2: Initiate Release Process in 3rd Party App
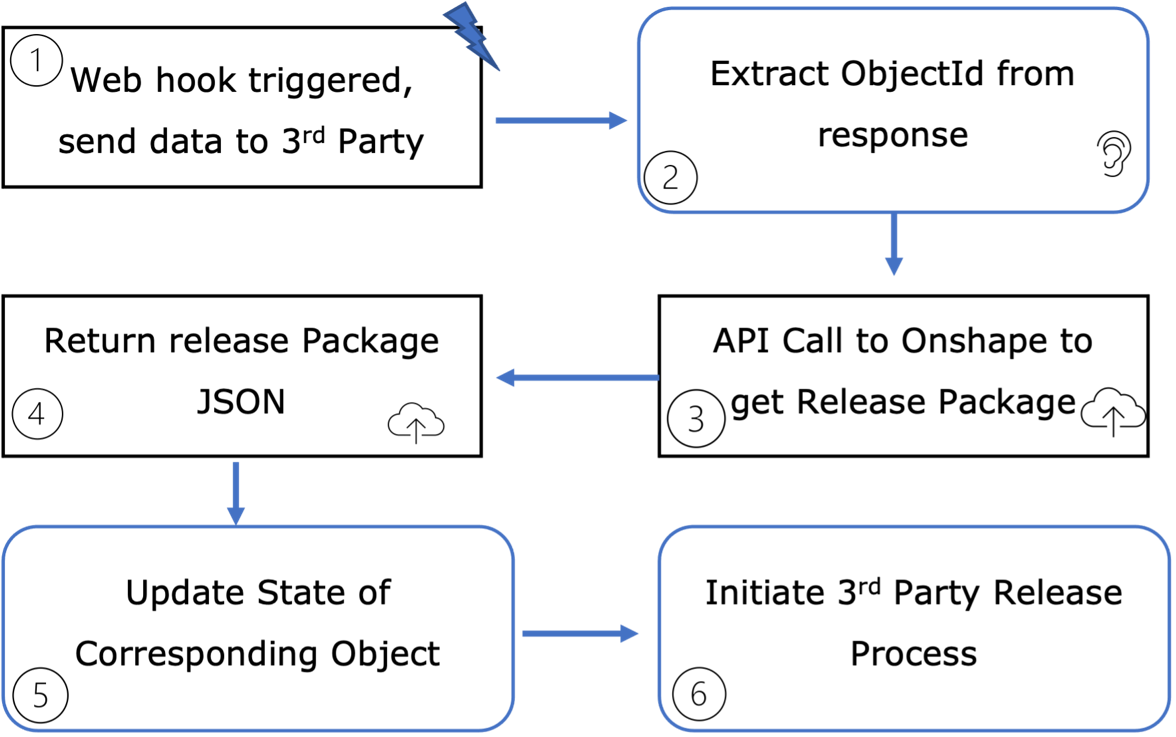
Once the user initiates the release candidate and the parts transition to the “pending” state we can register for a webhook that will notify our third-party application that the parts have changed state.
Once the parts enter the workflow, the onshape.workflow.transition webhook will be triggered.
Our third-party application should be listening for this event along with other data, we are provided with the objectId of the release package – this is all the data associated with the parts that are to be released. The response also contains the objectType and the transitionName; for our use case we will only concern ourselves with requests that have an objectType of “Release” and a transitionName of “Submit”.
Using the ObjectId we make an API call to onshape; /api/releasepackages/<releasePackageId>?detailed=true
This API call will return to us a JSON response containing all assemblies and parts in the release package. The following information should be extracted from the release package:
For each line item (assembly or part) extract the documentId, the elementId, elementType, versionId and PartId
Iterate through the top level properties and record the propertyId for property with the name “comment” – this will be used to update the release comments later on.
Now that we have the relevant IDs we can update the state of our corresponding objects in the third party system and record any additional data such as the release comment field.
Finally, we can kick off our official release process in the third-party application. This could be an automated process or a manual one.
Step 3: Complete Release Process
The release process continues in the third-party application until approvals have been received by all required actors. Meanwhile in Onshape the parts are in the pending state. In this step we close the loop once the release process is completed.

The release process managed by the third-party application is completed and the data in that system is released.
Once this happens, we make a call to the Onshape API; /api/releasepackages/<releasePackageId> the releasePackageId is the ID we were provided with at the start of this process – While there are different ways of implementing this, I tend to store the ID and any other data related to the release in a custom “release Object” in my database so I can retrieve and update the release as required. In addition to the passing the release package ID, in the body of the request we should pass the id of the release comment and a value for the comment. This will update the release in Onshape with any relevant data.
Onshape releases the data that was included in the release candidate and that completes the workflow process.
Onshape will return a status code that indicates success or failure
Finally we can optionally update the corresponding object to indicate that it is in sync with the Onshape data.
In the event that the release process is rejected at anytime, we can send the releasePackages API request to Onshape with a REJECT workflow Action argument. This will cause Onshape to reject the workflow and the state of the parts at the specific release point in time, will be set to “Rejected”.

Figure 43 - release candidate rejected
Since our timeline is moving forward this has no actual effect on the parts other than to cancel the pending release and enable them to be released at another future point in time.
Implementation
In this section we will take a closer look at how to implement the release scenario in our code. The first thing we need to do is define the correct web hook to listen for the initiation of the release – this means that once the user clicks the submit button on the release candidate dialog, this web hook will be triggered.
Set Up Webhook

This code is very similar to what we defined previously for the metadata update, instead here we are defining a hook for the onshape.workflow.transition hook. As with other code examples that require authentication, we have included error handling in order to refresh that access token in the event that it has expired.
The onshape.workflow.transition will in fact fire whenever a revision or release package transitions through different workflow states. In his specific case we are only interested in catching the event when the workflow is initially submitted. This can be filtered by the information sent to the return URL, in this case https://myserver.com/api/getReleaseData
In this implementation we are storing he webhook ID in the database so that we can ping it when the application is loaded to make sure that it is still active. Other implementations delete the webhook after it is used and then recreate it as required. There is no specific preference for which methodology is better – that depend s upon the requirements of your integration.
Receive Web Hook Notifications
Once the user who is initiating the release clicks the Submit button on the Release Candidate dialog, the webhook will be triggered and a message will be sent to the third-party application listening for that webhook.
In our example the URL that the webhook data from Onshape gets sent to is:
https://myserver.com/api/getReleaseData
In our application we can define a router for that end point as follows:
router.route(’/getReleaseData’).post(mymodule.getReleaseData);
In this case “mymodule” is where I’ve defined all the functionality for managing data coming from Onshape. Since the webhook data contains no authentication information (just minimal data is sent from the webhook for security reasons), we can’t directly authenticate our application against Onshape, therefore we need to pass the data received from the webhook through a method that will then add the authentication data to our request object. The getReleaseData method simply passes the webhook information received by the application to another authenticated endpoint as follows:

Here is the endpoint defined for processReleasePackage:
router.route(’/processReleasePackage’).post(authController.isAuthenticated, releaseController.processReleasePackage);
As we can see here, we have now added in the authentication middleware - authController.isAuthenticated - and can make secure calls to Onshape’s API.
Get Release Package Data
The parameter that the web hook sent over to our application that we need to make use of is the ID of the release package. We can now make a call to Onshape to retrieve the complete release package with the ID.
We get the release package ID from the request object and make the REST API call to get the package as follows:

The complete release package should be returned in “response”. We can now parse that data to retrieve the properties we need. The most important properties will the IDs of the parts that we are going to release – these should already be synced with our system – if not, we can create them from the data in the release package.
Save Release Package Data
The next step is to save the properties of the release package to a corresponding object in our database. We need at least the ID of the release package so we can later release it automatically from the third-party application. In this case I’m storing other properties that came from the release candidate such as release name and description.

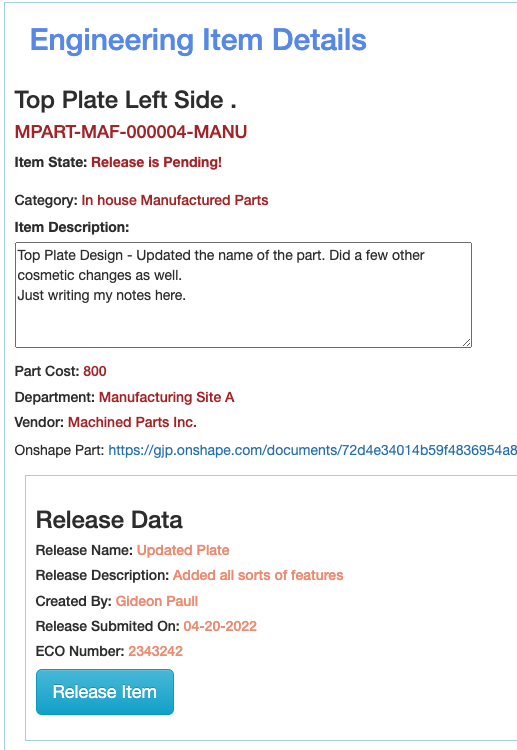
Most of this code deals with retrieving values from the release package and storing them as a new release object in the database. Additional values are associated with the part in the PLM system. In a typical production scenario this code would interface with the PLMs workflow capabilities and possibly kick off a release or change process in that system. For our basic example we are storing values from Onshape with our items and setting a state on the part so that users can see that the part is pending release and take actions required.
At this point in time, Onshape does not care that the part is pending a release. The part in Onshape will remain in a pending state until it is released by the PLM system. As noted previously, we used a user setup in the system to specifically initiate the release, therefore no other users will receive notifications from Onshape with regards to release actions on this part.
Complete the Release
Once the release or change workflow has completed in the PLM system and all approvals have been received, the Part/Item will be in a released state in the PLM system. However, we must now update Onshape with the correct release status of the parts. It is important that Onshape data is in sync with the corresponding data in the PLM system for reasons of data integrity and the visual cues used within Onshape to identify a part as released.
In a typical scenario Onshape will be automatically updated once the workflow completes in the PLM system. In our use case we are simplifying the process by clicking a button to release the item. This will update the state of the part in our system and send a REST API call to Onshape to release the data in the release package (be it one part, an assembly with multiple parts, or drawings).

This code snippet updates the database with the released status of a part. Since we stored data from the release package in our database we now retrieve the “Comment” property so that we can send an updated value to Onshape with the release.
let attrid = rp.props.find(ob => ob.name == “Comment”);
The important line of code here is the REST API call to Onshape:
axios.post(‘https://cad.onshape.com/api/releasepackages/' + id + ‘?wfaction=RELEASE’
The id provided here is the ID of the release package that we stored when the web hook was called at the beginning of the process. The “wfaction” argument indicates that the workflow action in Onshape should be to release the data associated with this release package.
In this example we are also updating the release comments in Onshape, for this reason we required the property ID of the Comment field – which we also previously stored in our release object in the database.
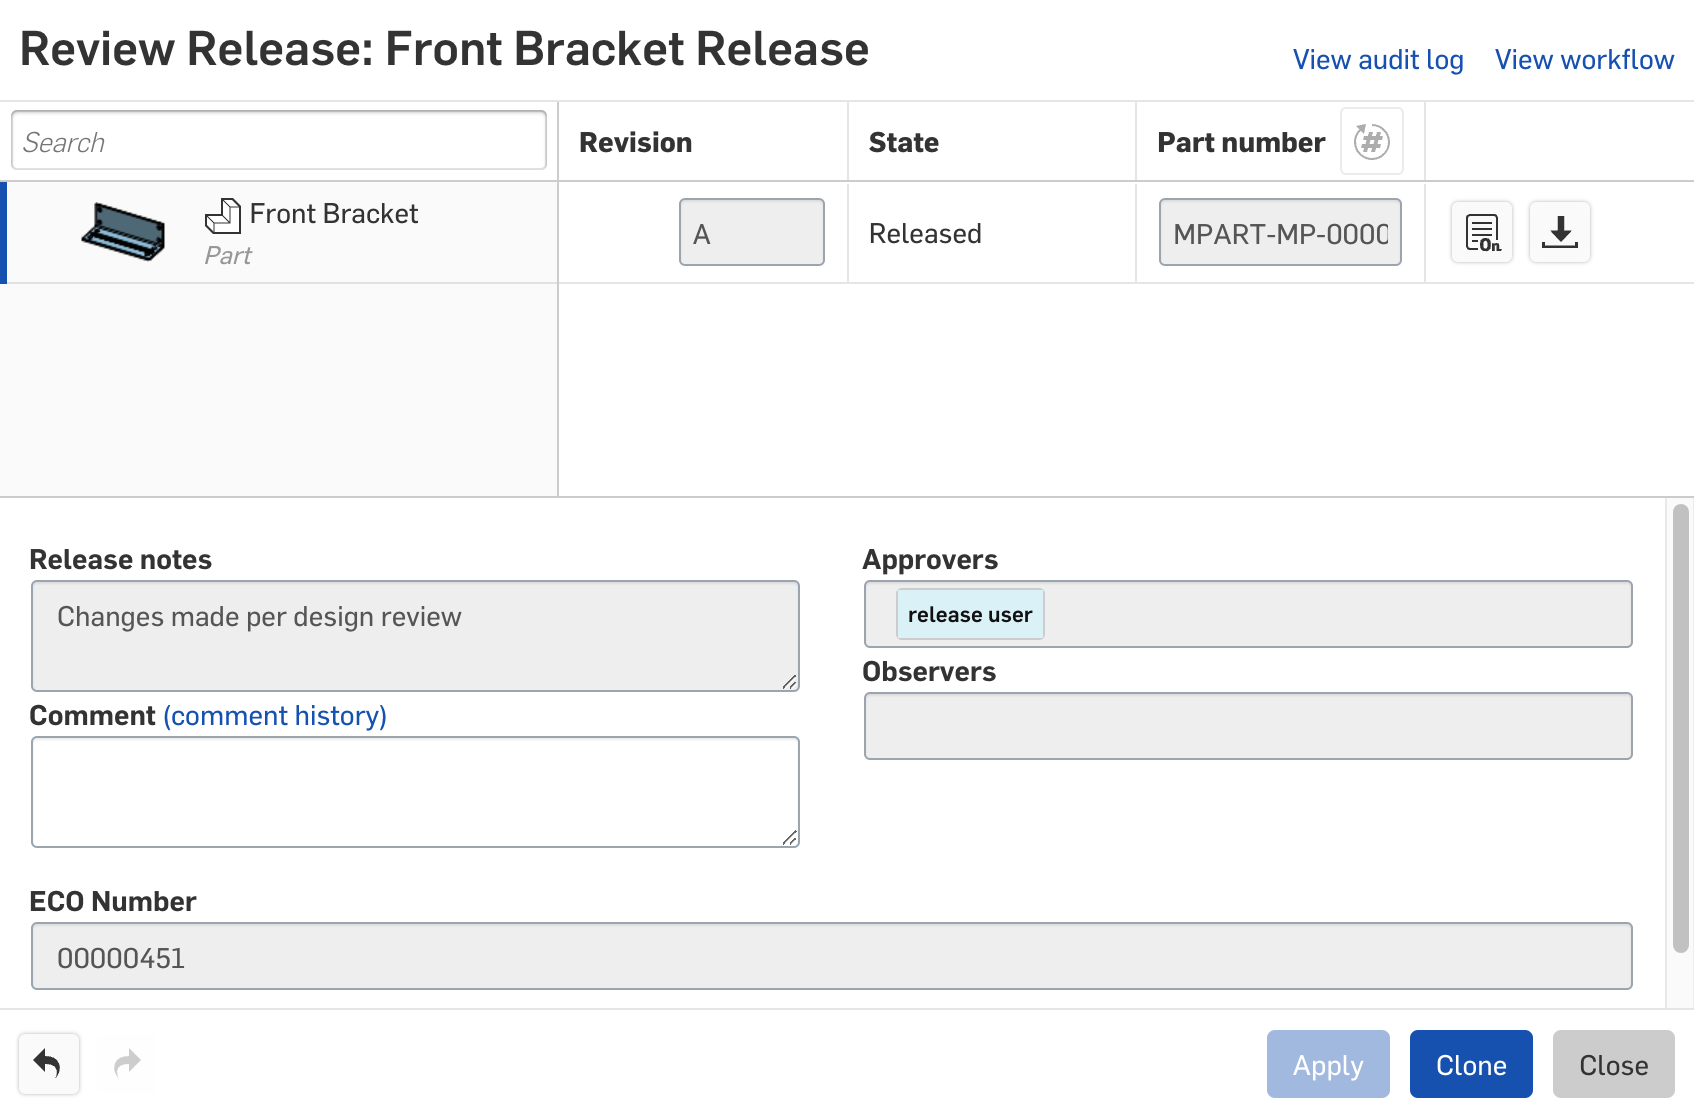
Figure 45 - Release completed automatically in Onshape
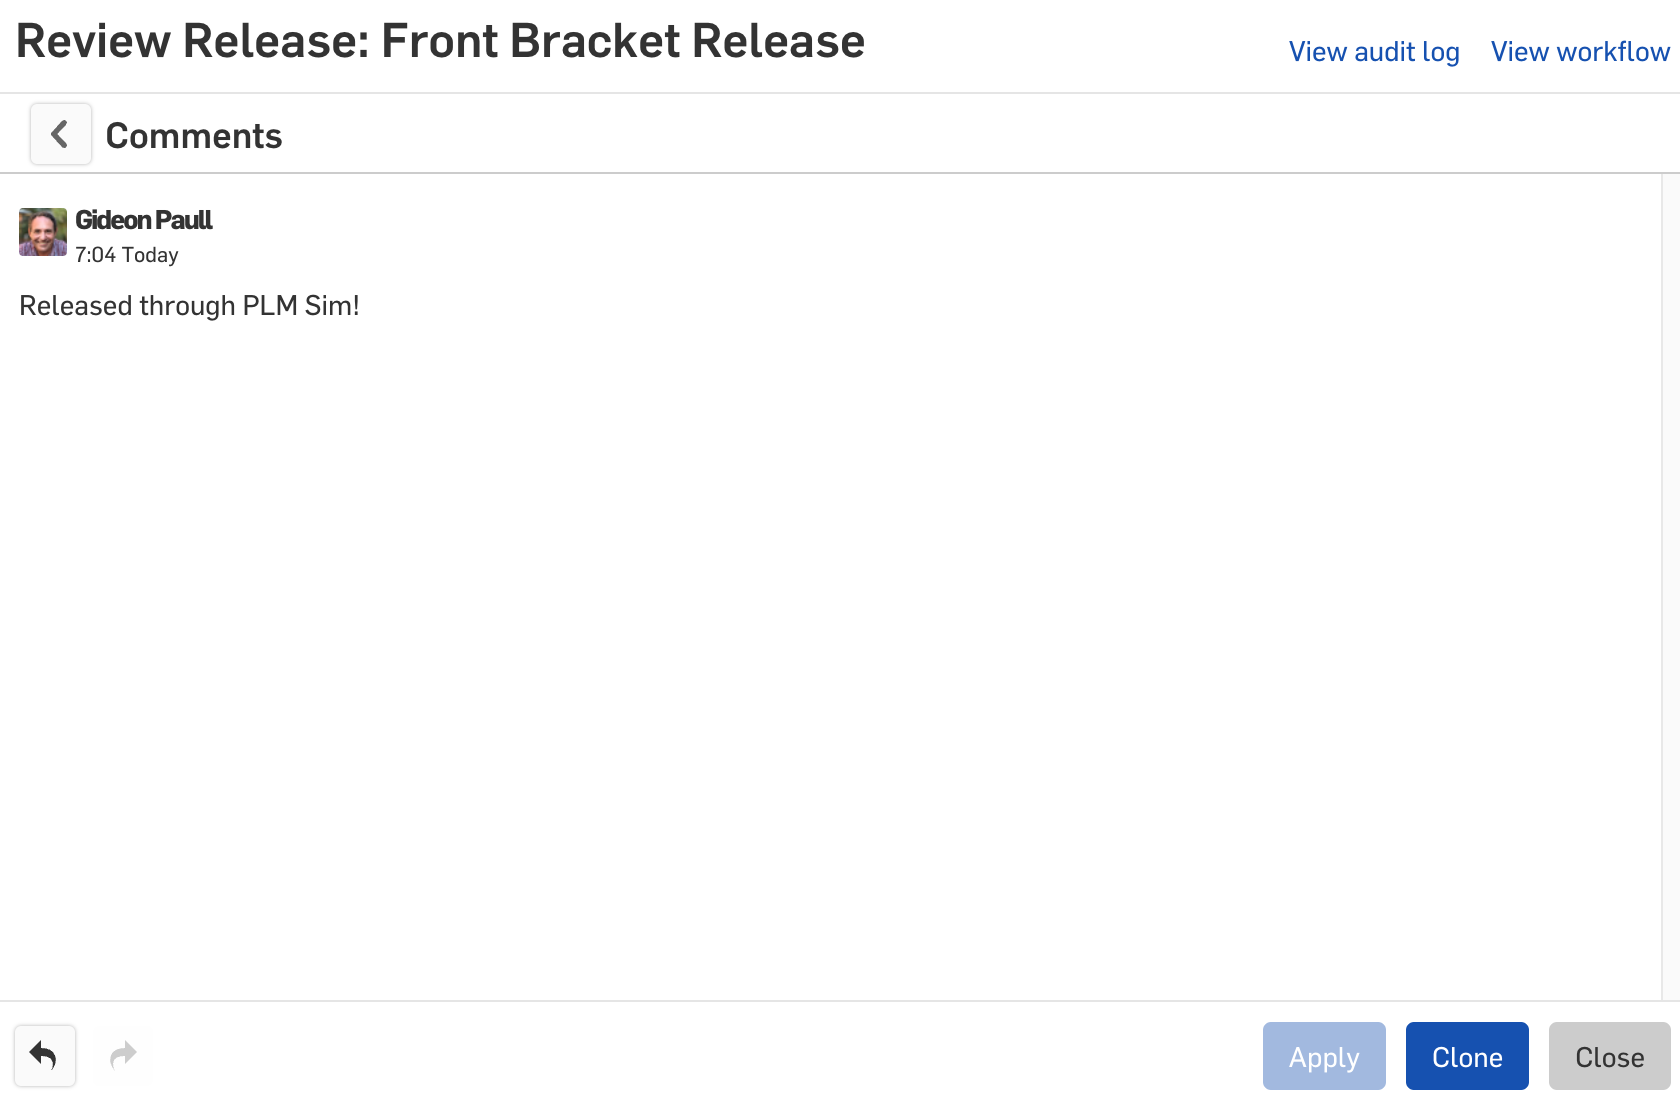
Figure 46 - Release comments Updated from third-party system