Sync Data and Metadata
The first business case is probably the most common, “How do I sync data that I create in Onshape with my ERP or PLM system?”. There could be many reasons why you would want to sync data between two different systems. Primarily Onshape is a system that creates new data. This data is created by designers as they perform their daily tasks. While the designer works primarily in Onshape, the actual data that they create does not exist in a vacuum, it is used by other departments, other processes within the organization. These departments and processes probably do not have access to Onshape or the required knowledge of how to use Onshape. In addition, quite often, the data generated by Onshape will be augmented with additional data as the product lifecycle process progresses.
Therefore, Onshape could be considered the genesis of the data that will be used to develop a product, yet it is not the only data that will be required.
Overview
In this business case we examine how a designer could work in Onshape and how the data generated by Onshape can be used to make decisions in other systems. Based upon the decisions made, data is pushed back to Onshape as values calculated in another system. Let’s look at the process in much more detail.
Step 1: Define Properties in Onshape
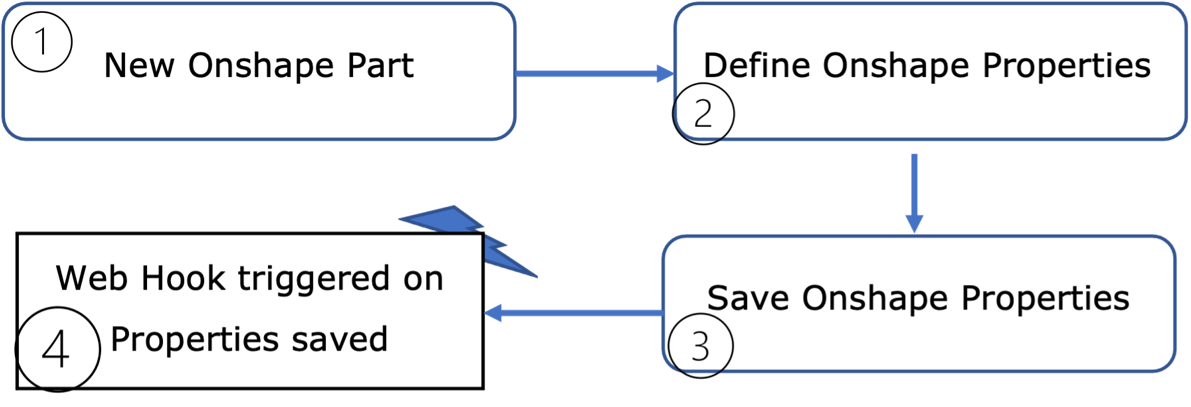
In the first step, the designer starts a new part in Onshape – remember that in Onshape a Part can be created along with other parts in a Part Studio, so we can assume that there could be multiple parts created in the single document. Obviously, we want the designer to have the freedom to use all Onshape functionality without constraints placed by the demands of the integration.
At some point in the design process, the designer will be required to enter property values for the part – these could include values such as the Part Name, the description, material and so on.
The designer clicks the “Save” or “Apply” button for the properties and closes the properties window.
A web hook that listens to any changes in the properties has been defined. As the user saves the properties, the web hook is triggered, and it will send a notification through the defined web hook to the third-party system.
 Note: There are Part
properties, workspace properties and document properties – all these
properties live at different levels of the document. While the trigger
could pick up changes to any to these properties, we are currently
focused on just Part properties – the event will be triggered on any
saving of properties, however our third-party code can ignore anything
that’s not a Part (or an Assembly). In this next step we assume that a
new object is being created in the third-party application.
Note: There are Part
properties, workspace properties and document properties – all these
properties live at different levels of the document. While the trigger
could pick up changes to any to these properties, we are currently
focused on just Part properties – the event will be triggered on any
saving of properties, however our third-party code can ignore anything
that’s not a Part (or an Assembly). In this next step we assume that a
new object is being created in the third-party application.
Step 2: Create Corresponding Object
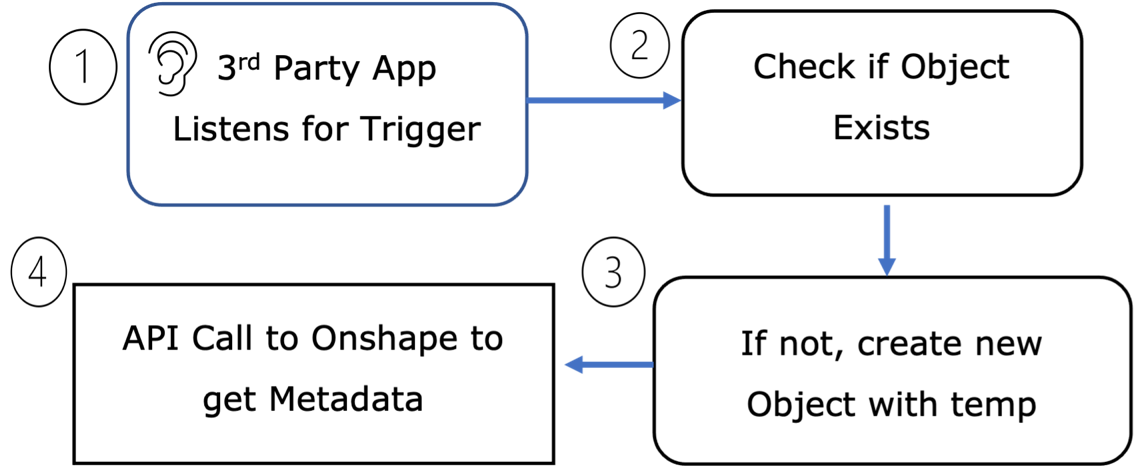
Once the designer made changes to the properties in Onshape and saved those changes, a message is sent to our third-party application. This message is in JSON format and contains minimal information such as the Workspace ID, the Document ID, the Element ID, the Part ID (if it’s a Part) and information regarding the event that was triggered. The third-party application receives this information to an endpoint that was defined during the setup of the web hook.
The code in our application can now use the ID’s sent over to check if an object with corresponding IDs exists in our system. Here we are assuming that no such object exists. This does mean that we must store Onshape IDs into our objects in the third-party system.
We then create a new object and populate the ID information and save it to the database. Note that at this point in time, we only have minimal information that provides no more than the identity of the Onshape Part.
Next, in order to get the complete metadata, we must make a REST API call to Onshape in order to get the metadata for the part. Since we were provided the ID information in the web hook, we have enough information to go back to Onshape and request the metadata for a specific, document, element, workspace and part.
Note that you can either
store the Onshape IDs in separate fields in your database or as one long
unique string which can be used to easily identify the part in your
application.
Step 3: Get Onshape Metadata
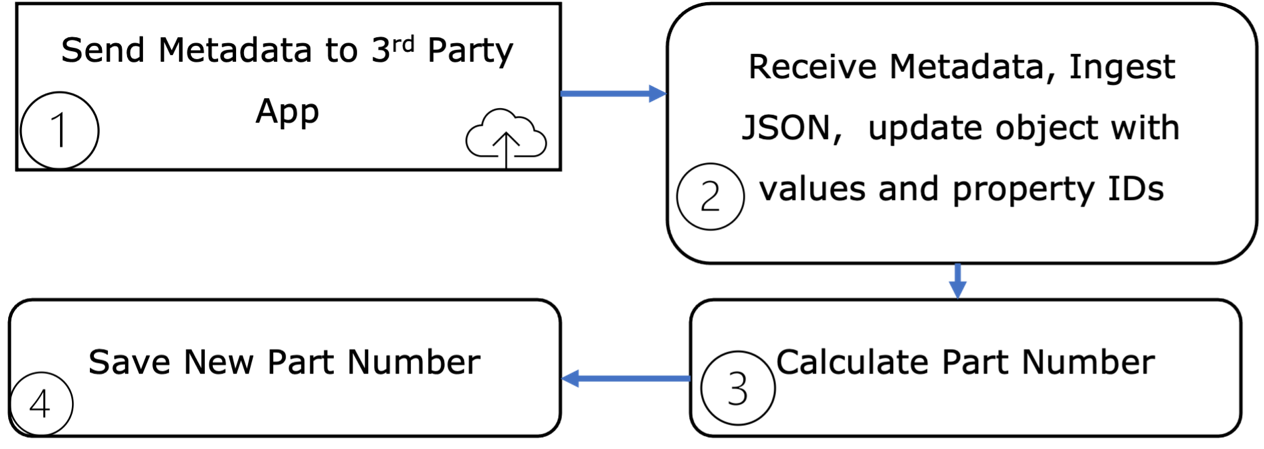
The response from the call to the Onshape API is sent back as JSON. The data will contain a lot of different objects that represent the property values, their types, the IDs, name of the property, value of the property, etc.
Once received this data must be parsed by your third-party application code and the corresponding object updated as required. For bi-directional update, it is important to store the Onshape property IDs of any data that will need to be synced back to Onshape from the third-party application.
This is an optional stage. Once you have all the metadata values imported, you could now calculate any values that are based off the metadata. The most common use case scenario is the generation of intelligent part numbers. Based off configuration, part type, etc., you could generate a part number that has specific meaning within the context of the company.
If you calculated specific values, you can now store them in your database.
Step 4: Modify Properties in Onshape
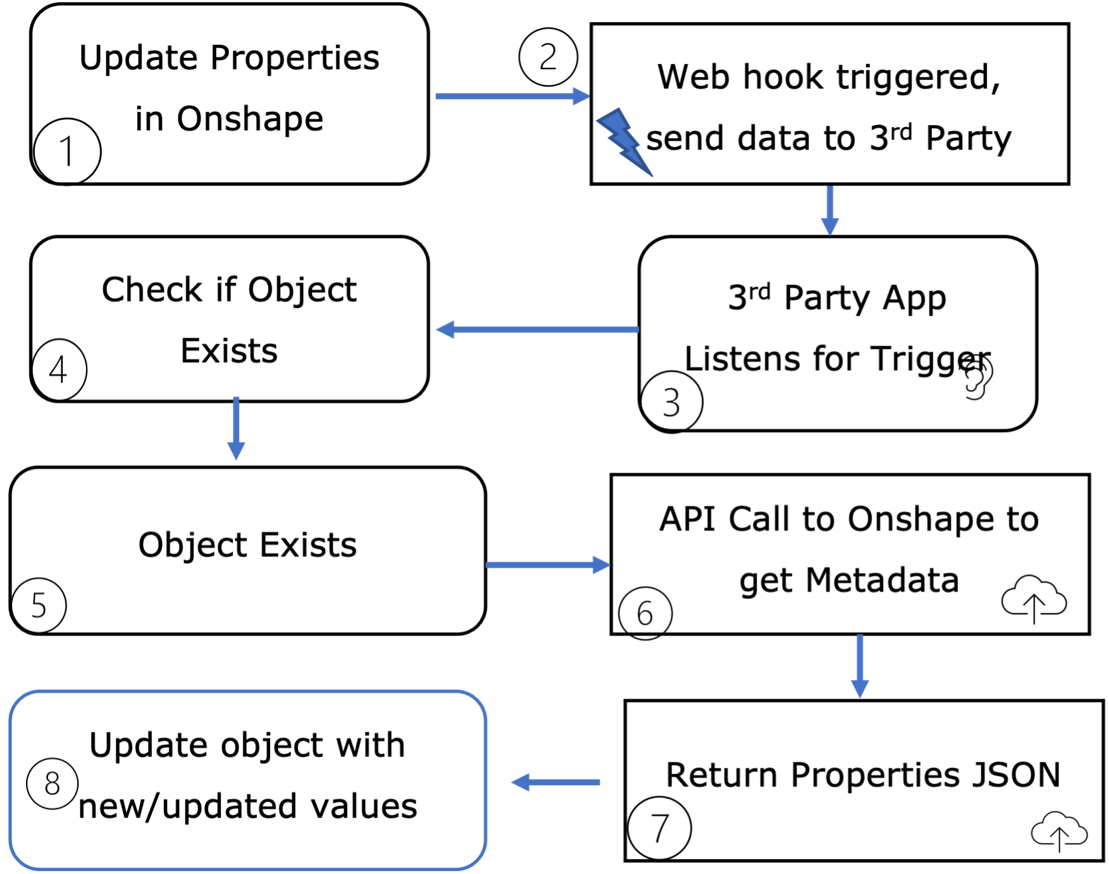
As in Step 1 the designer updates the properties in Onshape – this is obviously something that can happen multiple times
The web hook is triggered when the designer saves the property changes
Our third-party application is listening for property changes
The third-party application’s code will check if the corresponding object exists based off the IDs sent from Onshape.
In this scenario the corresponding object has already been saved in our system
We make a REST API call to Onshape to get the metadata based off the IDs sent from Onshape.
Onshape returns the JSON that represents the updated properties
We ingest the updated metadata and update our existing object in the third-party system.
Step 5: Request Part Number
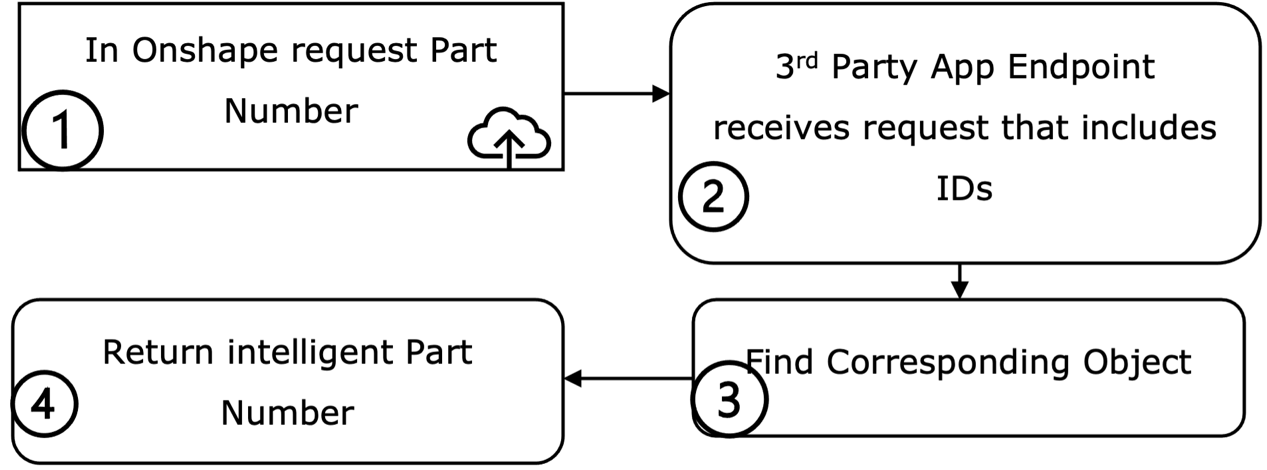
As we will see later, Onshape has the built in capability to pull custom part numbers from a third-party system. From either the properties window or the release candidate window, click the button to request a part number
Onshape sends basic ID information to a predefined endpoint in our third-party app.
The ID information sent by Onshape is enough data to find the corresponding object in our database. We then extract from that object the pre-calculated intelligent part number – or we can calculate it at this point.
The part number is returned to Onshape and populated in the Part Number field
Note that in order to pull a
part number from a third-party application we will need to implement
OAuth2 in our application and grant Onshape access to the resources of
our application. Onshape has a very good mechanism for achieving this
and we will be explaining this in detail in this section.
Note that by default Onshape uses its own internal Part number generator, in order to use a custom third-party generator, we will need to define an app extension and then define in the Enterprise release settings to use our custom part number generator.
Step 6: Push Updates from Third-Party Application
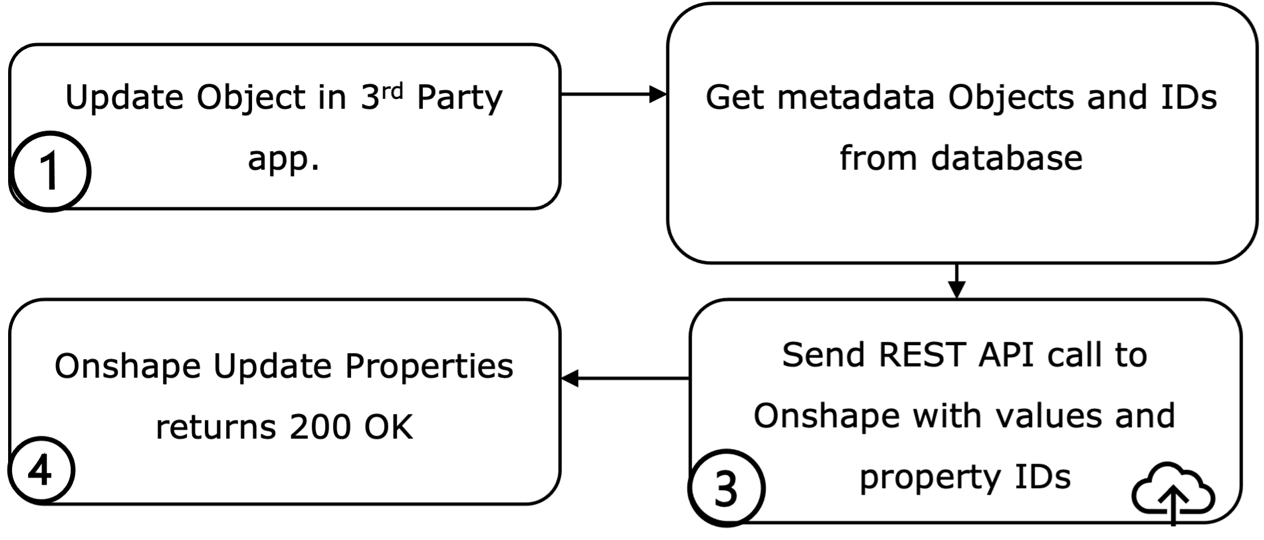
In this scenario we are updating an Object in our third-party application and expecting that some of the property values will be updated in Onshape. We can either send over all the properties populated for this object, or a subset of properties and values
The REST API to update properties in Onshape requires that we reference the IDs of the properties that we are updating. For this reason we have stored the Onshape property IDs with our metadata object in our database.
We construct the correct JSON that contains all the properties to update and the new values. We can then call the Onshape REST API to update the properties in Onshape with the new data.
Once successfully completed, the Onshape REST API call will return HTTP 200 and we can notify the user if needed.
Note that updates to Onshape
will happen behind the scenes in real-time, therefore someone working on
the document in Onshape will be able to see the updates as soon as they
have been made. There is no notification in Onshape that notifies the
user that properties have been updated, however you can open the
properties window and view the updated data.
Implementation
We’ll start by defining an App Extension in Onshape so that we can receive custom part numbers.

Debug
All Browsers now have developer tools exposed in their interface. These tools provide us ways to debug client code, view console messages and most importantly for our use case, view Network requests and their response.
In this example I am using Chrome’s developer tools. Most other Browsers have more or less copied Chrome’s layout for the developer tools so it should be easy to find the network section.
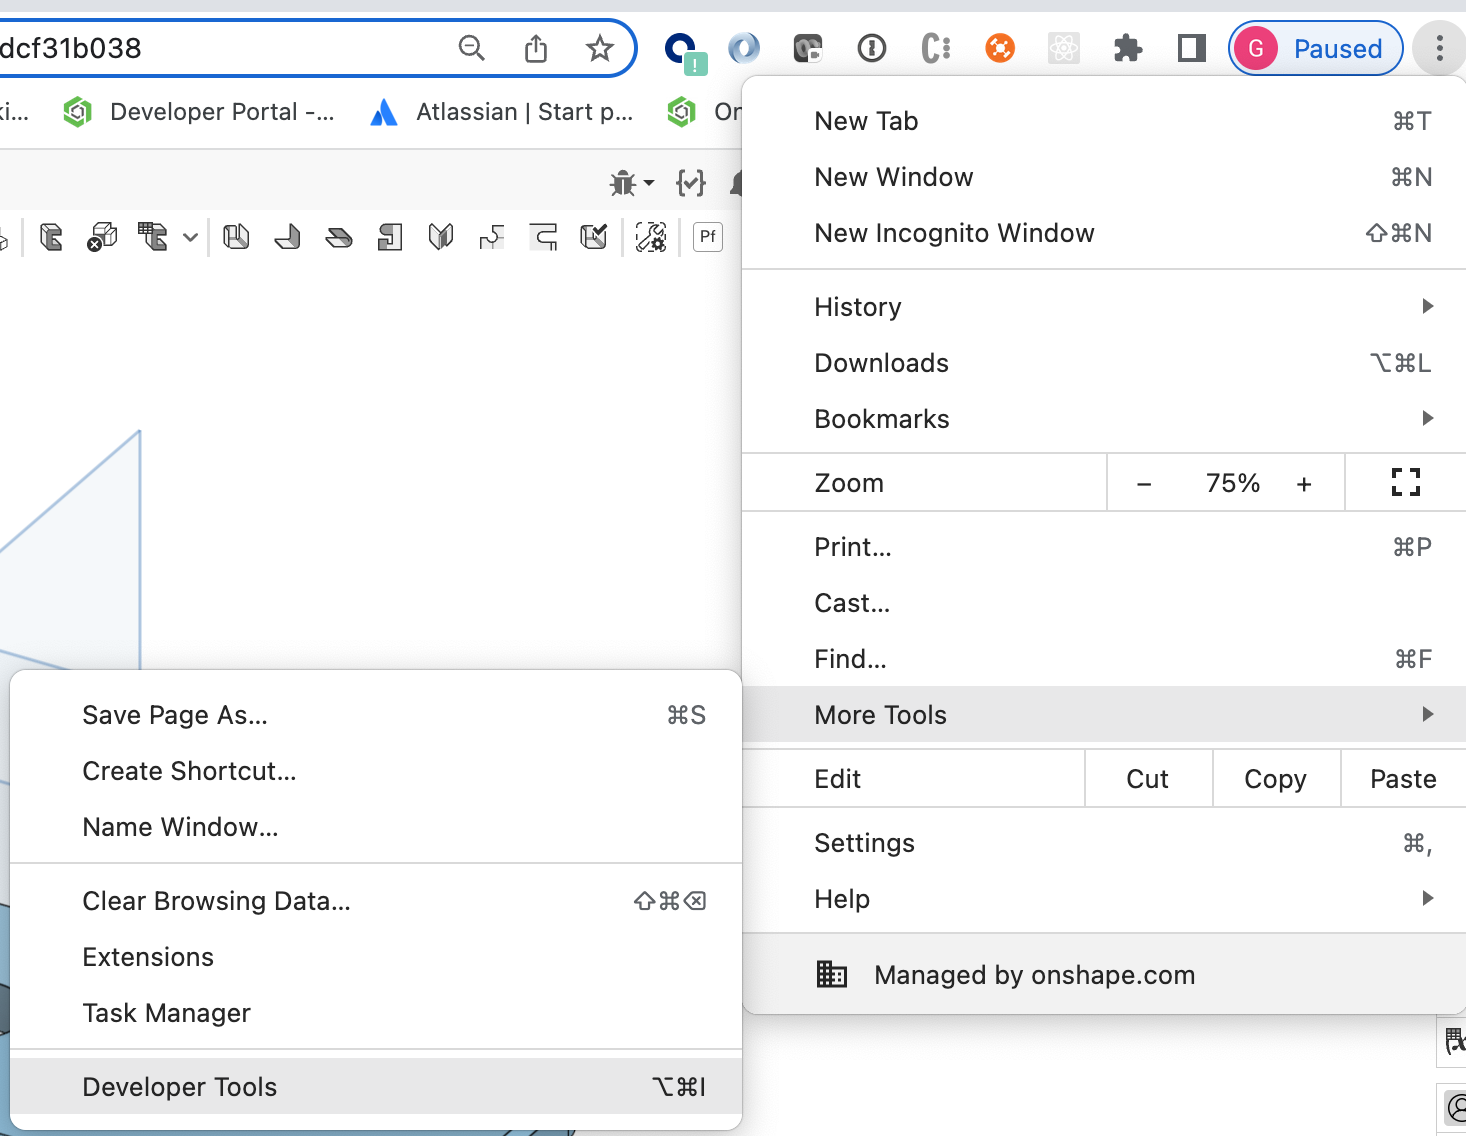
Figure 24 Accessing Chrome’s Developer Tools
Let’s take the simple use case of trying to understand which endpoint Onshape uses for saving Metadata.
Open a document in Onshape and define some properties – don’t save yet.
Prior to saving open the developer tools and click on the “Network” tab.
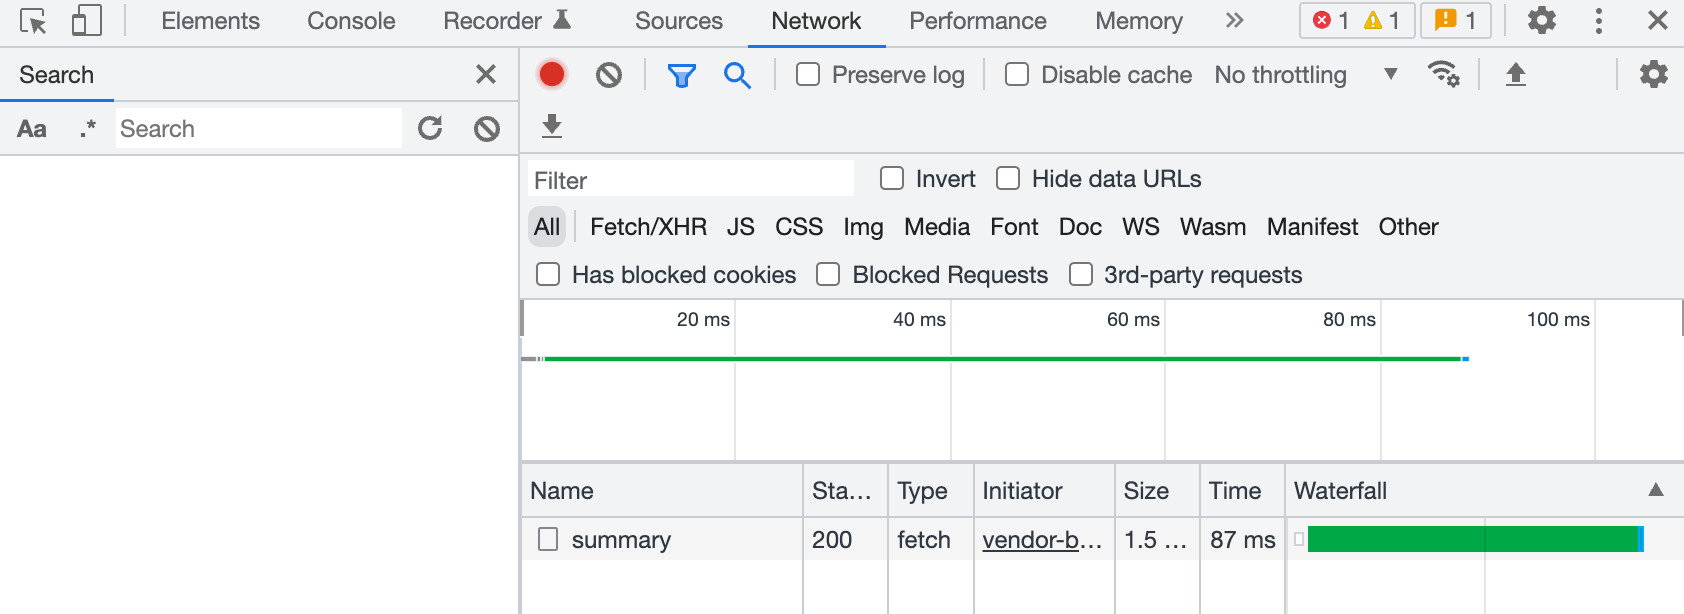
Figure 25 Developer Tools Network Tab
Next save the updated properties by clicking either the Apply Button or the Save Button
In the Network tab you will see a new web request – select it:
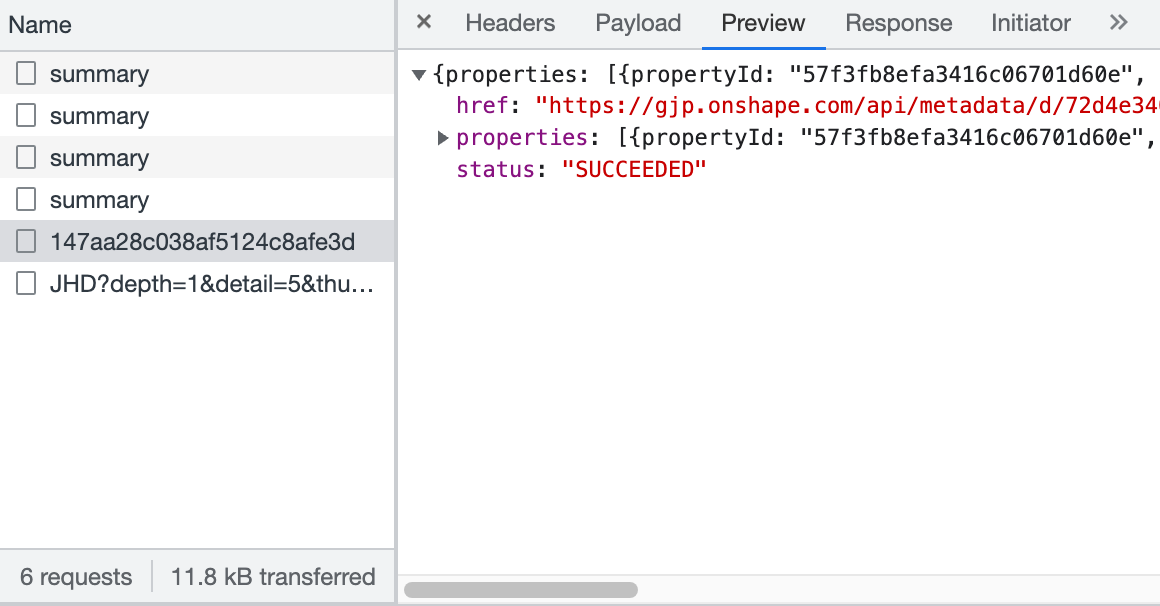
Figure 26 Network Request Sample
What we are seeing here is the response from the call to Save the properties. We can expand this response to view the complete JSON.
By clicking on the Headers we can view the actual request:

Figure 27 HTTP POST Request for Saving Properties
Here we can see that this will correspond to the APIs listed in the API Explorer.
Most importantly the “Payload” tab is our definition of the body of the request. This is provided in JSON format and can be expanded. As shown here:
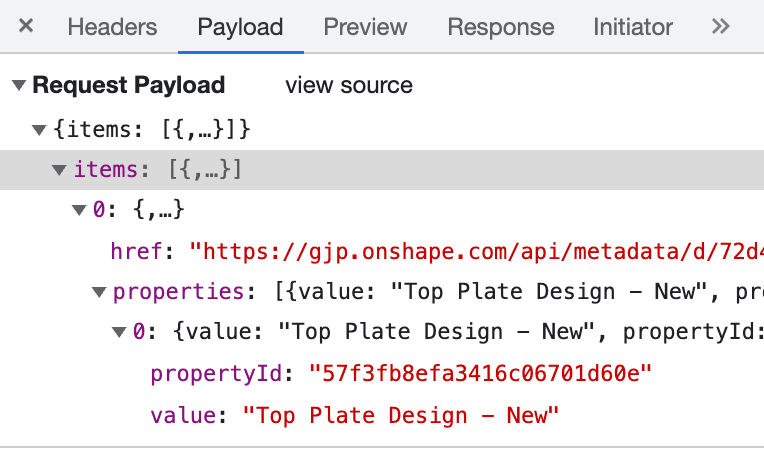
Figure 28 HTTP POST Body
We now have the correct API call and the format of the body to successfully make the API call. We can also see from the body that if we wish to update properties in Onshape from our third-party application, we need to store the propertyID value.
It is important to mention –
ALWAYS use cad.onshape.com to make API calls (no matter what you see in
the Headers tab or is shown in the Payload tab.
Define an Application Extension
An application extension is how Onshape embeds third-party application features in its UI. There are two types of extension:
An extension that embeds its UI from the application into the Onshape UI in an iFrame. Such a application my call Onshape REST APIs or just expose an application interface inside Onshape.
An extension that embeds and that calls a REST API exposed by the application from the Onshape UI. For instance, embedding application functionality in the context menus or toolbars. This type of application extension relies on external OAuth information in order to authenticate the call. In this case Onshape acts as the client and the application as the server.
Each extension will exist at a specific location in the Onshape UI and will work within the context of that location or a specific selection, passing the relative information to the application.
In order to define the Application Extension we return to the development portal at https://cad.onshape.com/appstore/dev-portal where we initially defined our OAuth Application.
Select the OAuth Application that you previously defined and click on the Extensions tab.
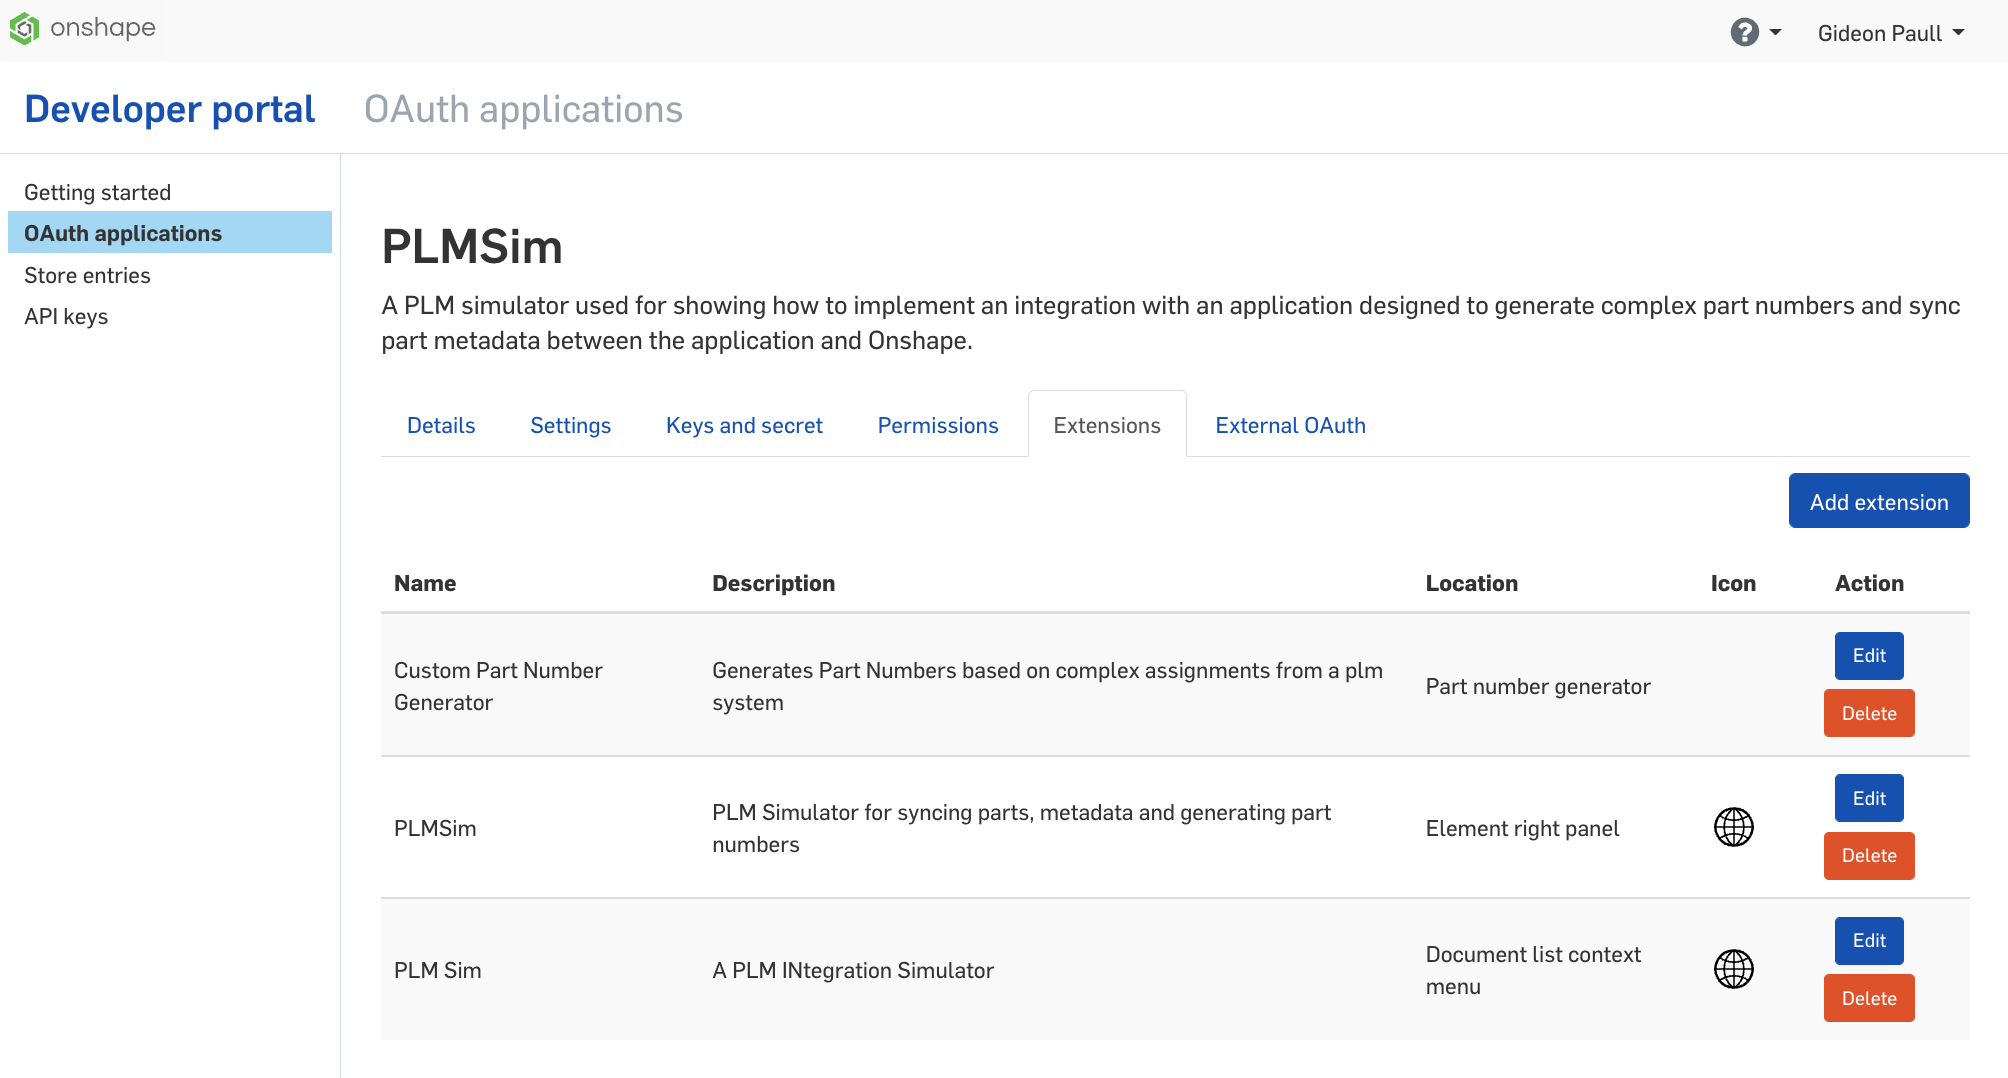
Figure 29 - Oauth Applications - Extensions
Start by clicking the Add Extension button.
Note that you can create as
many extensions as you need for your application within the Onshape UI.
This is the interface where you define where in the Onshape UI the command will appear, and what endpoint in your application the command will reference. Changing the Location dropdown will provide additional fields that can be defined to specify context and other relevant fields.
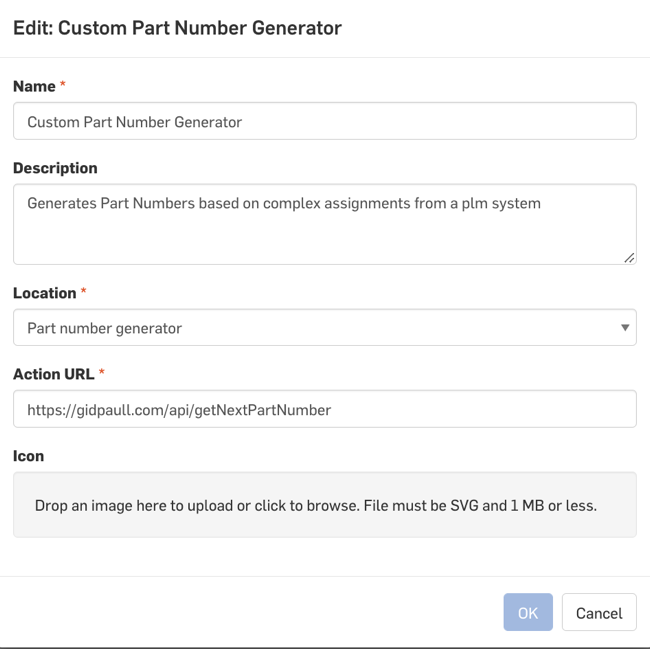
For our use case, Define a name, i.e. “Custom Part Number Generator”, define a description of the extension and select “Part Number Generator” from the Location dropdown. The only other field that you need to define is the Action URL. This is the endpoint in your application where you will fetch the part number from.
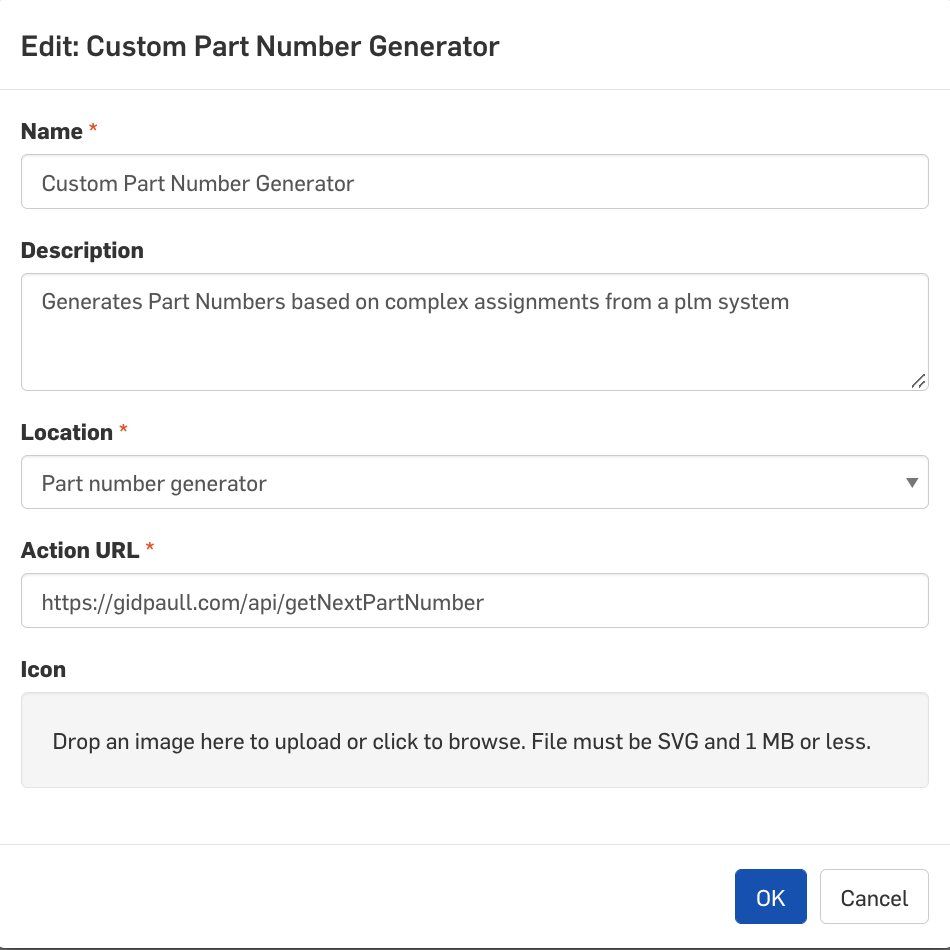
Figure 30 - Define Application Extension
Once you save the definition you will see it in the list of extensions. You can always come back and edit the definition of the extension.
Grant Onshape Access to 3rd Party Data
If you require Onshape to access the resources of your application, then you will need to define the external OAuth parameters. In our use case we will need Onshape to access data in our application in order to pull the part numbers into Onshape.
Click on the External OAuth tab, the final tab on the OAuth Applications page.
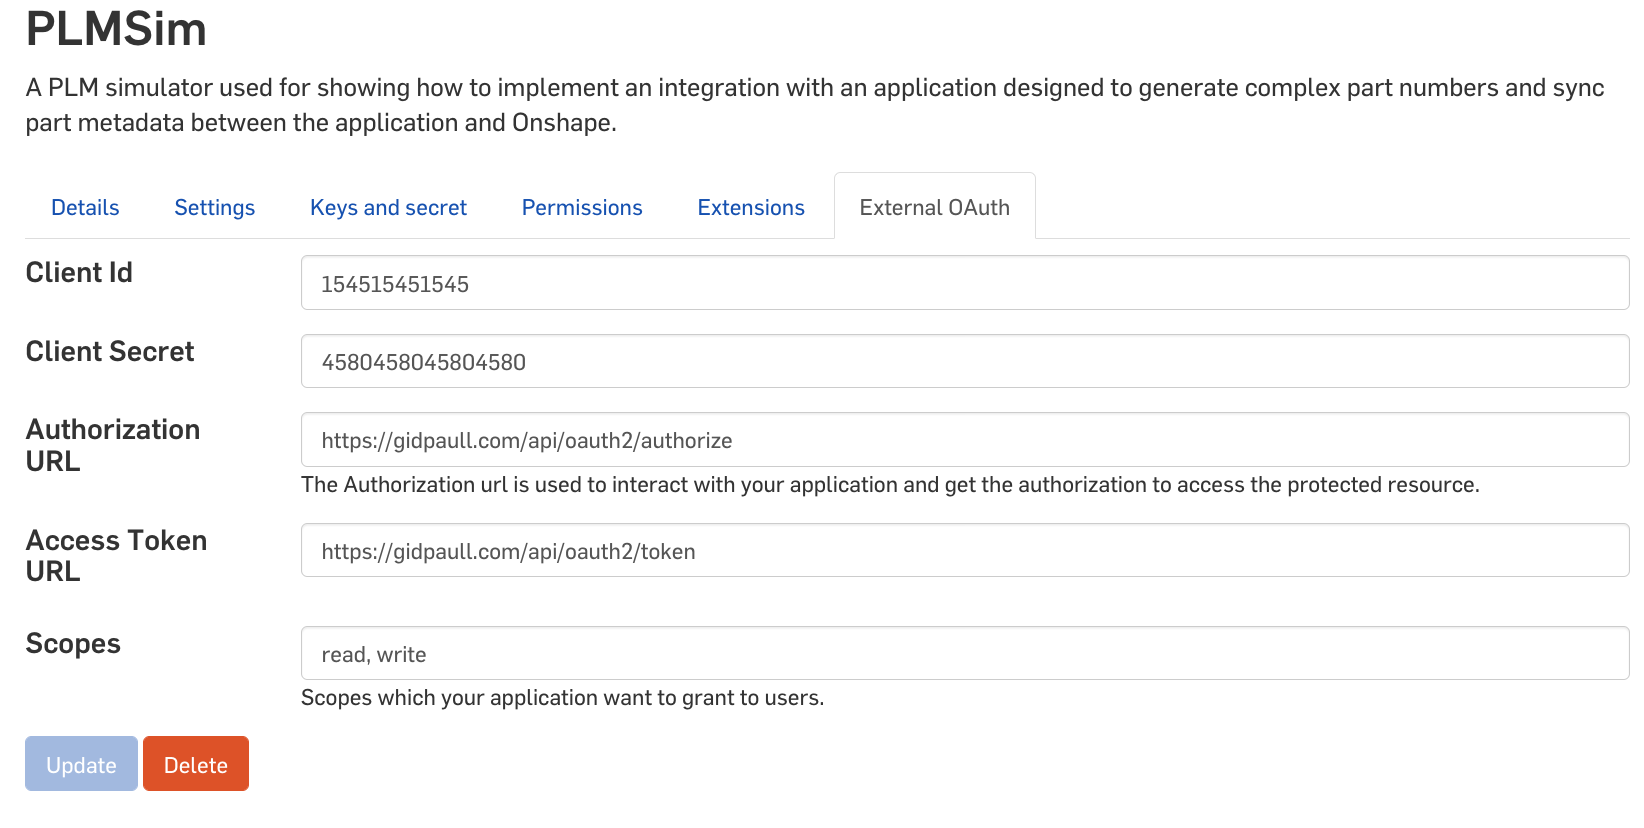
Figure 31 - Define External OAuth
In this guide we’re not
detailing the implementation of OAuth2 inside your application, this is
explained very well in many on-line guides. My favorite of these can be
found at:
https://www.digitalocean.com/community/tutorials/an-introduction-to-oauth-2
Onshape provides the fields that are required for it to make a secure request to your application, receive an access Token and refresh it when required. In this case Onshape acts as the client and your application as the server – this is the inverse to what we defined when we enabled the third-party application to access Onshape.
Once you have defined the fields, Save/Update the definitions. We have now completed defining the application extension and enabling Onshape to access your applications resources.
Note if you haven’t defined
all the endpoints at this time, you can come back later and update the
information once you have it defined in your application.
The last thing we need to do is for the user to grant access for Onshape to access your applications resources. We can do this through the same interface that we used to grant access to Onshape.
From inside Onshape go to your account settings, from the top right dropdown menu. Click on the applications page.
For applications that have an application extension and External OAuth defined we have the “Grant” button available in the “external Access” column as shown here:
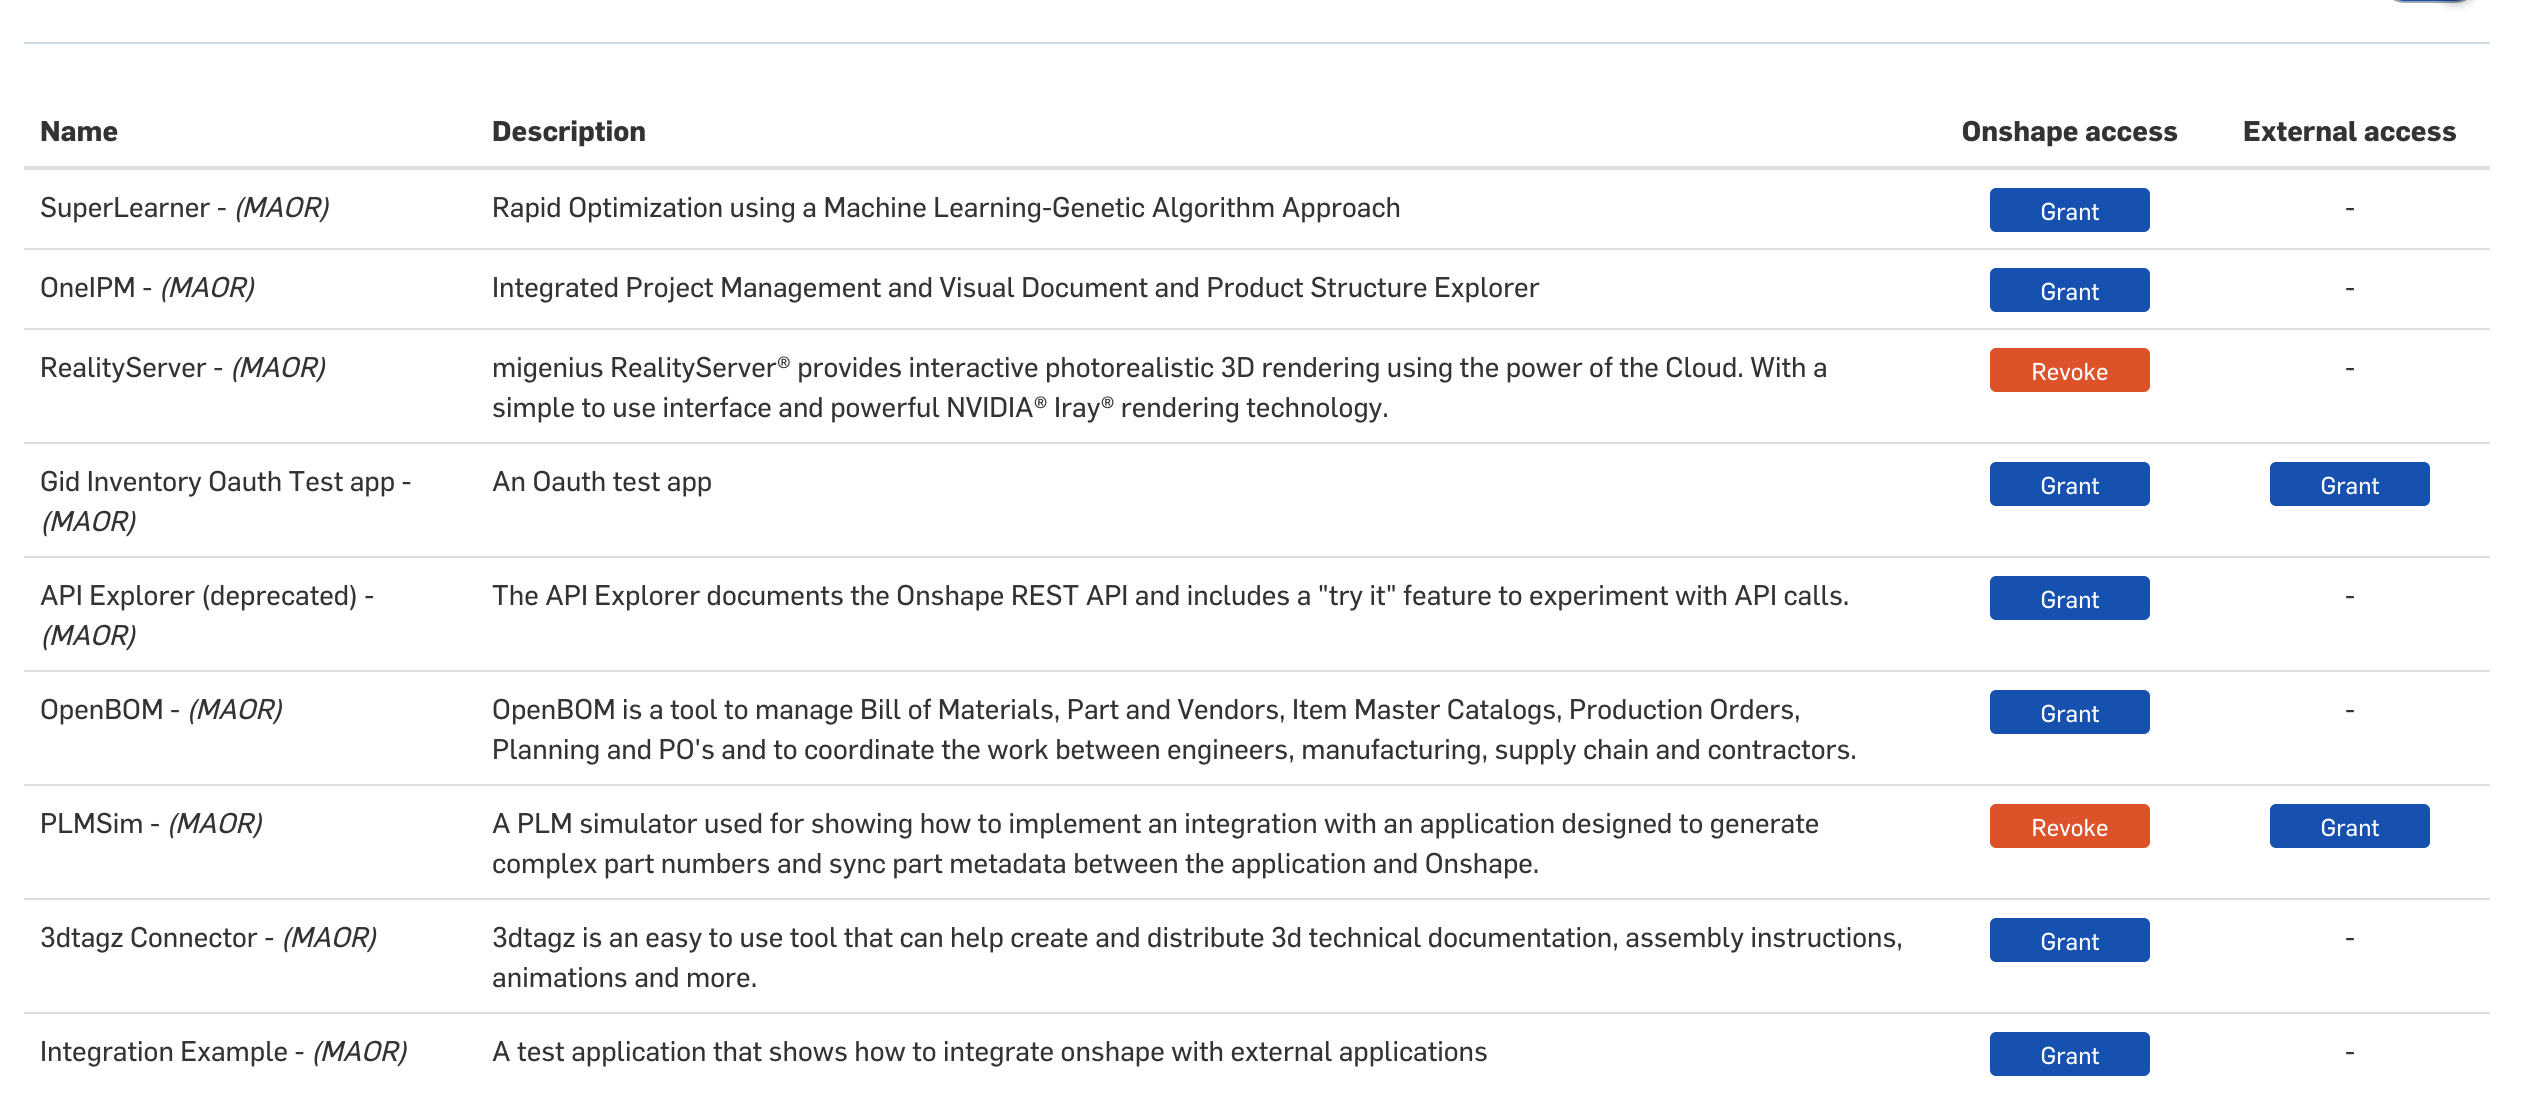
Figure 32 - Grant External Access
Click the “Grant” Button in the External Access column.
Your third-party application will present the user with option to authorize access to the application – similar to this simple interface:
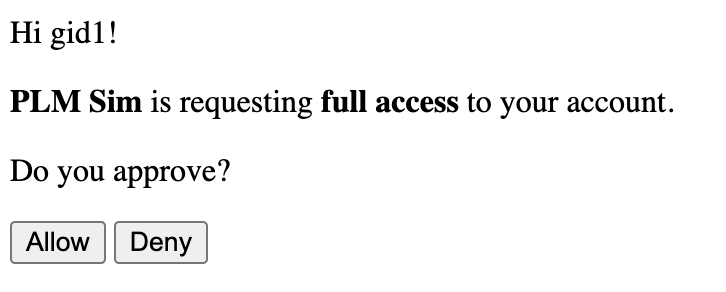
Figure 33 - Enabling Onshape to access a 3rd parties data
If you click “Allow”, you will be returned to Onshape’s Applications page and external access will be granted.
Defining Webhooks
Now that we’ve defined our application extension and OAuth access to our application, we can start on receiving notifications in our application when events happen in Onshape.
Onshape supports webhook notification for many different types of events. We will register an endpoint in our application that will receive a notification whenever something occurs in Onshape. In our specific scenario this will be when the user updates the Onshape properties – as we defined in Step 1 Define Properties in Onshape:
For our purposes we will be registering to receive web hook notifications for the onshape.model.lifecycle.metadata event. When registering for an event in Onshape there are only two pieces of information required:
The event (onshape.model.lifecycle.metadata)
The Enterprise ID
To easily find your enterprise ID, in Onshape select the Enterprise Settings option from the top right dropdown menu and then click on the “Details” menu option on the left-hand menu bar.
You will see your Enterprise ID and a “Copy to Clipboard” button next to it. This will enable you to directly copy this unique ID into your code.
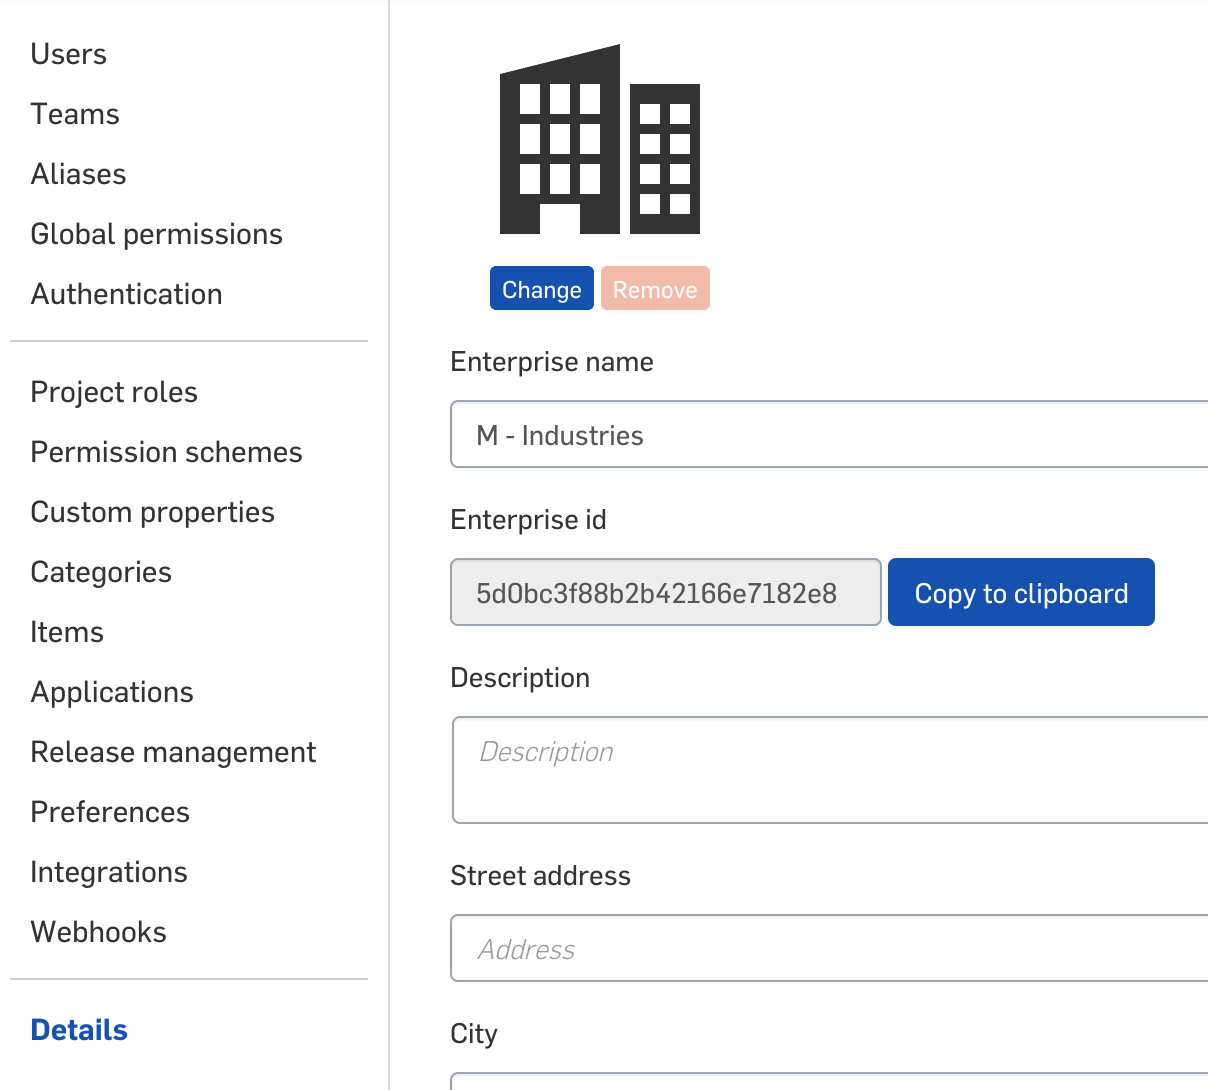
Figure 34 - Finding Your Enterprise ID
The following code shows how we can register a webhook in Onshape.

As with other calls to Onshape that we’ve seen, we are passing the accessToken in the header in order to establish a secure call to Onshape’s resources.
The information coming back from the registration call will be similar to the following:
{

"timestamp": "2014-12-16T23:45:10.611-0500",

"event": "webhook.register",

"workspaceId": "000000000000000000000000",

"elementId": "000000000000000000000000",

"webhookId": "544e91f7fb88ed44f5de1508",

"messageId": "34795d2e5f5f44eeb61fb7b1",

"data": "Some data",

"documentId": "000000000000000000000000",

"versionId": "000000000000000000000000"

}
In our example we are saving the event (onshape.model.lifecycle.metadata) and the returned webhookId to a database in order that we can later ping it to make sure that it is live.
Following the registration of
the webhook, Onshape will attempt to make a call to the Notify URL
defined in the body of the registration request. This is the endpoint of
your application that should be called when the event is fired in
Onshape. The most common reason for registration failures is that the
endpoint you defined, does not return an HTTP 200 status code.
Therefore, even if you registered for an event and received a
registration notification and a webhookId back from Onshape, your web
hook is not in fact registered until Onshape validates the notify URL
and receives the HTTP 200 notification back from it. Unfortunately there
is no way to easily know if your web hook has been successfully
registered until you either ping it, request to list it, or try to
activate the event through Onshape.
Also it is important to know
that even when your webhook is registered successfully, if you change
your code later on and Onshape fails to receive an HTTP 200 status code
back from the notify URL, the web hook will be removed.
One of the ways we can validate that a webhook is “live” is by pinging it using the Onshape REST API. The following code shows the implementation of a ping to the webhook. If an HTTP status code of 200 is returned, we know that the webhook is enabled, if not then we can re-register the webhook as needed.

Note that you can create many
duplicate webhook registrations for the same event with the exact same
notify URL. Onshape doesn’t limit how many registrations are created for
a single webhook. In the event that this happens, the notify URL will be
called as many times as there are webhooks registered for that event.
You can validate the registered webhooks by calling the
Webhook API.
Use
https://cad.onshape.com/glassworks to call APIs and validate the
requirements for each REST API call. This interface lists all the
available Onshape REST APIs and provides examples of the values returned
from each call.
Receiving Webhook Notifications
Once your webhook is registered and confirmed to be working you should be getting a notification from the webhook to your notify URL. The notification should be similar to the following:
{

    "timestamp": "2014-12-16T23:46:29.284-0500",

    "event": "onshape.document.lifecycle.metadata",

    "workspaceId": "000000000000000000000000",

    "elementId": "000000000000000000000000",

    "webhookId": "544e91f7fb88ed44f5de1508",

    "messageId": "60f54ac1cbc04179a6642d9a",

    "data": "Some data",

    "documentId": "0f9c4392e5934f30b48ab645",

    "versionId": "000000000000000000000000",

    "documentState": "IN PROGRESS"

}
In your case the workspaceId, elementID, documentID, and PartId should be populated with the values from the Onshape document that was open when the properties were updated.
It is important to note that
there is currently no OAuth validation on the webhook response,
therefore the endpoint in your application will not receive any access
token data for directly calling Onshape APIs. Therefore, if you need to
make a call to the Onshape REST APIs inside the notify URL endpoint make
a call to an endpoint in your application and include your application
OAuth credentials in the body of the request. In this way, you can make
a call to your application and load the passport and the Onshape
credentials.
Onshape takes security very
seriously and for this reason, unauthenticated calls only provide
minimal details such aa, in this case, id’s.
Getting Onshape Properties
In our specific use case, when we received the webhook notification, we want to use the ID data provided to find the corresponding object in our database (or create a new one) as shown in Step 2 Create Corresponding Object: Then we make a call to the Onshape REST API: /metadata/d/{did}/{wvm}/{wvmid}/e/{eid}/{iden}/{pid}
All the relevant data is provided in the response from the webhook so we can pass this to the method which will call this API as follows:


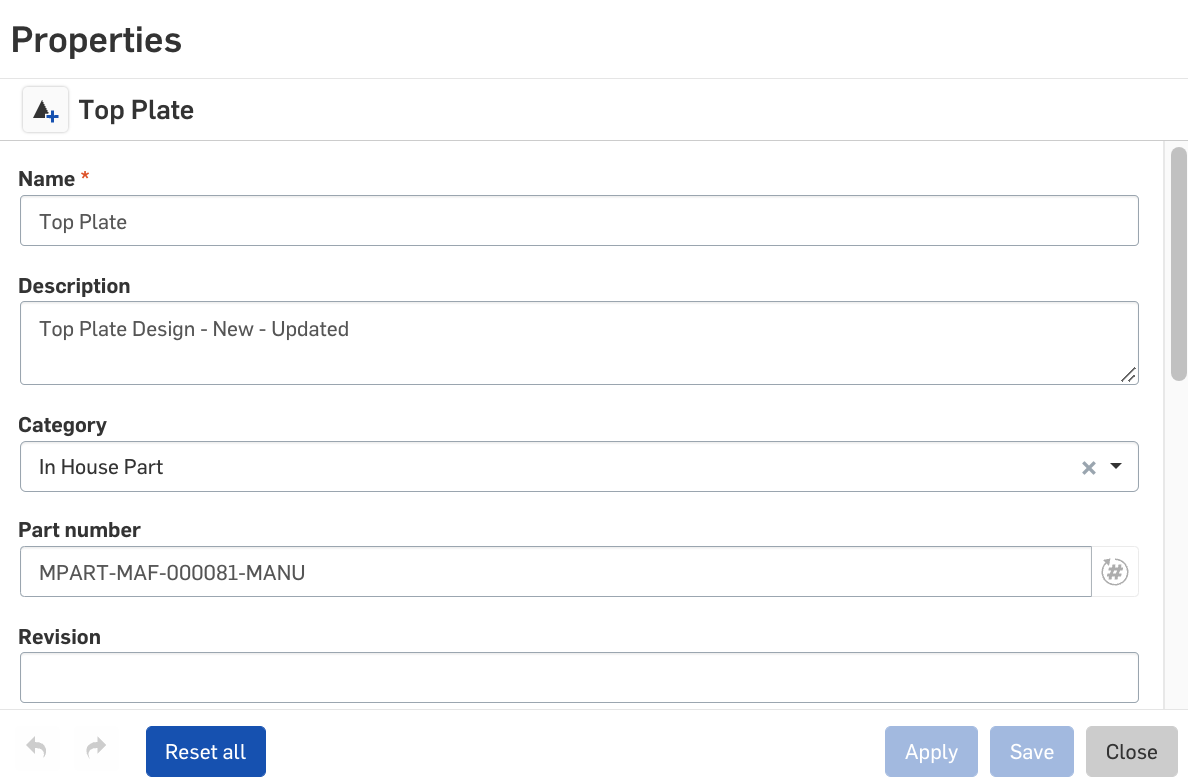
In fact there is probably only three key pairs that we’re interested in here:
Name – name of the property. In this case “Name”
Value – the value of the property. In this case “Top Plate”
propertyId – the ID of this property. We might need this if we want to enable a bi-directional sync between both applications.
Note that for valueType
CATEGORY the actual name, value and id will be embedded deeper in the
object inside an array. I suggest copying and pasting the output from
the API call into a JSON viewer such as http://jsonviewer.stack.hu/ so
that it will be easier to find where the correct values are.
We can now update our corresponding object with the Onshape metadata values as described in Step 3 Get Onshape Metadata:
Updating Onshape
So far we have pulled data from Onshape and populated it into our third-party application, however what if we make updates in our application that we want to propagate back to Onshape? This is certainly possible through Onshape’s REST API. Usually this would be implemented in your application on the click of a button – such as “Save”, if you have multiple properties to update, or when a property is updated if you want to trigger the sync for the update of a specific field.
Either way it is fairly straight forward to send the REST API call to Onshape to update properties. The following snippet of code shows how the call can be made:

The response from this API call should be an HTTP 200 status. If this is the case, we can update the user that the sync was successful.
If you know that you want to
update Onshape with property values from your application, it will be
important to build a data model that can store the properties with the
unique ID provided by Onshape.
Implementing Custom Part Numbers
The final step in this business case is to pull the part numbers form our third-party application. The part numbers can be calculated based on metadata values that were previously synced from Onshape or they might be numbers being pulled from yet another system – such as an ERP or even a Google Spreadsheet. The important thing is that when the user clicks a button in Onshape, the correct Part Numbers get populated.
To first understand how the setup for pulling part numbers from a third-party application we need to go back to the definition of our Application Extension in the Onshape developer’s portal.
Here we can see that we gave the application extension a name, defined the location as “Part Number Generator” and defined the “Action URL” – this is the endpoint in our application where we will fetch the part number from.
Once we have the application extension defined as Location = Part Number Generator, you will be able to use this option inside Onshape Release Management settings.
Note that in order to use the
Part Number Generator option you will have to define the External OAuth
option and grant Onshape access to the resources of your application.
This is because Onshape will need to access the defined endpoint in
order to pull the part number from the application
From within Onshape Select the “Enterprise Settings” from the top right dropdown menu. Navigate to the “Release Management” settings and scroll down to the “Revisions and part numbers” section of the page.
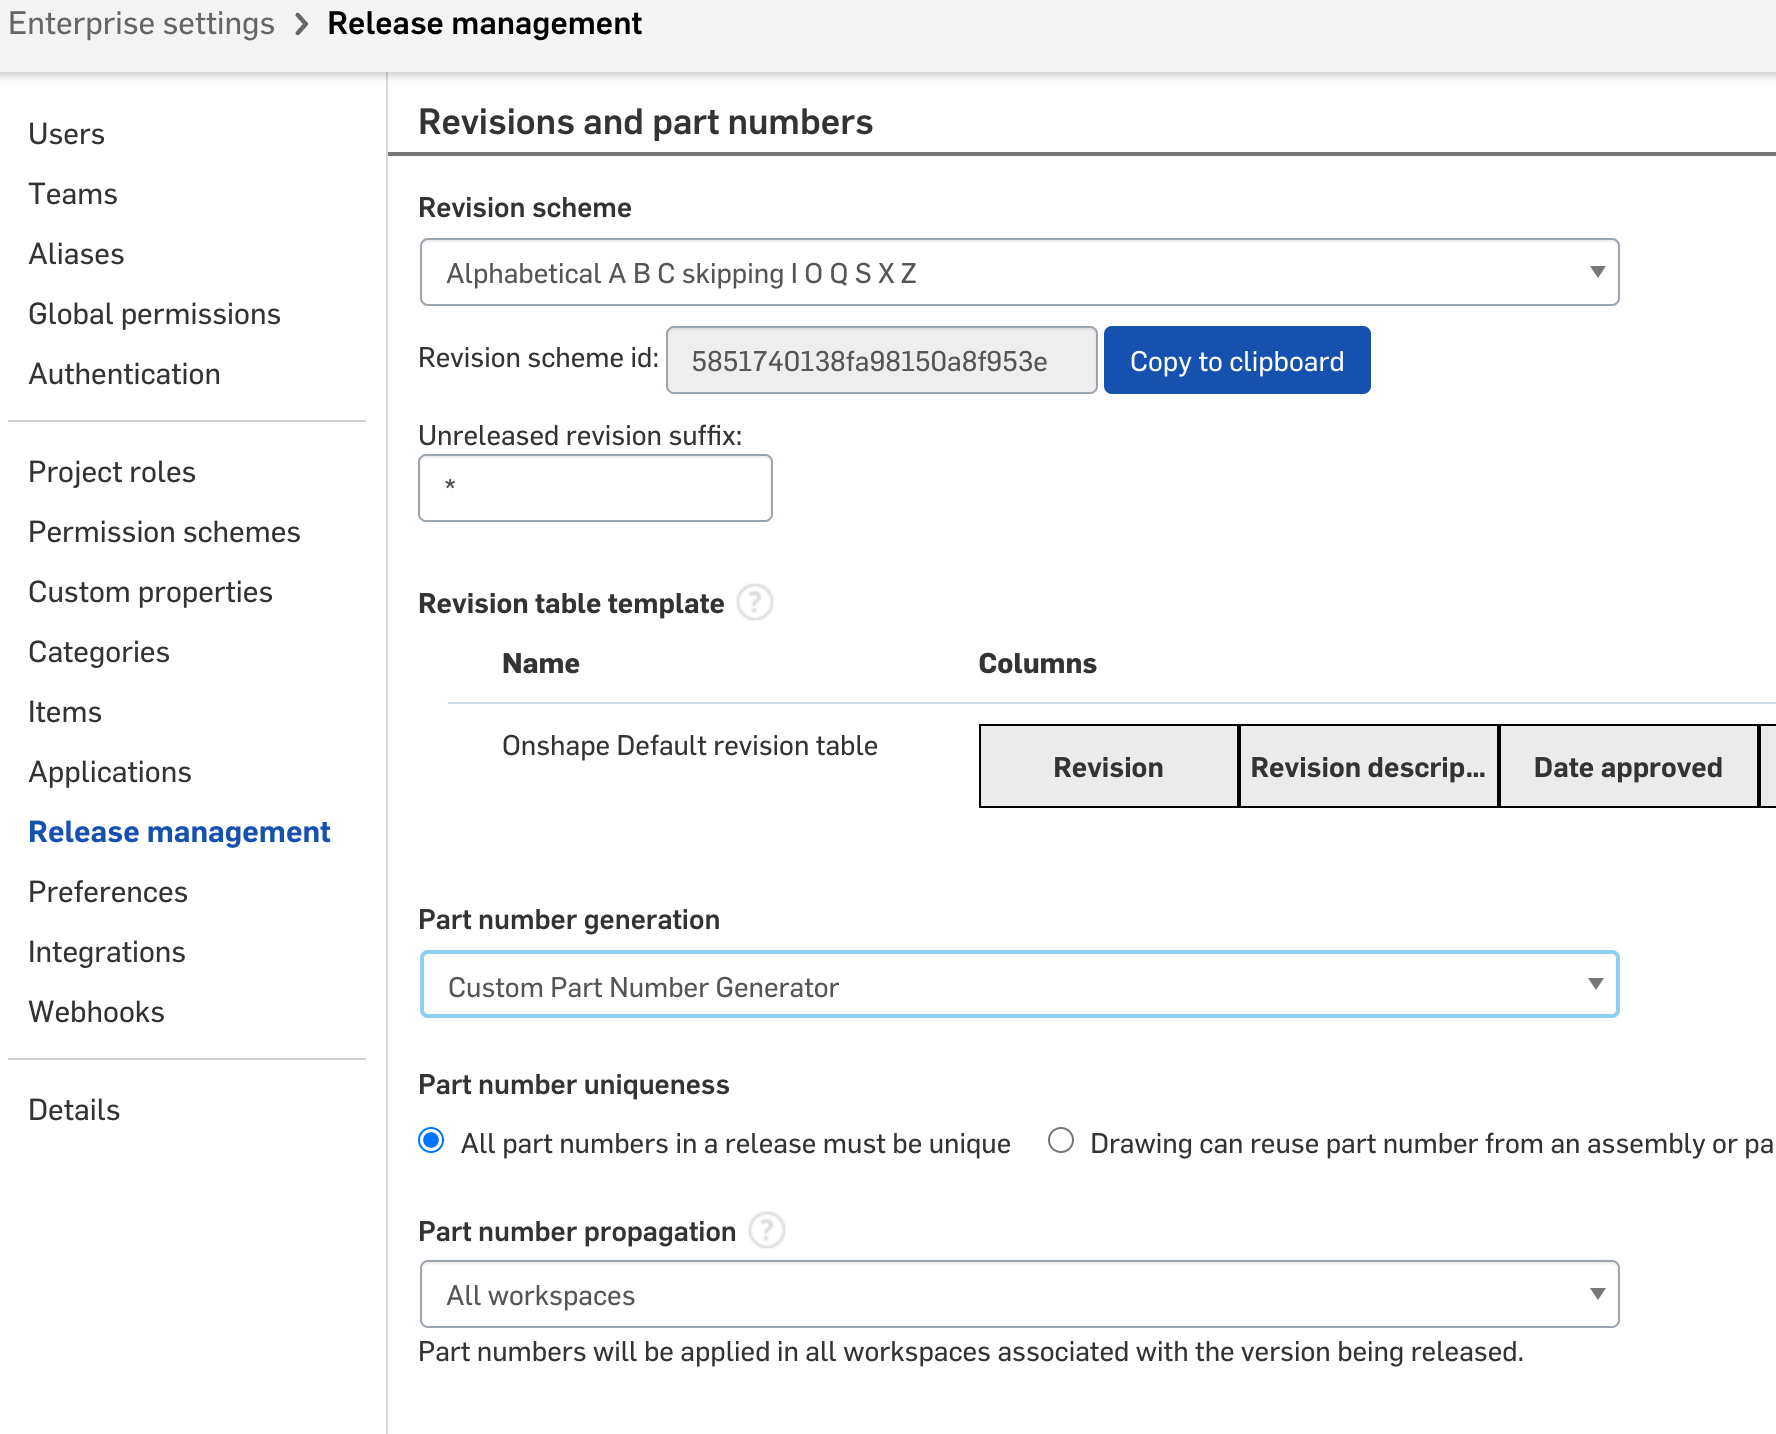
Figure 36 - Revisions and Part Number Settings
In the Part Number Generation dropdown select the “Custom Part Number Generator”. Note that this is the name that you defined in your Application Extension so it might differ from what’s shown here.

Figure 37 - Selecting Custom Part Number Generator
Finally scroll to the bottom
of the page and save the settings.
Note that you will need the Admin role in order to access the enterprise settings.
Implementing Part Number Code
Onshape will send a message to the endpoint defined in your application extension settings. The content of this message will be an array of the following data.

Onshape will expect a response back from your endpoint and it should be formatted in the following manner:

The following is an implementation of the getNextPartNumber endpoint that was defined in the application extension “Action URL” field:


Once you load the Part Properties window or the Release candidate window, you can now request the Next Part number. The part number will be pulled from the third-party application and populated in the relevant fields as shown below.

Figure 38 - Release Candidate Part Number generation